
Win STORM Help - Utilities


Win STORM is in beta stage. While we're debugging the application, please report any bugs you find through our Contact form.
The Utilities page lets you run and manage all the utilities that are shipped with Win STORM, and even create your own utilities. Below is a screenshot of this page.
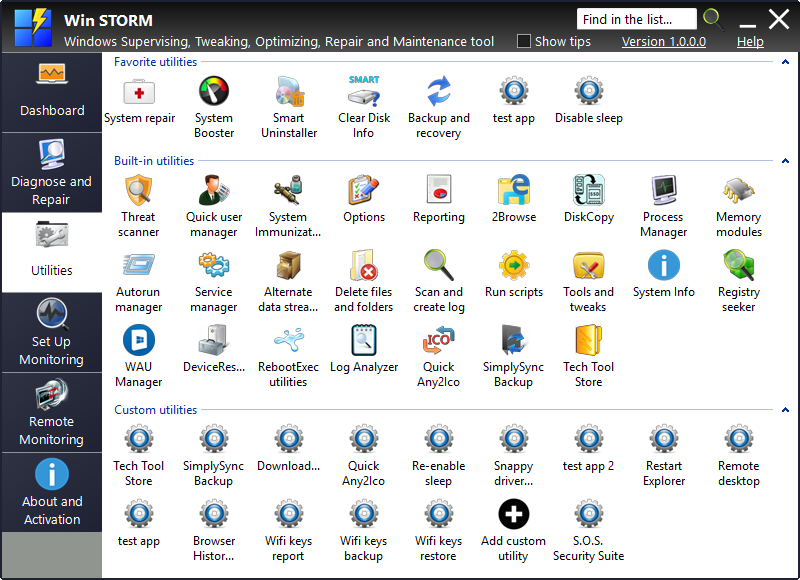
Besides running utilities, this page also lets you pin utilities to the Dashboard, move utilities to the favorites group at the top, and add/remove custom utilities.
To run an utility, simply double-click on it. Some utilities are part of Win STORM. When you run one of those, Win STORM's GUI is replaced with the utility's UI. Examples of such utilities are System repair, System booster, Smart uninstaller, Process manager, among others.
Other utilities are themselves separate apps, thus Win STORM's UI remains visible while the utility is running. Examples of such utilities are WAU Manager, DiskCopy, Clear Disk Info, Tech Tool Store, among others.
For other utility related options, right click an utility to bring up their context menu.
Utilities' context menu
To bring up the context menu, right-click an utility in the list. The menu shows up, similar to the picture below.
Depending on which group the selected utility belongs to, and its current status, some menu items may be disabled. For example, if the utility is not pinned to the Dashboard, the Unpin from dashboard menu item is disabled.
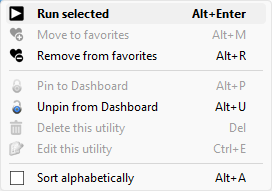
Select the desired menu item :
- Run selected - Run the selected utility. This is the same as double-clicking the selected utility.
- Move to favorites - Move the selected utility to the Favorites group, at the top of the list.
- Remove from favorites - Remove the selected tool from the favorites group.
- Pin to Dashboard - Pin the selected utility to the Dashboard page.
- Unpin from Dashboard - Unpin the selected utility from the Dashboard page.
- Delete this utility - Delete the selected custom utility. Not valid for the built-in utilities.
- Edit this utility - Edit the selected custom utility. Not valid for the built-in utilities.
- Sort Alphabetically - Check this item to automatically sort all the utilities alphabetically, inside each group.
Add/Remove custom utilities
Win STORM allows you to add your own utilities to the list. To do so, click the icon with a plus sign on a black circle.
Each utility is a set of actions that you tell Win STORM to perform and can do the following:
- Download a file from the internet using several methods.
- Run up to four commands. These commands are normally used to install/run the downloaded application, register it, update it, start a scan, etc., but they can do many other things. For instance your utility could download a reg file, and use the regedit.exe /s, or the reg import command to merge it. The last three commands can be set to execute a file depending on the current Windows architecture. This can be useful if the application has two different files, one 32 bits, and another one 64 bits.
- Each command can also be a single line Scripting command, but multiple line commands will not work.
The utilities you create belong to you. You can set them to do what ever you want, and you are fully responsible for all the actions they perform.
To create a custom utility, double-click the icon with a plus sign on a black circle named Add custom utility. A window similar to the one in the screenshot below is displayed, allowing you to configure your new utility.
To edit an existing utility, right-click its icon and select Edit this utility.
The screenshots below explain how to create an app that downloads, installs and runs Adlice Protect in automated mode. You will find more examples below.
Utility info tab

Firstly you need to set the name for your new utility. This is the only
required filed, meaning you can create an empty utility that doesn't do
anything.
In this
example, the app's name is Adlice Protect.
Enter a quick description for your utility in the Icon tooltip (optional) field. This text will be displayed as a tooltip when you select this utility in the list. In this example, the description is Adlice Protect (RogueKiller) is able to find known and unknown malware, of all kind.
Then switch to the Download tab and enter the download URL for your
app, and the path where the downloaded file should be saved in the
hard drive, including the file name. You can use any of the
supported
environment variables. The drop-down area to the right of
the field can help you to automatically select %ThirdParty%
or %InstallSourceDir%.
In this example, the file's path is
%ThirdParty%\AdliceProtect_setup.exe.
Download tab
In this tab you can program your app to perform two optional downloads, for which you can choose the download method, and optionally the Link text's text, as shown in the screenshot below.

For both downloads, you have six different download methods available:
![]() Direct download: This is the easiest method. You just have to
specify the download URL.
Direct download: This is the easiest method. You just have to
specify the download URL.
The drawback with this method is that not all applications have a permanent download URL. For instance Win STORM has a constant download URL (https://www.carifred.com/winstorm/WinSTORM.exe), but for some other programs, the URL changes each time a new version is released, i.e. http://www.example.com/program_1.1.exe, then http://www.example.com/program_1.2.exe, and so on.
Also, some web pages provide a temporary download URL, which will only last a few minutes.
This is when the other download methods become useful.
![]() Parse link text: To use this method, you need to find a web
page that has a link pointing to the updated file. The web page and
the text link do not change when a new version is released, but the
target URL of the text link is updated each time a new version is
released. This is very common. This is the method used in this
example.
Parse link text: To use this method, you need to find a web
page that has a link pointing to the updated file. The web page and
the text link do not change when a new version is released, but the
target URL of the text link is updated each time a new version is
released. This is very common. This is the method used in this
example.
Set the Download URL field with the address of the page that contains the link, and the Link text field with the text of the link. If the link displays an image instead of text, you can specify a portion of the html code contained in the link's <a> element. This can be the link's image file name, for instance. Try to use a portion of text which is unique in the page's html code.
Need an example? Here it goes:
Take a look at this link: Download Win STORM now
Now have a look at your browser's address bar. You'll see the URL of this page (https://www.carifred.com/winstorm/help/utilities.php).
Thus, you could create an app that downloads Win STORM by parsing the text link above. You would set the download related fields as follows:
Download url:
https://www.carifred.com/winstorm/help/utilities.php
Download type: Parse link text
Link text: Download Win
STORM now
Download file: %ThirdParty%\WinSTORM.exe
![]() Softpedia page: If none of the methods above work for you,
and the program you want to download is part of the Softpedia's list
of software, then you can use this method.
Softpedia page: If none of the methods above work for you,
and the program you want to download is part of the Softpedia's list
of software, then you can use this method.
Google Softpedia followed by the name of the program, and you will quickly find the page, if it exists. Usually it's address is something like http://www.softpedia.com/get/[Section]/[Program's name].shtml.
Set the Download URL field with the address of that page, and select Softpedia page.
![]() Majorgeeks page: If the program you want to download is part of the Majorgeeks list
of software, then you can use this method.
Majorgeeks page: If the program you want to download is part of the Majorgeeks list
of software, then you can use this method.
Google Majorgeeks followed by the name of the program, and you will quickly find the page, if it exists. Usually it's address is something like http://www.majorgeeks.com/files/details/[Program's name].html.
Set the Download URL field with the address of that page, and select Majorgeeks page.
![]() TechSpot (64 bits) or TechSpot (32 bits): These
download types can be used when a program has two different
downloads: One 32 bits and the other 64 bits.
TechSpot (64 bits) or TechSpot (32 bits): These
download types can be used when a program has two different
downloads: One 32 bits and the other 64 bits.
You just need to find the Techspot page of the desired program. You can Google TechSpot followed by the name of the program, and you will quickly find the page, if it exists. Usually it's address is something like http://www.techspot.com/downloads/[ID and name].html.
Just set the Download URL field with the address of that page, and select TechSpot (64 bits) or TechSpot (32 bits), according to the version you wish to download.
Tick If the downloaded file is a zip file, extract it to a same named folder if your utility downloads a zip file. In this case Win STORM unzips the file to a folder having the same name as the name you chose for the zip file, without the file extension. For instance, if you specify %ThirdParty%\zipname.zip as the downloaded file name, Win STORM extracts the contents of the zip file to %ThirdParty%\zipname. If the extraction folder does not exist, it will be automatically created.
Tick Download only if the files in the commands 2, 3 and 4 don't exist if you wish to skip this download in the case the files you set to run in the commands 2, 3 and 4 already exist. This can be useful if you want to skip the download if a program is already installed.
The options below control which of the two downloads are executed. For instance, you can have a different download for 32-bit and 64-bit systems, or perform the second download only if the first one fails. The available options are:
- Perform download 2 only if download 1 fails.
- Perform download 1 if 32-bit OS, and download 2 if 64-bit OS.
- Always perform both download 1 and download 2.
Select the desired option. If you select the first one, the same file path is used for both downloads, so the File field of Download 2 is disabled.
You can test your downloads anytime by pressing the Test download 1 and Test download 2 buttons, respectively.
In this example, the fields were set as follows:
URL of Download 1:
https://www.adlice.com/download-start/?app=roguekiller&type=setup
File:
%ThirdParty%\AdliceProtect_setup.exe
Download 1 type: Parse link
text
Link text: click here
URL of Download
2:
https://www.filecroco.com/download-roguekiller/download/
Download 2 type: Download now
Once you've set the download fields, you can test them out by pressing the Test button, to the right of the Link text field. If the download type you selected is Parse Link Text, pressing the Test button will open the Parse link text tester, which will help you test your download and find the correct link text.
Commands tab
Once you have configured your downloads, switch to the Commands tab. You will now be able to set up the commands that your app will run, as shown in the screenshot below.

The first command does not have the Run only if 32 or 64 bit OS option. This command is normally (but not necessarily) used to run the downloaded file. You can leave it blank if you don't need it or use it to run any other command.
Check Run only if the files in the commands 2, 3 and 4 don't exist if you wish to skip this command in the case the files you set to run in the commands 2, 3 and 4 already exist. This can be useful if you want to skip running this command if a program is already installed. For instance, you could check this option for this example, to skip the command if cCleaner is already installed.
Check Wait for all child processes to end before moving to the next command if you want Win STORM to monitor all processes children of this command, and only move to the next command after those processes have been closed. By default, Win STORM only monitors the command's process itself, not child processes. This option is useful for applications that automatically install and run, such as combofix, or UVKPortable.
The three commands left (Command 3,Command 3 and Command 4) are optional. You can set these commands to Always run, Run only if the operating system is 64 bits, or run only if the OS is 32 bits. Just select the desired radio button in the same group.
Use the Browse button in each group if you want to locate the file you want to run using the Windows shell.
Each command can also be a UVK scripting tag. Only single line tags are supported. Multiple line tags will not work. Use the Log analyzer utility to list the available command tags. The code below shows some tags you can use, one per command.
<FixInstallProblems>
<RegisterSysemDLLs>
<DefragDrive>D:
The commands can also be used to open files and protocols. For instance, to install an MSI package, you can use
"Package Path.msi" /passive /norestart
instead of the full command, which would be
msiexec.exe "Package path.msi" /passive /norestart
You can also make use of this new feature to open internet locations and other protocols. For instance, you can create an app that opens one or several internet pages. Tutorials, for instance. You just need to enter the URL of the page as the command.
Or you can make use of the mailto protocol to create apps that send pre-formatted emails.
mailto:example@website.com?subject=My%20Subject
Or you can make your apps open local documents, such as MS office docs, text files, or PDF docs, by simply specifying the path of the document itself, which will be opened with the default application in the current PC.
%InstallSourceDir%\Docs\Tutorial 1.pdf
%ThidParty%\Docs\Tutorial 2.docx
%Desktop%\Docs\Tutorial 3.txt
Or you can create apps that run Win STORM scripts easily. You just need to specify the path of your script in the command. Append -Auto if you want to run the script without confirmation.
%InstallSourceDir%\My script.uvk
%ThirdParty%\My script.uvk -Auto
Click << Back if you want to go back and edit the utility's name or download info. The data you have entered in this section will not be lost.
Save the new utility
When you feel you have entered all the desired info, select the Utility info tab and click the Save utility button. Once you utility is saved, this window is closed, but you don't need to worry about any mistakes you may have made. You will be able to easily edit your app later.
If you want to discard everything you entered, just close this dialog box instead.
Your utility is now ready to test/run and you should be able to see it in the utilities list, Custom utilities group. If you want to test it, just double click its icon. If you want to edit the new app, right-click it in the list and press Edit this utility.
The commands for this example are:
Command 1: %ThirdParty%\AdliceProtect_setup.exe /silent
Command 2:
%ProgramFiles%\RogueKiller\RogueKiller64.exe
Command 2 option: Run only if 64 bit OS
Command 3:
%ProgramFiles%\RogueKiller\RogueKiller.exe
Command 3 option: Run only if 32 bit OS
