PCData Back


PCData Back introduction
PCData Back is a professional backup & restore tool for Windows, which allows you to easily backup and restore user (and other) data. It has the impressive restoring ability to create the exact same user accounts and restore data directly from a different volume or from Windows.old, making this tool a great backup/restore solution for Windows reinstall, migration to SSD or bigger storage device, or simply to keep a safe backup copy of your data.
PCData Back is also part of our premium tool, UVK.
Current version: 3.0.2.0
Please read the End User License Agreement for our software before using this program.
If you like this program and want to support its future development, you can donate by clicking the button below. Thanks in advance. Any amount is appreciated.
Tutorial content index:
Restore a previously created backup
Restore from Windows.old, from a different volume or custom location
PCData Back's overview:
PCdata Back allows you to easily backup and restore user (and other) data. It has the impressive restoring ability to create the exact same user accounts that were backed up, making it a great backup solution for Windows reinstall, migration to SSD or bigger disk, restoring user data from Windows.old or from a different PC, or simply to keep a safe backup copy of your data.
This feature was built with simplicity and ease of use in mind. All options are shown in one pane, so you setup everything in just a few clicks.
PCdata Back can also automatically detect user folders that have been moved to a non-standard location, so you don't need to worry about that.
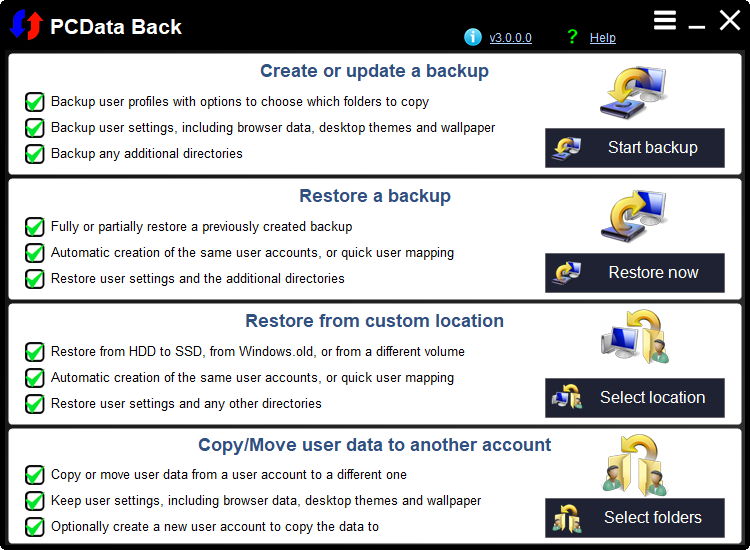
In order to use PCdata Back, you just need to download the executable file by pressing the button above, and then launch the downloaded file. No installation is required. You will be presented with a screen similar to the picture above. Then click the button of your choice; if you're going to create a new backup or udate an existing one, click Start backup.
Otherwise, if you are going to restore a backup, click Restore now. PCdata Back will open a File browsing dialog, allowing you to search for and select the backup file to open. Then you will be taken to the Restore section.
The Restore section is even more dynamic. User data can be restored to different user accounts, or the same user accounts can be automatically created on the fly by the restoring process. Finally, the extra backed up folders can be restored to locations different from the original ones, and all this can be setup within just a few seconds.
As mentioned above, PCdata Back can also restore data from a different volume containing a previous Windows installation. In addition, you can restore data from C:\Windows.old. This is where existing data is moved to when you perform a new OS installation by booting up from the Windows install media. If you find this location in your PC, then you may have your old photos or documents there, and you can use PDCata back to easily restore them.
To use this feature, press the Select location button, and after selecting the root of the data to copy, you will be taken to the Restore from.. section.
Since version 3.0, PCData Back also inluces a more dynamic 'per folder' data migration utility, which lets you copy or move data directly from a user profile to another,(even on different drives), or simply copy data from any direcory to another.
To get started with this method, press the Select folders button, and you will go to the Copy/move user data section.
Create or update a backup:
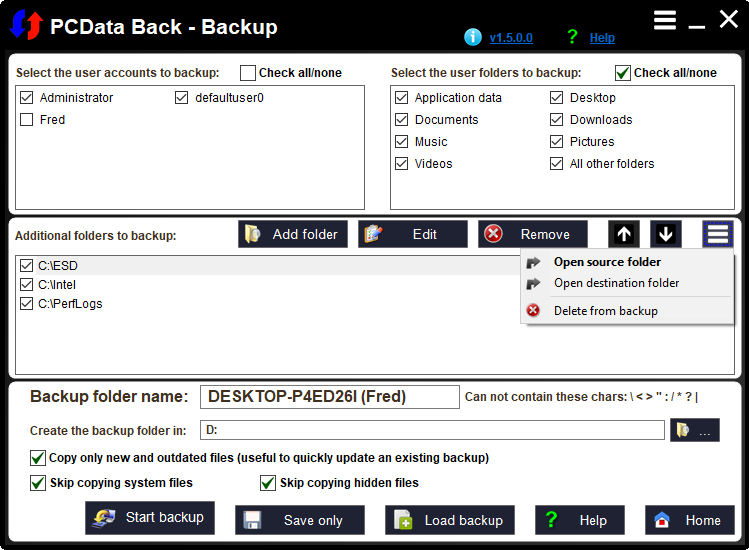
The Backup feature allows you to easily backup user and other data, so it can be restored later. This feature has a user interface as shown in the picture below.
If you want to upgrade an existing (previously created) backup, press the Load backup button, in the lower pane. If you came to this section by opening a backup file (.uvkbk), that backup is automatically loaded.
Top panes (users and user folders):
Select the user accounts you wish to backup in the top left pane, and then the desired user user folders in the top right pane. You don't have to worry about any user folders that may have been moved to a non-standard location, because the applicaton automatically detects those.
Both Users and User folders lists have a Check all/none checkbox just above the list itself, that you can use to quickly check or uncheck all the items in the respective list.
Middle pane (additional folders):
You can add any additional folders you wish to backup in the middle pane's list by pressing the Add folder button, and then indicating the folder you wish to add, or by simply dragging the desired folders to add from the Windows file explorer to the list. Once new folders are added, you can edit, remove, or move them up/down in the list: To do so, select a folder in the list and press the button above the list that corresponds to the action you want to perform.
The additional folders list also has a context menu which can be accessed by right clicking an item in the list, or selecting an item and then pressing the "three line" button at the top-right corner of this pane. This context menu has two options: Open source folder and Open destination folder. Select these options to take a peak at the actual contents of the source and destination folders, respectively.
Lower pane options:
If you are creating a new backup, you can set its name in the Backup folder name input. If you intend to create more than one backup, you should name them in a way that will remind you later what is the intent of this backup.
The Create the backup folder in: text input field tells the directory where the backup folder is to be created. This filed is automatically filled when you you load an existing backup. Otherwise, you can set this field by pressing the button to the right, or manually typing or pasting the path into the filed.
Note: This filed is the parent folder where the backup folder will be created. For instance: if this field is D:\Backups, and the backup's name is My backup, your backup will be created in D:\Backups\My backup.
Backup options:
![]() Copy
only new and outdated files: This option can make a backup
operation much faster, since files already copied and that
have not been changed since the last time they were backed up are
skipped.
Copy
only new and outdated files: This option can make a backup
operation much faster, since files already copied and that
have not been changed since the last time they were backed up are
skipped.
![]() Skip
copying system files: We recomment that you leave this option
checked. When this option is enabled, UVK will not copy files with
SYSTEM attributes. Not only will this speed things up, but it will
also avoid messing up with system files such as desktop.ini, thumbs.db or
ntuser.dat. Restoring those files later could cause the user profile
to be corrupted.
Skip
copying system files: We recomment that you leave this option
checked. When this option is enabled, UVK will not copy files with
SYSTEM attributes. Not only will this speed things up, but it will
also avoid messing up with system files such as desktop.ini, thumbs.db or
ntuser.dat. Restoring those files later could cause the user profile
to be corrupted.
![]() Skip
copying hidden files: Un-check this option if you want to backup
files with HIDDEN attributes. Usually users do not need to backup
hidden files, so you probably best leave this option checked.
Skip
copying hidden files: Un-check this option if you want to backup
files with HIDDEN attributes. Usually users do not need to backup
hidden files, so you probably best leave this option checked.
Note: all three options above are ignored when copying appication data, which is always copied integrally.
Lower pane buttons
Once you're done setting up your backup, you can now execute it. Just press the Start backup button, and let the application do all the work for you. A dialog box will popup andwill tell you the progress of the backup operation Click here for more info.
If you decide you do not want to start the backup operation just yet, but you do not want to loose the information you entered, just press the Save only button. This will create your backup directory and save the current backup information to a file named BackupInfo.ini, in that directory, but no files will be backed up. This may also be useful to test whether the backup directory can be created or not.
As explained before, the Load backup button allows you to load the backup info from an existing backup file. If you want to update a backup you previously created, Press this button, browse to the backup folder you want to load and open the BackupInfo.ini file inside it. All the bcakup information is loaded to the corresponding fields, and you're ready to update the backup.
Press the Help button whenever you want to read this help page again.
Press the Home button to leave this section and go to UVK's Home page.
Restore a previously created backup:
Once you create a backup, it is available for restoring whenever you want. For instance, you can create a backup and immediately restore it to a different computer, or to a new hard drive. Please see in the Overview section how to open this feature.
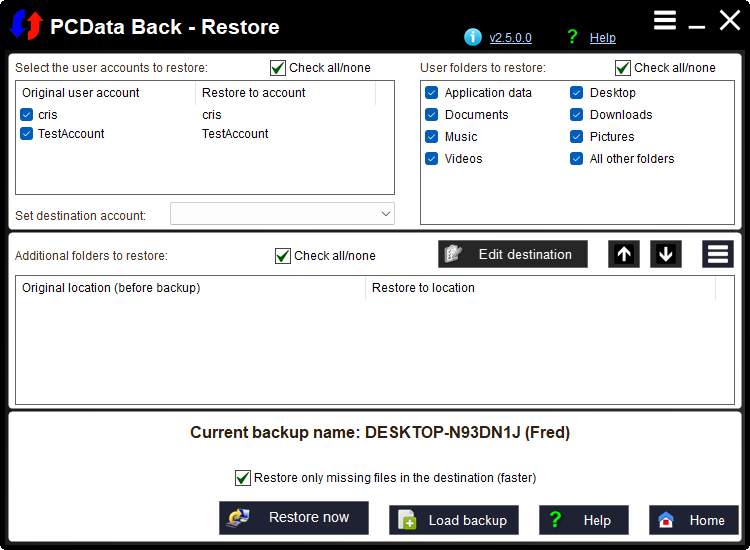
The Backup and recovery's Restore feature has an interface similar to the screenshot below.
User mapping
The user mapping list, at the top left corner of the UI, allows you to quickly setup how the user data will be restored.
If you want to restore the user data to different user accounts than the ones in the list, just select the desired user and use the drop down box below to change the user account the data will be restored to.
By default, if a user account with the same name as the one from the backup exists, then that user is automatically selected. Otherwise, a same named account will be created, and the data will be restored to the newly created user account. In this case, you will see " <create>", just after the user name, in the list's Restore to account (second) column. This is how you know that no matching user account exists, and the restore operation will automatically create it.
Obviously you don't need to restore the data to a same named user account. You can map the users the way you like. There is no restrictions about it. You can map two source users to one destination account, or one source user to several destination acounts.
Only checked users are restored. Use the Check all/none check box above the list to quickly toggle the checked state of all items in the list.
The user list also has a context menu that you can access by right-clicking a user item in the list. Available options are Open backup folder, which allows you to jump to the location where the user files are saved in the backup folder, and Delete from backup, which will remove the hilighted user folder from the backup and also from the list.
User folders to restore
Check the user folders you want to restore in this list. Use the Check all/none check box to quickly toggle the checked state of all the folders in the list.
Keep in mind that, the folders you select may not have been backed up. The selection just tells the application that, if the folder exists, then it should be restored. Also, if you select several users, then only the selected user folders will be restored for all the selected users. It was done this way to simplify the restoring process, but you can always restore one user account at a time, specifying different folders for each user.
Additional folders to restore
The extra folders that were backed up are listed in the middle pane. Only checked folders are restored. Use the Check all/none check box above to quickly toggle the checked state of all the folders in the list.
The extra folders don't have to be restored to the original location from where they wered backed up from. You can edit the destination of one folder by selecting it in the list and then pressing the Edit destination button. You can restore several folders to the same destination folder, but be careful, because duplicated files will be overwritten.
Use the up arrow/down arrow buttons above to move the folders up/down in the list. This will chage the order in which the folders are restored. The extra folders are restored from top to bottom, and only the ones that have a tick on their check mark are restored. So don't forget to tick the ones you want to restore, and un-tick the ones you don't.
The additional folders list also has context menu which can be accessed by right clicking an item in the list, ot pressing the "three line" button at the top-right corner of this pane. This context menu has two options: Open backup folder and Open restore location. Click these buttons to take a peak at the actual contents of the source and destination folders, respectively. The Delete from backup button in the same context menu allows you to completely remove the hilighted folder from the backup thus freeing up the HDD space it was using.
Lower pane options
Tick Restore only missing files in the destination if you wish to skip copying files that already exist in the destination. This option only checks for file existance. It does not check whether the source and destination files are identical. If the file exists, it is simply skipped. We recommend you to use this method, unless you are sure you want existing files to be replaced.
Note: the option above is ignored when restoring appication data, which is always copied integrally.
Once all the desired options are set, press Restore now. The restore operation begins, and you are presented with a dialog box telling you the progress of the operation. Click here for more info.
Whenever you want to load a backup from a different location, you do not need to leave this section. Just press the Load backup button, browse to the new backup's location and select the BackupInfo.uvkbk file inside it. All fields are updated to reflect the new backup's settings, and you're ready to restore.
Press the Help button whenever you want to read this help page again.
Press the Home button to leave this section and go toPCData Back's Home page.
Restore from Windows.old, from a different volume or custom location:
PCData Back is able to restore user and other data from Windows.old or from a separate hard drive or disk partition. This feature is intended to be used when:
- You reinstalled Windows, but you did not format your hard drive. Your old data was moved to C:\Windows.old. You can use PCData Back to restore your files to their original location.
- You replaced your old HDD with an SSD and installed a fresh copy of Windows. You can use PCData back to restore your files from the old HDD to the new SSD.
- Your old hard drive was failing or too small, so you replaced it with a new one and installed a fresh copy of Windows. You can use PCData back to restore your files from the old HDD to the new one.
In order to access this feature, launch PCData Back and then click Select location, in the Restore from custom location group. PCData Back will display a Browse for folder dialog box, allowing you to indicate the location where the files will be copied from. Usually you would select C:\Windows.old or the root of a volume such as D: or F:. PCData Back will then show the Restore from... interface which will be similar to the picture below.
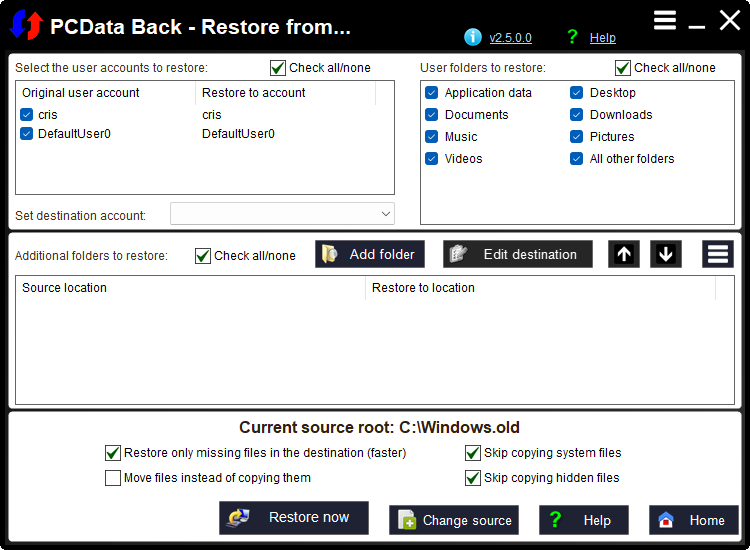
As you probably already noticed, this interface is very similar to the one in the Restore a backup module. allowing you to map users, select the user folders to restore and add extra folders to restore.
User mapping
The user mapping list, at the top left corner of the UI, allows you to quickly setup how the user data will be restored.
If you want to restore the user data to different user accounts than the ones in the list, just select the desired user and use the drop down box below to change the user account the data will be restored to.
By default, if a user account with the same name exists, then that user is automatically selected. Otherwise, a same named account will be created, and the data will be restored to the newly created user account. In this case, you will see " <create>", just after the user name, in the list's Restore to account (second) column. This is how you know that no matching user account exists, and the restore operation will automatically create it.
Obviously you don't need to restore the data to a same named user account. You can map the users the way you like. There is no restrictions about it. You can map two source users to one destination account, or one source user to the destination acount you want.
Only ticked users are restored. Use the Check all/none check box above the list to quickly toggle the checked state of all items in the list.
User folders to restore
Check the user folders you want to restore in this list. Use the Check all/none check box to quickly toggle the checked state of all the folders in the list.
Keep in mind that, the folders you select may not really exist in the source location. The selection just tells the application that, if the folder exists, then it should be restored. Also, if you select several users, then only the selected user folders will be restored for all the selected users. It was done this way to simplify the restoring process, but you can always restore one user account at a time, specifying different folders for each user.
Additional folders to restore
Any extra folders existing in the source location can be restored. You can add the desired folders to the list by pressing the Add folder button, or by simply dragging the desired folders to add from the Windows file explorer to the list. Only ticked folders are restored. Use the Check all/none check box above to quickly toggle the checked state of all the folders in the list.
By default the extra folders are restored to the same location in the C: volume. You can change that behavior by selecting one item in the list and then pressing the Edit destination button. You can restore several folders to the same destination folder, but be careful, because duplicated files will be overwritten.
Use the up arrow/down arrow buttons above to move the folders up/down in the list. This will chage the order in which the folders are restored. The extra folders are restored from top to bottom, and only the ones that have a tick on their check mark are restored. So don't forget to tick the ones you want to restore, and un-tick the ones you don't.
The additional folders list also has context menu which can be accessed by right clicking an item in the list, ot pressing the "three line" button at the top-right corner of this pane. This context menu has two options: Open source folder and Open restore location. Click these buttons to take a peak at the actual contents of the source and destination folders, respectively. The Remove from the list button in the same context menu allows you to remove the hilighted folder ffrom the list, but it will not be deleted from the hard drive.
Lower pane options
![]() Restore only missing files in the destination
: Check this option if you
wish to skip copying files that already exist in the
destination. This option only checks for file existance. It does
not check whether the source and destination files are
identical. If the file exists, it is simply skipped. We
recommend you to use this method, unless you are sure you want
existing files to be replaced.
Restore only missing files in the destination
: Check this option if you
wish to skip copying files that already exist in the
destination. This option only checks for file existance. It does
not check whether the source and destination files are
identical. If the file exists, it is simply skipped. We
recommend you to use this method, unless you are sure you want
existing files to be replaced.
![]() Move
files instead of copying them : This option is only valid if
both the source and destination directories reside in the same
drive. For example, if you're restoring data from
C:\Windows.old.
Move
files instead of copying them : This option is only valid if
both the source and destination directories reside in the same
drive. For example, if you're restoring data from
C:\Windows.old.
![]() Skip
copying system files: We recomment that you leave this option
checked. When this option is enabled, PCData Back will not copy files with
SYSTEM attributes. Not only will this speed things up, but it will
also avoid messing up with system files such as desktop.ini, thumbs.db or
ntuser.dat. Restoring those files could cause the user profile
to be corrupted.
Skip
copying system files: We recomment that you leave this option
checked. When this option is enabled, PCData Back will not copy files with
SYSTEM attributes. Not only will this speed things up, but it will
also avoid messing up with system files such as desktop.ini, thumbs.db or
ntuser.dat. Restoring those files could cause the user profile
to be corrupted.
![]() Skip
copying hidden files: Un-check this option if you want to
restore
files with HIDDEN attributes. Usually users do not need to
restore hidden files, so you probably best leave this option
checked.
Skip
copying hidden files: Un-check this option if you want to
restore
files with HIDDEN attributes. Usually users do not need to
restore hidden files, so you probably best leave this option
checked.
Note: all three options above are ignored when restoring appication data, which is always copied integrally.
Once all the desired options are set, press Restore now. The restore operation begins, and you are presented with a dialog box telling you the progress of the operation. Click here for more info.
Whenever you want to change the source location, you do not need to leave this section. Just press the Change source button and indicate the new source location.
Press the Help button whenever you want to read this help page again.
Press the Home button to leave this section and go toPCData Back's Home page.
Copy/Move user data:
This module provides you with a flexible way to copy or move user data. While it was designed to copy user profiles, it can be used to copy or move the contents of any folder to another.
To start using this module, press the bottom button (Select folders), in the application's main page. You'll be presented with a dialog box silmilar to the one in the picture below.
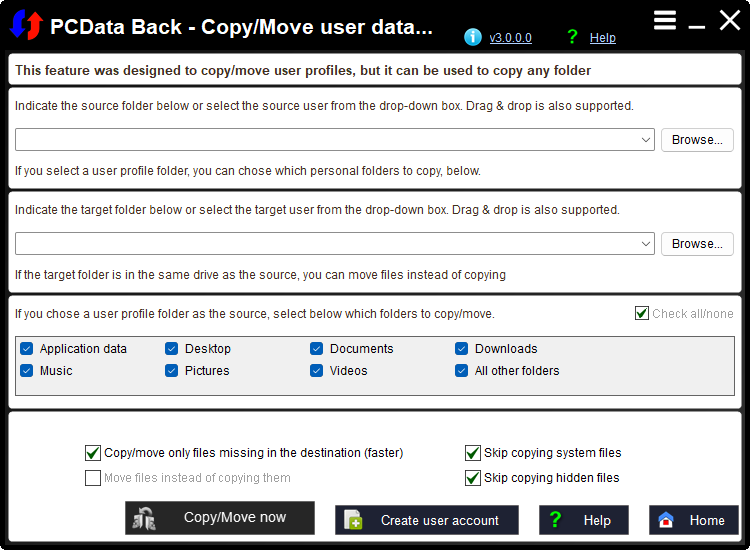
Indicate the source folder:
The source folder field is a drop-down box that lets you choose a user profile folder from the local system. But you can actually choose any folder, from any available drive.
To indicate a folder not listed by the drop-down box you can simply drop it over the text field, or press the Browse button to select it using the Windows shell.
Indicate the target folder:
The target folder field works exactly the same way as the source folder field. you can select a local user profile folder from the drop-down box, drop a folder over the field, or press the Browse button to the right of the drop-down box. The only difference is that, this time, you're indicating the destination folder, where the contents of the source will be copied or moved to.
User personal folder selection:
If the source folder you indicate is a user profile root folder, PCData Back will let you choose the user personal folders to copy or move. Select the desired folders by ticking the check mark to their left. The Check all/none checkbox may help you with the selection, by toggling the state of all the folders in the list;
By default, all folders are ticked.
Lower pane options:
![]() Copy/move only files missing in the destination
: Check this option if you
wish to skip copying/moving files that already exist in the
target. This option only checks for file existance. It does
not check whether the source and destination files are
identical. If the file exists, it is simply skipped. We
recommend you to use this method, unless you are sure you want
existing files to be replaced.
Copy/move only files missing in the destination
: Check this option if you
wish to skip copying/moving files that already exist in the
target. This option only checks for file existance. It does
not check whether the source and destination files are
identical. If the file exists, it is simply skipped. We
recommend you to use this method, unless you are sure you want
existing files to be replaced.
![]() Move
files instead of copying them : This option is only valid if
both the source and destination directories reside in the same
drive. For example, if you're restoring data from
C:\Windows.old.
Move
files instead of copying them : This option is only valid if
both the source and destination directories reside in the same
drive. For example, if you're restoring data from
C:\Windows.old.
![]() Skip
copying system files: We recomment that you leave this option
checked. When this option is enabled, PCData Back will not process files with
SYSTEM attributes. Not only will this speed things up, but it will
also avoid messing up with system files such as desktop.ini, thumbs.db or
ntuser.dat. Restoring those files could cause the user profile
to be corrupted.
Skip
copying system files: We recomment that you leave this option
checked. When this option is enabled, PCData Back will not process files with
SYSTEM attributes. Not only will this speed things up, but it will
also avoid messing up with system files such as desktop.ini, thumbs.db or
ntuser.dat. Restoring those files could cause the user profile
to be corrupted.
![]() Skip
copying hidden files: Un-check this option if you want to
restore
files with HIDDEN attributes. Usually users do not need to
restore hidden files, so you probably best leave this option
checked.
Skip
copying hidden files: Un-check this option if you want to
restore
files with HIDDEN attributes. Usually users do not need to
restore hidden files, so you probably best leave this option
checked.
Note: some options above are ignored when restoring appication data, which is always copied integrally.
Once all the desired options are set, press Copy/Move now. The operation begins, and you are presented with a dialog box telling you its progress. Click here for more info.
This section also lets you create new a user account and immediately copy data onto it. To do so, press Create user account, and follow the instructions. More help here.
Press the Help button whenever you want to read this help page again.
Press the Home button to leave this section and go toPCData Back's Home page.
Create user account
PCData Back lets you easily create a user account, setting its password and picture simmultaneously. Just press the Create user account button. You'll be presented with a dialog box similar to the one in the screenshot below.
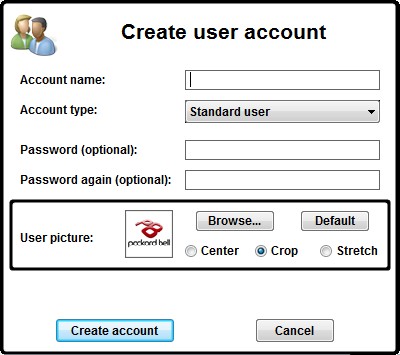
![]() Enter the
desired user name in the Account name field. User names can
not have any of the following characters: "/ \ [ ] : | < > + = ; ?
*,
Enter the
desired user name in the Account name field. User names can
not have any of the following characters: "/ \ [ ] : | < > + = ; ?
*,
User account names also can not end up with a period. If
you need to use one of those charactes in the account name, you will
be able to set them in the User display name field of the
main Quick user manager's interface.
![]() You can
optionally set the password for the new user account in the
Password (optional), and Password again (optional)
fields.
You can
optionally set the password for the new user account in the
Password (optional), and Password again (optional)
fields.
![]() You can also
set the picture associated with the new user account using the
controls in the User picture group. For more info on how to
use those controls, see Changing a user account's picture.
You can also
set the picture associated with the new user account using the
controls in the User picture group. For more info on how to
use those controls, see Changing a user account's picture.
![]() When ready,
press the Create account button to start creating your new
user account.
When ready,
press the Create account button to start creating your new
user account.
![]() Or press the
Cancel button to cancel the user creation operation.
Or press the
Cancel button to cancel the user creation operation.
Backup/Restore progress dialog box:
After you start a backup or a restore operation, as explained above, you are presented with a dialog box indicating the progress of the operation, similar to the one in the picture below.
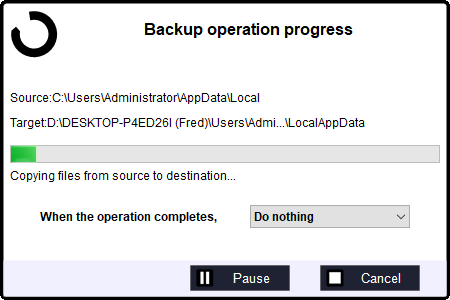
The Source label indicates the source folder where the files are currently being copied from.
The Target label indicates the destination folder where the files are currently being copied to.
The progress bar tells the progress of the current operation, and the text label just below tells what the application is currently doing.
It is possible to set a power action to be performed once all the backup actions complete: Close application, Log off, Sleep, Hibernate, Shut down and Restart. Just select the desired action and the application will automatically execute it when the whole operation ends.
You can also temporarily pause the whole operation by pressing the Pause button, or completely stop it by pressing the Cancel button and confirming by pressing Yes at the message prompt that follows.
