DeviceRescue


DeviceRescue overview
DeviceRescue is a highly featured replacement for the Windows Device Manager. This tool is also part of our premium apps Ultra Virus Killer and Tech Tool Store.
DeviceRescue has really nice features such as:
- One-click device googling. You can search google for a device's hardware ID, name or both in one click.
- Batch device install, uninstall and reinstall. Device setup operations can be performed to several devices in sequence.
- Batch device enable, disable and restart. Change the state of several devices in just one operation.
- One-click removal of all hidden devices. Uninstall all the devices not present, with a click of a mouse button.
- Easy driver backup and restore. Backup the selected drivers (or all of them) in an eye blink, and reinstall them just as easy.
Current version: 1.1.1.0. Change log
Please read the End User License Agreement for our software before using this program.
If you like this program and want to support its future development, you can donate by clicking the button below. Thanks in advance. Any amount is appreciated.
Tutorial content index:
The list of devices
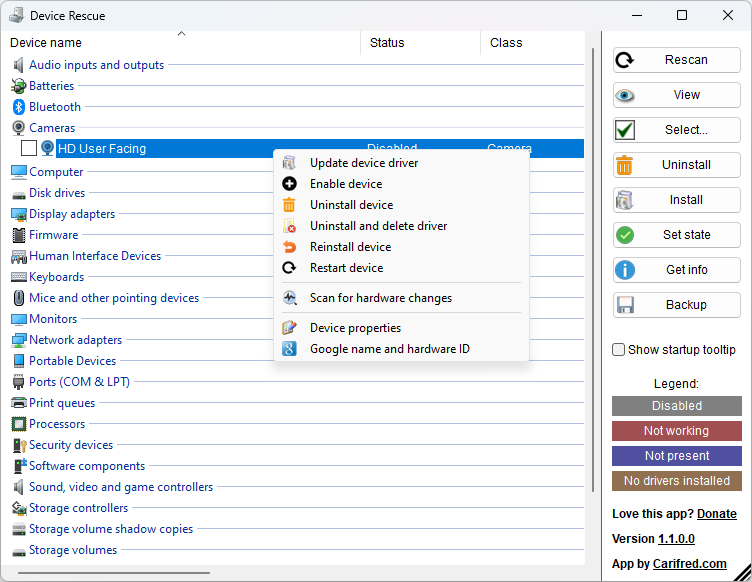
Unlike the Windows Device Manager which displays the devices in a tree, DeviceRescue displays them in a grouped list with columns, which gives you more information at a glance.
Each group corresponds to a device type (or class). By default, when you launch DeviceRescue, all the groups are collapsed unless they have devices marked with a state different from 'Working properly' (i.e. disabled or with errors). This corresponds to the Windows Device Manager's behavior.
Click anywhere in a group header to expand it and show the devices belonging to the associated device type. Click again to collapse. Click the View button in the right pane to access more group expanding/collapsing options.
To select (check) a device, tick the corresponding check mark, or just double-click anywhere in the device's line. Perform the same action to un-select (uncheck). Click the Select button in the right pane for more device selection options.
The right pane contains a few buttons. Clicking each button displays a menu with related options. For instance, clicking the Uninstall button shows a menu with three options: Uninstall checked, Uninstall and delete driver, and Uninstall all devices not present. Don't hesitate to click the right pane buttons, they do not do anything other than displaying the associated menu.
If you want to get information about a device, such as googling its hardware ID or showing the Device properties dialog box, do not tick its mark. Instead, hilight the desired device's line by clicking anywhere on it.
By default, DeviceRescue displays a tooltip with instructions at startup. If you don't need this tip, just uncheck Show startup tooltip, in the right pane. Check it back on to show the tooltip again..
As shown in the right pane's Legend section, disabled devices are marked gray, not working devices are marked red, not present devices are marked blue, and devices with no drivers installed are marked brown. Marked devices are painted in those colors, the whole line.
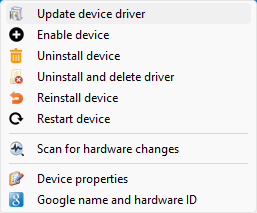
The list's context menu
Right click any device in the list to bring out this menu, which looks like the picture below.
Select the desired option or or press Esc to close this menu.
- Update device driver: This option lets you update the selected device's driver, or install a different driver for it.
- Enable device: This option may also read Disable device. It lets you enable or disable the selected device.
- Uninstall device: This option uninstalls the selected device from the system.
- Uninstall and delete driver: This option uninstalls the selected device from the system and also deletes its driver from the driver store.
- Reinstall device: This option uninstalls the selected device and then instals it back.
- Restart device: This option stops the selected device and then turns it back on again.
- Scan for hardware changes: Check if there has been any changes to the hardware, and update the device list accordingly.
- Device properties: This option shows the Device properties dialog box for the selected device.
- Google name and hardware ID: This option launches a google search for the device's name and hardware ID.
Rescan
When you click the Rescan button, in DeviceRescue's right pane, a menu similar the the one in the picture below is displayed.

Select the desired option or click the Rescan button again to close this menu.
- Just refresh the list: This option just rebuilds the device list.
- Scan for hardware changes: Select this option to request Windows to re-enumerate all the devices plugged in.
- Scan and install missing devices: This option scans for hardware changes and automatically installs new devices.
View
When you click the View button, in DeviceRescue's right pane, a menu similar the the one in the picture below is displayed.
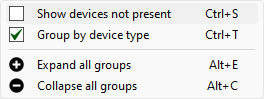
Select the desired option or click the View button again to close this menu. Options with check marks are enabled/disabled by single click.
- Show devices not present: When this option is enabled, the hidden devices are listed, otherwise, they are not.
- Group by device type: If you disable this option, the list no longer groups devices by type. Instead all the devices are always displayed.
- Expand all groups: Expand all the device groups. This option is not available if Group by device type is disabled.
- Collapse all groups: Collapse all the device groups. This option is not available if Group by device type is disabled.
Select
When you click the Select button, in DeviceRescue's right pane, a menu similar the the one in the picture below is displayed.
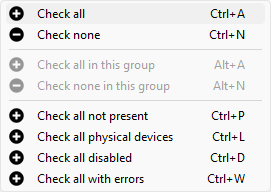
Select the desired option or click the Select button again to close this menu.
- Check all: Tick all the items in the list. Use this option, for instance, if you want to reinstall all the devices.
- Check none: Un-tick all the devices in the list, clearing the current selection.
- Check all in this group: Tick all the devices in the same group as the highlighted one. Click an item before using this option.
- Check none in this group: Un-tick all the devices in the same group as the highlighted one. Click an item before using this option.
- Check all not present: Tick all the devices currently not connected to the computer physically or virtually.
- Check all physical devices: Tick all the devices that are physically connected to the computer.
- Check all disabled: Tick all the disabled devices. Useful, for instance if you want to re-enable all the disabled devices.
- Check all with errors: Tick all the devices that have reported an error. Useful, for instance if you want to re-install those devices.
Uninstall
When you click the Uninstall button, in DeviceRescue's right pane, a menu similar the the one in the picture below is displayed.

Select the desired option or click the Uninstall button again to close this menu.
- Uninstall checked: Click this option to uninstall all the ticked devices in the list.
- Uninstall and delete drivers: This option lets you uninstall all the ticked devices and also remove the associated drivers from the Driver Store.
- Uninstall all the devices not present: Uninstall all the hidden devices. The current list selection is ignored.
Note: After selecting one of the options in this menu, a message box asking for your confirmation is displayed. You need to click Yes to confirm. Then, another dialog box displays the progress and detailed result of the whole operation.
Install
When you click the Install button, in DeviceRescue's right pane, a menu similar the the one in the picture below is displayed.
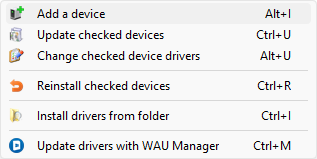
Select the desired option or click the Install button again to close this menu.
- Add a device: This option shows the Windows 'Add a device' dialog box, letting you easily install a new device on your system.
- Update checked devices: Shows the 'Update device' dialog box, the same one that is displayed by the Device manager.
- Change checked device drivers: Lets you browse and indicate the path of a different driver for each one of the checked devices.
- Reinstall checked devices: Uninstalls the checked devices and then attempt to automatically reinstall them.
- Install drivers from folders: Installs all the drivers from the folder you indicate to all the supported devices.
- Update drivers with WAU Manager: Downloads our WAU Manager tool, which lets you easily find updated drivers for all your devices.
Note: After selecting some of the options in this menu, a message box asking for your confirmation is displayed. You need to click Yes to confirm. Then, another dialog box displays the progress and detailed result of the whole operation.
Set state
When you click the Set state button, in DeviceRescue's right pane, a menu similar the the one in the picture below is displayed.
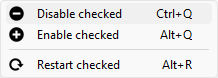
Select the desired option or click the Set state button again to close this menu.
- Disable checked: This option lets you disable all the ticked devices.
- Enable checked: This option lets you enable all the ticked devices.
- Restart checked: This option lets you easily restart all the ticked devices.
Note: After selecting the options in this menu, a message box asking for your confirmation is displayed. You need to click Yes to confirm. Then, another dialog box displays the progress and detailed result of the whole operation.
Get info
When you click the Get info button, in DeviceRescue's right pane, a menu similar the the one in the picture below is displayed.
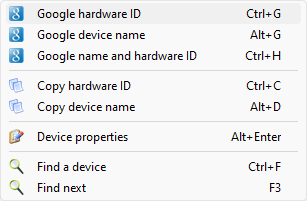
Select the desired option or click the Get info button again to close this menu.Most of this menu's options apply to the currently highlighted device, not to the checked devices, as was the case of the other menus' options. Internet searches are performed using the default browser and the Google search engine.
- Google hardware ID: This option searches for the highlighted device's hardware ID on Google.
- Google device name: This option searches for the highlighted device's name on Google.
- Google name and hardware ID: This option searches for the highlighted device's name and hardware ID on Google..
- Copy hardware ID: Copy the highlighted device's hardware ID to the clipboard.
- Copy device name: Copy the highlighted device's name to the clipboard.
- Device properties: This option shows the 'Device properties dialog box for the highlighted device.
- Find a device: This option displays the 'Find a device' box, which lets you type a part of a device's name to search for in the list..
- Find next: Highlight the next find result, if any.
The 'Find a device' dialog box is displayed over DeviceRescue's title bar. Enter a portion or the device name you want to search for and then press Enter or the magnifier icon to the right of the text box. The first result (if any) is then selected in the list. To step to the next matched device, click the magnifier icon again, or just hit the F3 key. Click the Close icon to the right of the magnifier icon to close the 'Find a device' box.
Backup
When you click the Backup button, in DeviceRescue's right pane, a menu similar the the one in the picture below is displayed.
Select the desired option or click the Backup button again to close this menu.
- Backup checked: This option lets you backup all the ticked devices' drivers.
- Backup all: This option lets you backup all the devices. You will be asked if you also want to backup devices not present.
The driver backup operation is very fast, and the drivers are organized in folders:
Backup Path\Device Class Name\Device Name - Publisher - Driver Date
