
Win STORM Help - Scan and repair


Win STORM is in beta stage. While we complete debugging the app, please report any bugs you find in this tool using our Contact form
Scan and repair is one of the most important Win STORM modules and lets you deeply scan the current Windows operating system, or even an external or a remote one. The results are displayed in several lists. Selected items can be fixed one by one, or by list, or all at once.
Help content index:
Performing the scan
The scan's progress is displayed at the top right section of the title bar. While your computer is being scanned, you can start selecting items to fix. Switch to the desired list by clicking the Previous list and Next list buttons, or by selecting the desired list from the drop down box tbetween those buttons.
When you're working on a remote PC using Win STORM's RMM, the results displayed belong to the remote computer. Similarly, if you're woring on a Windows OS located in an external drive, the results displayed belong o the external OS.
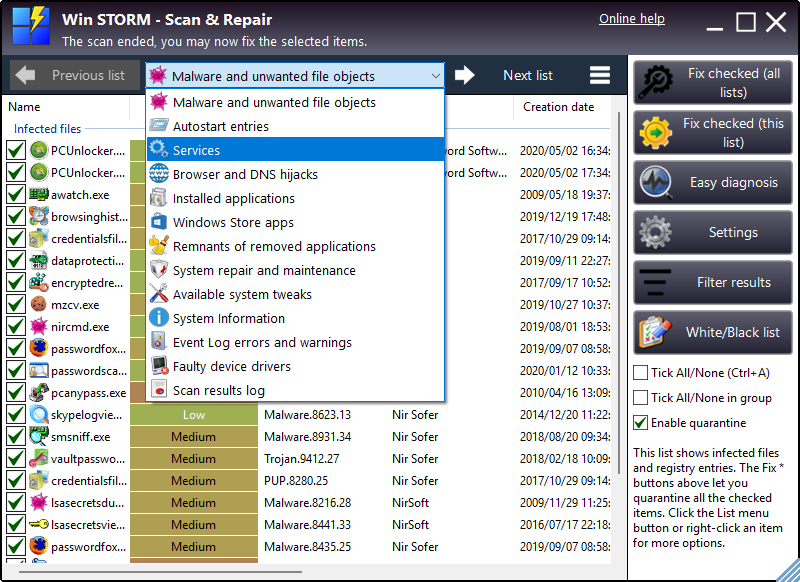
The number of lists displayed depends on the options selected before the scan the scan. If all the are areas were set to be scanned, the following lists are shown:
- Malware and unwanted file objects - Shows infected and intrusive file and registry objects.
- Autostart entries - Shows items that are automatically loaded when Windows boots or a user is logged in.
- Services - Shows win32 services and driver services.
- Browser and DNS hijacks - Shows browser extensions and other settings that may be hacking your internet activity.
- Installed applications - Shows installed desktop apps.
- Windows Store apps - Shows installed Windows Store apps.
- Remnants of removed applications - Shows files, folders, services and registry entries left over by removed applications. This is not a rgistry cleaner.
- System repair and maintenance - Shows windows fixes, reset options, maintenance and repair actions, among other functions.
- Available system tweaks - Shows lots of tweaks that help you free resources and customize Windows.
- System information - Shows detailed hardware and software information.
- Event log errors and warnings - Shows the latest errors and warnings saved to the Application and System event logs.
- Faulty device drivers - Shows devices disabled, not properly installed or not working properly.
- Scan results log - Lists the items that were automatically selected during the scan and the reason they were automatically selected.
Fixing the selected items
Once a list is complete, you can start fixing items, even if the whole scan is not complete. For example, Once the application has finished scanning for installed applications, the Installed applications list becomes available for fixing,
"Fixing items" is a global term that means executing the default action for each list, depending on the current settings. For instance, for the Services list, the action will be "Delete service", for the Installed applications list, it will be "Uninstall application", for the System repair and maintenance list, it would be "Run selected fix", and so on.
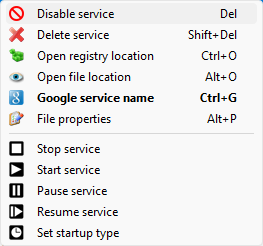
You can right-click any item to bring up the list's context menu. Each list has a different context menu, with options like Google selected item or Open file location, besides the Delete item and Disable item common options. Select the desired option, but keep in mind that it will target only the highlighted item in the list, not the checked ones.
When you're working on a remote PC using Win STORM's RMM, items will be fixed in the remote computer you've loaded the scan from. Similarly, if you're working on an offline system (i.e. located in an external drive), items will be fixed in the offline system. The current (online) system is not affected.
The Services list's context menu also has service management options that let you send commands to the highlighted service, like Stop service, Pause service or Set startup type.
The Fix checked (this list) button also becomes active when the current list is fully scanned. You can click this button to start fixing the ticked items in the current list.
And finally, when the scan completes, the progress controls in the title bar disapear, and the Fix checked (all lists) button also becomes enabled. Click it to fix all the checked items, in all the lists, but be sure to have a look first, and ensure they should be fixed.
If you're working on RMM, and loaded a scan from a remote PC, items are fixed in the remote computer, In this case, no changes are made to the local computer.
Easy diagnosis
This feature was created to help you selecting fixes in the list by providing you with a list of symptoms that you need to select instead. When you press the Easy diagnostic button, a dialog box similar to the one in the pictures below will be displayed.

Tick the items that correspond to the issues you're having. The list also contains some generic items such as Other software issues, or Other Windows issues, which you may choose if none of the remaining items apply to you.
When you're done, press Check only or Check and run, and the fixes that are likely to repair the issues you select here will automatically be checked in the lists. If you press Check and run, the repair operation is also started automatically. Note: Items previously checked in the lists will not be unchecked. If you don't want to check any items in the lists, just press Cancel or close this dialog box.
Settings
When you click the Settings button, a dialog box similar to the on in the picture below is displayed.
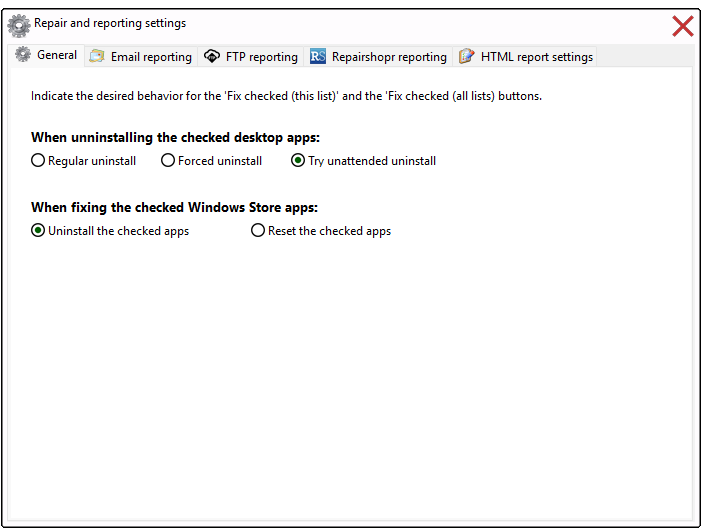
The dialog box contains four tabs: General, Email reporting, FTP reporting, Repairshopr reporting and HTML report settings. Switch to the desired tab to set up the associated options.
General
The General tab lets you set the behavior when fixing items the checked items, for some lists.
When uninstalling the checked apps:
Regular uninstall - If this option is selected, the application's regular uninstaller is executed, and no automation is performed. This usually requires user interaction to uninstall applications. Do not use this option for RMM unless you you have a person in front of the remote machine who can perform the actions needed to compete uninstalling the applications.
Forced uninstall - If this option is selected, the checked applications are forcefully uninstalled. While this does not need any user interaction, the selected applications may not be completely uninstalled.
Try unattended uninstall - When this option is selected, Win STORM will try to execute the QuietUninstallString value, and also automate the applcations uninstall process trough mouse clicks and key strokes simulation. Some user interaction may still be needed to complete the uninstall process.
When fixing the checked Windows Store apps:
Uninstall the checked apps - If this option is selected, the checked Windows Store Apps are uninstalled.
Reset the checked apps - If this option is selected, the checked Windows Store Apps are reset.
Email reporting
This tab lets you enable sending an email to a specific recipient after a repair operation completes. The professional HTML professional report that is created during the repair oeration is attached to the message. This feature is cloud synced (encrypted).
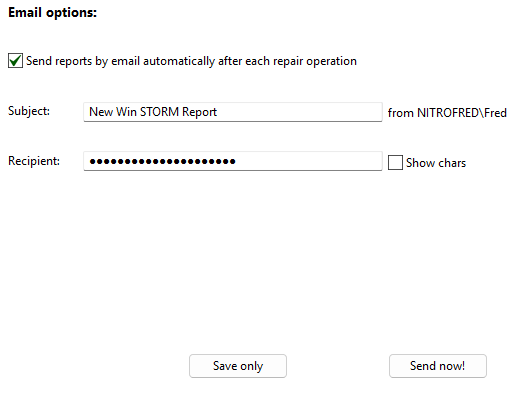
Check Send reports by email automatically after each repair operation if you wish to enable this scheduled function.
Fill in the Subject and Recipient fields, and press Save only to save the selected settings. Before closing this dialog box, don't forget to check the Professional HTML report settings. Once you complete the repair operation, the HTML log is sent to the recipient you indicated.
If you want to send a previously created report, press Send now, and indicate the location of the HTML file to send.
FTP reporting
This tab lets you enable automatically sending the HTML report to an FTP server after a repair operation completes. This feature is cloud synced (encrypted).
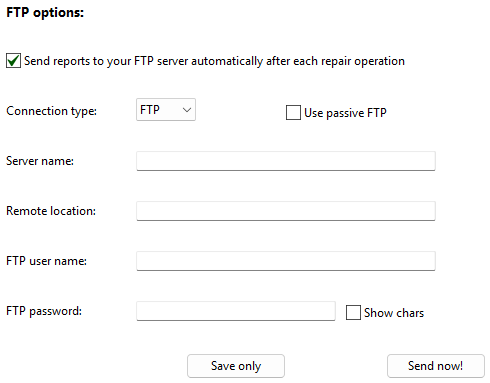
Check Send reports to your FTP server automatically after each repair operation if you wish to enable this scheduled function.
Select the desired connection type, and whether you want to use passive FTP. Fill in the
Fill in the FTP user name and FTP password fields, and press Save only to save the selected settings. Before closing this dialog box, don't forget to check the Professional HTML report settings. Once you complete the repair operation, the HTML log is sent to the FTP server you indicated.
If you want to send a previously created report, press Send now, and indicate the location of the HTML file to send.
Repairshopr report options
This tab lets you enable automatically sending the report to Repairshopr after a repair operation completes. This feature is cloud synced (encrypted).
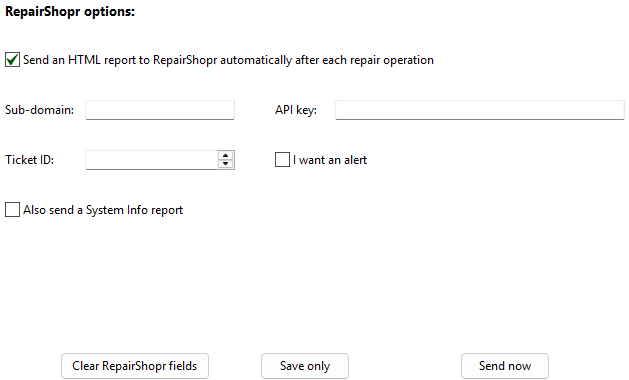
Check Send and HTML report to Repairshopr automatically after each repair operation if you wish to enable this scheduled function.
Fill in the repairshopr fields. The ticket ID field is a personalized text string intended to help you identify this report. If desired, check Also send a System Info report.
Press Save only to save the selected settings. Before closing this dialog box, don't forget to check the Professional HTML report settings. Once you complete the repair operation, the HTML log is sent to the Repairshopr account you indicated.
Repairshopr report options
This tab lets you indicate the desired HTML professional report details. This feature is cloud synced (encrypted).
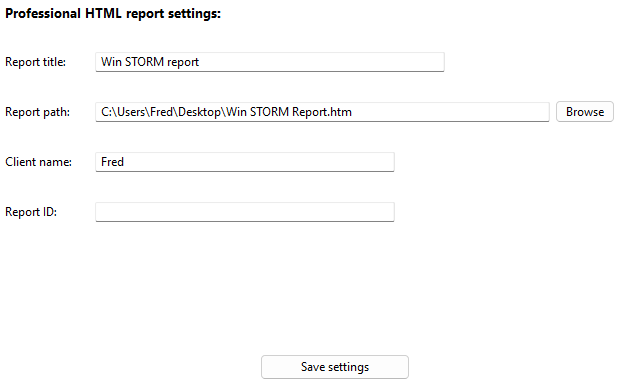
In the Report title field, enter the desired data. This is usually a generic value, like Your company report.
Click the Browse button to indicate the location where you want the HTML report to be saved, or enter the desired path manually in the Report path field.
Fill in the Client name and Report ID fields. These are free fields intended to help you identify this report.
Once you have entered all the desired values, press Save settings.
Filter results
This feature is very useful as it lets you quickly learn the changes that have ben made to the system within a certain perod of time (between two scans).
Once the scan ends, click the Filter results button, a menu similar to the one in the picture below is displayed.
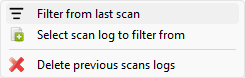
Select the desired option:
Filter from the last scan - Results present in both the current and the previous scan are removed from the lists, leaving only the new items.
Select scan log to filter from - When you select this option, a dialog box similar to the one in the picture below is displayed.
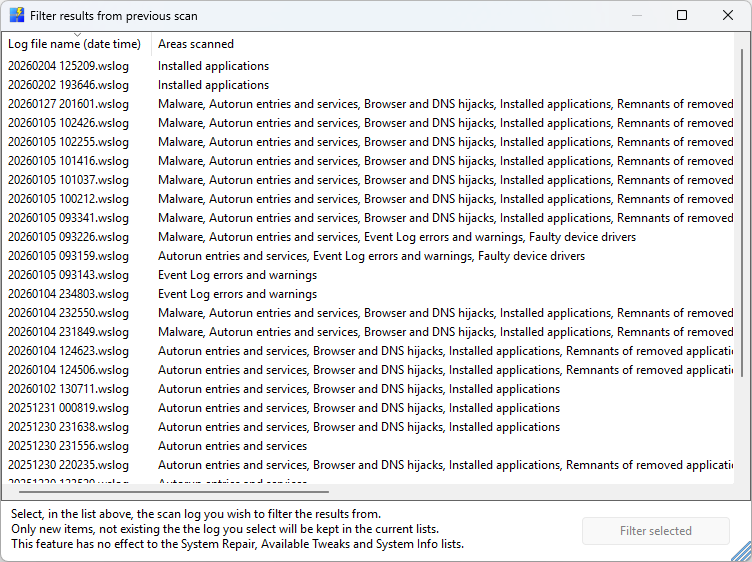
Select, in the list, the scan log you want to filter out the results and press Filter selected
To help you with the selection, the list's left column contains the scan's date and time, and the right column shows the areas that were scanned. For optimal results you should select an identical scan as the current one, in terms of the areas scanned. This is not required, though.
Delete previous scan logs - This option lets you select and delete logs from previous scans. More info here.
White/Black list
If you feel that some items should never be displayed in the scan's results, all you need to do is use a whitelist and add those results to it.
Similarly, if you feel that some scan results should be automatically selected for fixing, you just need to use a blacklist, and add those results to it.
When you click the White/black list button, a menu similar to the one in the picture below is displayed.
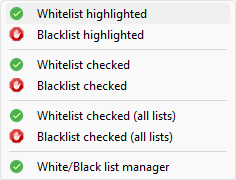
Select the desired menu item:
Whitelist highlighted - Add the currently selected (highlighted) item to the whitelist.
Blacklist highlighted - Add the currently selected (highlighted) item to the blacklist.
Whitelist checked - Add the currently checked (ticked) items to the whitelist.
Blacklist checked - Add the currently checked (ticked) items to the blacklist.
Whitelist checked - Add the checked (ticked) items, in all lists, to the whitelist.
Blacklist checked - Add the checked (ticked) items, in all lists, to the blacklist.
White/Black list manager - Manage the current Whitelisted and blacklisted items. More info here.
