
UVK help - Download and install


How to install or run UVK
UVK - Ultra Virus Killer is provided to you through 3 Installation packages and one ZIP archive:
UVKInstaller.exe: Displays a friendly user interface that allows you to configure several options for the application's installation.
UVKPortable.exe: Extracts the UVK files silently and runs the application.
UVKPortable.com: Same as UVKPortable.exe, with a COM file extension, to use in case the EXE file association is corrupted.
UVK.zip: A portable archive containing all the files needed by the application. The ZIP format allows you to easily modify the contents of the archive, for instance, to add your UVK license and configuration scripts.
These .EXE packages are executable files that contain all the files needed for UVK to work compressed in their resource.
The files contained in the portable packages are exactly the same as the ones contained in UVKInstaller.exe.
The directory where you place these packages is very special. It can be accessed from UVK by using the %InstallSourceDir% environment variable. More info here.
The portable packages do not create a start menu entry. If you want a start menu entry, you need to use UVKInstaller.exe.
If you have a UVK license, copy it to this directory, and the UVK package will automatically install it. This removes the overhead of installing the license later. If you have a branding license, please also copy your logo to this folder before installing UVK.
You can also place UVK related files in this directory. If named accordingly, these files are automatically loaded by the application. More info here.
UVK Installer
You can download the latest version of UVKInstaller by clicking the button below:
Current version: 11.10.26.0 | File size: 27.65 MB | MD5: 7CB312F8E2C4F80D9C6DAAF8EBBEB38A (UVKInstaller.exe)
If your .exe file extension has been corrupted use UVKPortable.com instead.
Use the dialog boxes of your browser to save the file, and then open it when the download is complete.
Accept the license agreement by clicking the button I accept.
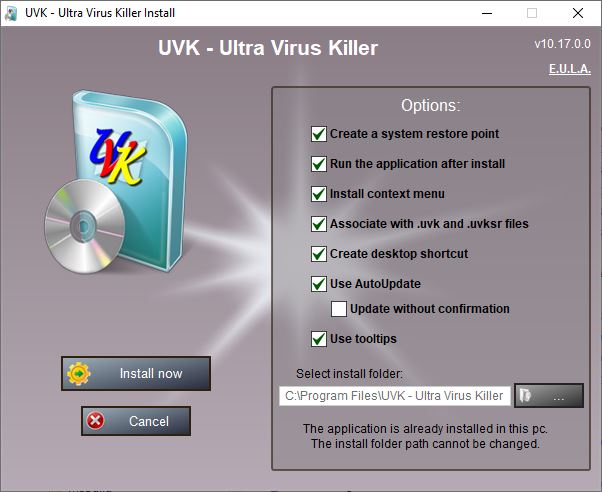
The UVK Install window will be displayed similarly the screenshot above.
Select the options of your choice by checking or un-checking the boxes under Options.
![]() Create system restore point:
Create system restore point:
Whether to create a system restore point before installing the
application. We recommend to leave this option checked.
![]() Run
the application after install:
Run
the application after install:
Whether to open UVK after completing the install process.
![]() Install context menu:
Install context menu:
If you leave this option checked, the setup will create a context menu
(Right click menu) for all files and folders, showing: Force
delete. This allows you to easily force the removal of some
files or folders you can't delete using the Windows explorer.
It will
also create a context menu for all files showing File
information. This menu allows to get all sorts of info on a
file, verify its signature and get its VirusTotal analysis report.
This feature will only be available for the users having a
License key.
![]() Associate with .uvk
and uvksr files:
Associate with .uvk
and uvksr files:
If his option is checked, UVK scripts (.uvk) and System repair
settings (.uvksr) files will be associated with the application.
Recommended.
![]() Create desktop shortcut:
Create desktop shortcut:
Whether to create a shortcut to UVK on the common desktop folder.
![]() Use Auto Update:
Use Auto Update:
Whether to check for a new version each time the application is
launched.
![]() Update
without confirmation:
Update
without confirmation:
Download and install available updates automatically, without
asking for user confirmation.
![]() Use tooltips:
Use tooltips:
This will set whether to show tooltips for all the controls in the UVK's window.
Most of these options can be changed on UVK's interface, in the Options section. Just check or un-check the same named boxes and save the settings.
After configuring the desired options, press Install now. A progress bar will show you the progress of installation for a few seconds, and UVK will be automatically lauched if Run UVK after install was checked.
And that's all. UVK is installed and ready for use.
You can press the Help button, in the Welcome screen to learn all the features and functions of the program and get started!
Note: If you are reinstalling UVK, you won't be able to change the installation path.
UVK portable
The portable packages (UVKPortable.exe and UVKPortable.com) temporarily install UVK in its default directory (C:\Program Files\UVK - Ultra Virus Killer). Then, when you close the last opened instance of the application, you are prompted to uninstall.
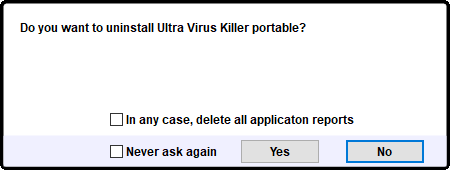
If you answer Yes, UVK is removed. Otherwise, if you press No, nothing will be uninstalled. UVK will keep asking you if you want to uninstall when you close the last instance of the application, unless you select Never ask again, in which case you will no longer be prompted, and UVK will remain installed untill you promptly uninstall it.
You can tick In any case, delete all application reports, in which case, even if you press No, all the reports created by UVK and also associated third party apps will be deleted. Normally you would use this option after you send the reports to your email address or FTP server, from the Reporting section.
For more info about UVK's uninstall process, click here.
You can drag and drop a UVK script or a System repair settings file over the UVK Portable package's icon, and it will be automatically loaded. For a System repair settings file, it will also be loaded everytime you go the the System repair section.
ZIP archive
Since version 9, UVK is also provided as a ZIP archive which contains all the files needed by the application. This package is especially useful for remote support, because you can add more files to it that you may need in the remote PC.
For instance, you can add your license keyfile and logo, so when you extract and launch UVK inthe remote machine, it is automatically activated.
You can also place your favorite UVK scripts and UVKSR files, so they are immediately available in the remote computer. In this case, it is advisable to create a folder named Third Party, place your files inside that folder, and add the folder itself with the files to the ZIP archive.
When using the ZIP archive, you may notice a file named PortableZip.ini inside. Even though this file may be empty, it should not be removed. It tells UVK that you are using the ZIP version, and thus should not perform actions such as uninstalling the application from that folder.
