
UVK Help - Reporting


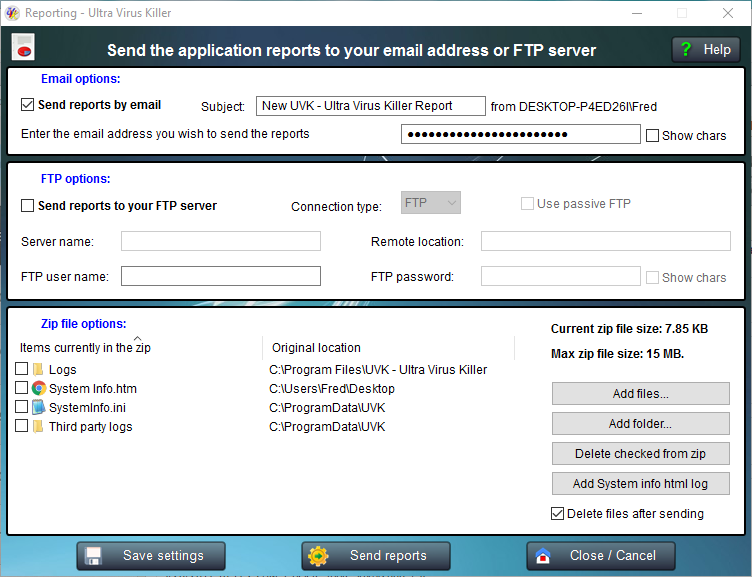
UVK's reporting service allows you to easily send the application reports to your email address or FTP server.
To use this feature, press "Reporting", in the welcome screen.
Email options
If you want to send the reports to your email address, check Send reports by email. The Subject input box is automatically enabled. You can edit the first words of the subject. The text from[Username]\[PC name] is automatically appended.
Enter the email address you want to send the reports to in the corresponding field. Please ensure it is a valid email address. UVK can only ensure the email is sent, but it can not ensure it is received by the receipient. The email address may be different from the one associated with your license, but you still need to be a registered user in order to use this feature.
These are the only settings you can configure for the email reporting feature. The zip file containing the reports is sent to the same email address you registerd when you purchased your license key. An automatic message is added to the email body, saying you can find the required reports attached.
How does it work?
Firstly, UVK sends the zip file containing the reports to our server (this server). Immediatelly afterwards, UVK requests the server to send it to the specified email address. All connections are secure and encrypted. The server emails the reports and deletes the zip file. That's it. No reccords or traces of the reports sent are kept in our server.
The email is sent from uvk AT carifred.com. Even though this is a valid email address, you should not reply to the reporting emails. If you want to contact us, use our contact form.
FTP options
If you want to send the reports to your FTP server, check Send reports to your FTP server. The controls in the FTP options group are automatically enabled. Enter the FTP server info and credentials.
![]() Connection
type: You can choose FTP, or FTPS if your server supports FTP
over SSL connections.
Connection
type: You can choose FTP, or FTPS if your server supports FTP
over SSL connections.
![]() Use passive
FTP: Check this option if your FTP server supports passive FTP
connections.
Use passive
FTP: Check this option if your FTP server supports passive FTP
connections.
![]() Server name:
Your FTP server name or IP address. i.e. example.com or
100.10.20.30. Do not prepend ftp:// to the server name.
Server name:
Your FTP server name or IP address. i.e. example.com or
100.10.20.30. Do not prepend ftp:// to the server name.
If your server uses a non standard port number, you can specify it in this field. Just append a colon followed by your custom port number. i.e.example.com:2121 or 100.10.20.30:2121.
![]() Remote
location: The remote folder where UVK should put the reports in.
This folder must already exist. i.e. public_ftp/reports.
Remote
location: The remote folder where UVK should put the reports in.
This folder must already exist. i.e. public_ftp/reports.
You can optionally also specify the remote file name, in which case, the zip file extension must also be specified. i.e. public_ftp/reports/RemoteFileName.zip. If the remote file name is omitted, the local name of the zip file is used. See Zip file options for more info about how the local zip file is named.
![]() FTP user
name: The user name used to connect to the FTP server. i.e.
Username or username@example.com.
FTP user
name: The user name used to connect to the FTP server. i.e.
Username or username@example.com.
![]() FTP
password: The password to connect to the FTP server. The
characters are not displayed.
FTP
password: The password to connect to the FTP server. The
characters are not displayed.
Zip file options
The reports are compressed into a zip file before they are sent. UVK automatically searches for existing reports and adds them to the file.
Reports already in the zip are shown in the list. This list contains two columns: The left column shows the report's file name. The right column shows the original location of the report.
A unique file name is used to name the zip file. You can not rename it locally, but you can choose a different file name to be created in your FTP server.
The pattern used to create the unique name is as follows: [User name]_[PC name]_[Year][Month][Day][Hour][Minute][Second]
You can add more files to the zip, or even folders using the Add files and Add folder buttons. However, the zip file size must not exceed 15MB. 15MB is also the maximum size allowed for each file or folder to be added.
If you want to remove one or more files or folders from the zip, tick the corresponding checkboxes and press Delete selected from zip.
You will probably want to include the html report created in the System info section to the zip. If the report had previously been created, it is automatically added. Otherwise you can quickly generate and add it by pressing the Add System info html log button.
Save settings
You can save the email and FTP settings to the registry, so UVK will automatically load them the next time you come back to the Reporting section.
To save the settings, press the Save settings button. FTP credentials will be encrypted before they are saved. For security reasons, we recommend that you save your settings before entering you FTP password, unless you are using your personal computer.
Once your settings are securely saved, you can export them to an ini file, in the Options section. This ini file is loaded by the UVK setup or portable packages, if placed in the same folder, and the settings are automatically applied. Useful to transport the UVK settings to a different (or remote) computer.
Send reports
Once you have setup your email, FTP and zip file options, and optionally saved your settings, you are ready to send your reports.
Just press Send reports and confirm. A message box will tell you if the reports were successfully sent or not. Obviously, at least one of the following check boxes must be selected before you can send the reports: Send reports by email or Send reports to your FTP server.
