
UVK Help - Cloud Sync


Cloud Sync overview
Cloud Sync, introduced in version 8.0, allows IT professionals to automatically synchronise all UVK settings, white/black lists and scripts from and/or to the cloud. This will be especially helpful when working remotelly, as you will be able to quickly load all those files, and also update them on the fly. The files that UVK can automatically sync are:
- The global application settings.
- Smart Uninstaller's white/black list.
- Ultra Adware Killer's whitelist.
- Custom Repair UVK script (Run scripts section).
- Custom Maintenance UVK script (Run scripts section).
- Default System Repair (UVKSR) file (System repair section).
Files are compressed and encrypted before they are sent to the cloud, so no one else can access them. In case you're wondering, they are hosted in this server (carifred.com).
The main benefit from using Cloud Sync is that you can load all your UVK customizations and other settings with just a few clicks, in every computer you work on (as long as it has an Internet connection). If the machine you're working on does not have an active internet connection, then you're obviously not working by remote access, and you can use the default files in %InstallSourceDir% instead, as explained in this help article. Working with local files is preferable, because it is faster and doesn't rely on an Internet connection.
Thus, our advice is to use Cloud Sync when working remotely, and use the default files to load from %InstallSourceDir% when working locally (from a network location or a USB drive, for instance)
Configure Cloud Sync
If Cloud Sync has never been configured before in a machine, registered users will be prompted once to do it. If you click Yes, you will be presented with the Cloud syncing settings dialog, which can be accessed anytime from the Options section, by clicking Cloud sync.
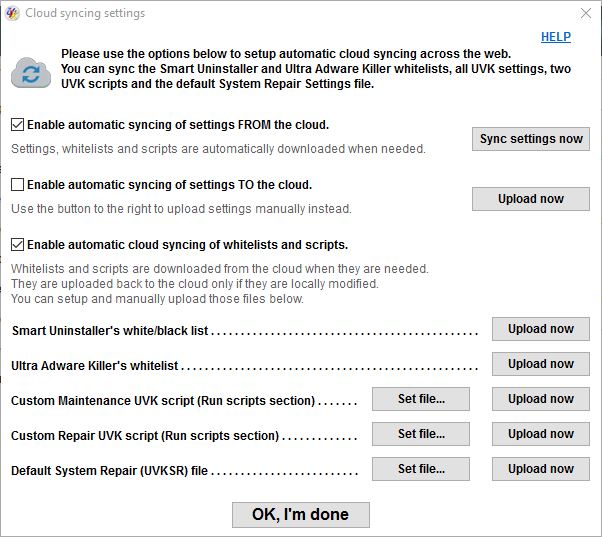
In the screenshot above, the recommended options have already been checked.
This option controls whether UVK should automatically download the settings, from the cloud when the application is launched. Obviously, you will need to export and upload the once, before they can be downloaded, as described below.
Click the Sync settings now button to the right, if you want to manually load the application settings from the cloud to the local computer's storage once.
This option controls whether UVK should automatically upload the current application settings to the cloud when the application is closed. Remember, if you update the settings in the cloud, they will be updated in every computer you run UVK (and has Cloud Sync enabled), so you may want to do this manually when you want to make a permanent change to an applicaiton setting.
Click the Upload now button to the right, if you want to manually sync the current settings to the cloud. You only need to do this once, before UVK can download the settings from the cloud.
This option controls whether UVK should automatically syncronize the Smart Uninstaller's white/black list, the Ultra Adware Killer's whitelist, the default System repair's UVKSR file, and the default maintenance and repair UVK scripts. Those files are downloaded from the cloud when they are needed, but they are unly uploaded back to the cloud if they are locally changed. This ensures that changes to those files will be reflected in any computer in the Internet you run UVK in (and has Cloud Sync enabled).
For instance, when this option is enabled, UVK will automatically download the Smart Uninstaller's white/black list when you go to the Smart Uninstaller section. When you leave the Smart uninstaller, UVK will upload the white/black list back to the cloud only if it was changed, i.e. if you added a program to the white list.
Set and upload the whitelists and default scripts:
Click the Upload now button to the right, if you want to manually sync the current Smart Uninstaller's white/black list to the cloud. You only need to do this once, before UVK can automatically download the list from the cloud in any computer. This setting is optional.
Click the Upload now button to the right, if you want to manually sync the current Ultra Adware Killer's whitelist to the cloud. You only need to do this once, before UVK can automatically download the whitelist from the cloud in any computer. This setting is optional.
Click the Set file button to the right, in order to indicate the UVK script you wish to use as the default script that is inserted when you click the Full system repair script button, in the Run scripts section. Then you should upload this script, otherwise it will not be automatically loaded in other PCs.
Click the Upload now button to the right, if you want to manually sync the default Full system repair script to the cloud. You only need to do this once, before UVK can automatically download the script from the cloud in any computer. This setting is optional.
Click the Set file button to the right, in order to indicate the UVK script you wish to use as the default script that is inserted when you click the Full maintenance script button, in the Run scripts section. Then you should upload this script, otherwise it will not be automatically loaded in other PCs.
Click the Upload now button to the right, if you want to manually sync the default Full maintenance script to the cloud. You only need to do this once, before UVK can automatically download the script from the cloud in any computer. This setting is optional.
Click the Set file button to the right, in order to indicate the UVKSR file you wish to use by default when you go to the System repair section. Then you should upload this file, otherwise it will not be automatically loaded in other PCs.
Click the Upload now button to the right, if you want to manually sync the default UVKSR file to the cloud. You only need to do this once, before UVK can automatically download the file from the cloud in any computer. This setting is optional.
Once you setup everything you need, just close this dialog box or press OK, I'm done. All settings are updated on the fly.
Using Cloud Sync
Cloud Sync was built to be simple and intuitive. Of the "Set it and forget it" type.
Let's say you're a computer technician who also does remote repairs. First you would setup Cloud Sync. This can be done from your personal PC, or your bench machine.
- Run UVK, go to the Options section and click Cloud Sync.
- Check Enable automatic syncing FROM the cloud.
- Check Enable automatic syncing of whitelists and scripts TO the cloud.
- Press the Upload now button, in the
Enable automatic syncing of settings TO the cloud line, to
upload the current settings to the cloud, so they are automatically
imported in each remote PC.
- If you use the Smart Uninstaller's white/black list, press the Upload now button, in the
corresponding line, to upload the current list to the cloud, so it's
automatically imported in each remote PC.
- If you use the Ultra Adware Killer's whitelist, press the Upload now button, in
the corresponding line, to upload the current list to the cloud, so
it's automatically imported in each remote PC.
- If you use a default UVKSR file, which you want to be automatically loaded in the
System repair section, click the Set file button, in the
corresponding line, indicate the path of the desired file, and then
click Upload now, in the same line.
- Proceed similarly for the default System repair and Maintenance scripts, if
you're using them.
- Close the Cloud syncing settings dialog box, and that's all. You've successfully configured Cloud Sync.
Now each time you work on a remote computer, it will be a peace of cake to import settings, scripts and whitelists.
- Proceed as usual to launch UVK in the remote machine and
activate your license.
- If Cloud Sync was never configured in this PC, or UVK was
not previously installed, you'll be prompted to setup Cloud Sync.
Answer Yes. Then, in the Cloud syncing settings dialog
box, check Enable automatic syncing of settings FROM the cloud,
and Enable automatic cloud syncing of whitelists and scripts.
- Close the Cloud syncing settings dialog box, and that's all. UVK will now sync everything, and automatically update white lists and scripts, if you perform changes to them (i.e. if you add a program to Smart Uninstaller's black list).
If you do not uninstall UVK from the remote machine after completing the repair, you'll never need to setup Cloud sync in this PC anymore. Otherwise, you will have to do it each time, but it's very easy, as you can see.
