Tech Tool Store - Reporting

Warning: session_start(): Session cannot be started after headers have already been sent in /var/www/vhosts/carifred.com/httpdocs/includes/nmenu.php on line 3

Overview of Tech Tool Store's Reporting feature
New PC detected Send by email Send to FTP server Send to repairshopr
Tech Tool Store provides a professional reporting feature that allows you to keep tracking of the computers you work on, as well as the customer names and all the repair tools executed in each machine.
Reports can be accessed and configured in Settings, Reports tab, as shown in the screenshot below.
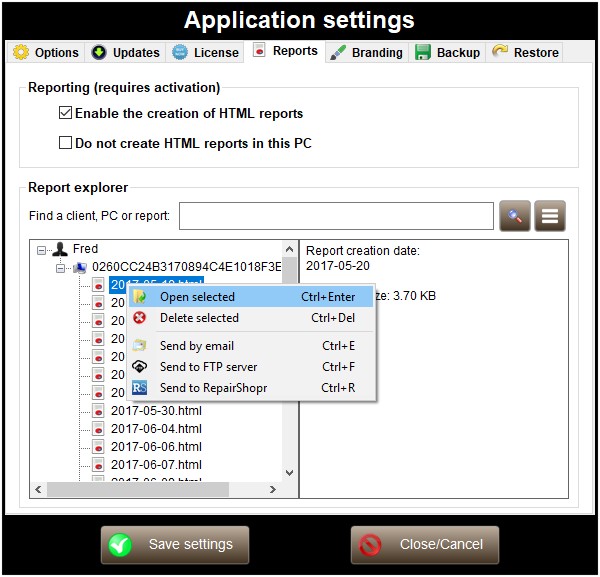
This tab allows you to set up the way Tech Tool Store creates HTML reports of your repairs, and also manage the reports already created. All reporting related features require activation.
Computer reports contain the actions you perform with the tools: Update, Run and Uninstall, the time they were executed and the result of the operation. Reports are created on a daily basis for each PC.
If you want to permanently disable the creation of HTML reports, uncheck Enable the creatio of HTML reports.
If you don't want to create reports in the current PC, check Do not create HTML reports in this PC.
Both options above will only take effect after you close all the running instances of Tech Tool Store.
The Report Explorer allows you to easily manage the existing reports. Reports are displayed in a tree view control. The root branch shows the Client names, each client branch contains the associated computers, identified by their hardware fingerprint, which, in their turn contain the associated reports. By selecting a item, the corresponding information is displayed in the right pane.
To quickly find a client, PC or report, use the built-in search feature.
The "three bar" (menu) button, as well as the right-click (context) menu contain five options:
![]() Open selected: Open the selected item in the tree. If the item is a
client or PC, the corresponding folder will be opened using the
Windows Shell. If the item is a report, it will be opened with the
default browser. Double-clicking an item has the same effect.
Open selected: Open the selected item in the tree. If the item is a
client or PC, the corresponding folder will be opened using the
Windows Shell. If the item is a report, it will be opened with the
default browser. Double-clicking an item has the same effect.
![]() Delete selected: Delete the selected item in the tree. If the item
is a client or PC, the corresponding folder will be deleted,
removing all child items.
Delete selected: Delete the selected item in the tree. If the item
is a client or PC, the corresponding folder will be deleted,
removing all child items.
![]() Send by email: This option allows you to
send the selected report to the email address you indicate.
Send by email: This option allows you to
send the selected report to the email address you indicate.
![]() Send to FTP server: This option
allows you to send the selected report to an FTP server.
Send to FTP server: This option
allows you to send the selected report to an FTP server.
![]() Send to Repairshopr: This option
allows you to send the selected report to Repairshopr and associate
it with a ticket.
Send to Repairshopr: This option
allows you to send the selected report to Repairshopr and associate
it with a ticket.
New pc detected
Each time you run TTS on a new computer, the application will generate a unique hardware fingerprint for that PC. If that fingerprint is not present in the reporting database yet, Tech Tool store will ask you to enter the client name to associate with the current PC. The dialog box is similar to the picture below.

Enter the client name you want to associate the current PC with. Alternately you can click the small down arrow to the right of the combo box to drop down the list of actual clients (if any), and select a client from the list.
If you don't want to create repors in the curent PC, check Never warn me about this PC again.
If you want to permanently disable the creation of HTML reports, check Disable the creation of HTML reports.
Press Apply to save changes, or Cancel to discard any changes.
Send by email
You can send the selected report to an email address of your choice. Just fill out the Email subject and Email recipient fields with the desired data, as indicated in the screenshot below.
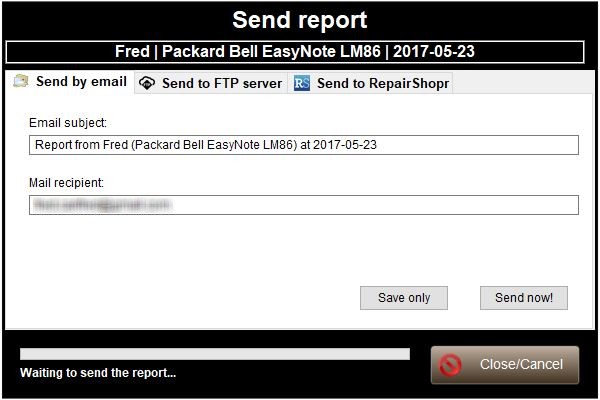
When ready, press Send now to send the report to the email address you specified. You can also press Save only, if you do not wish to send the report right away, bu want the fields to be automatically filled out the next time.
After sending or saving, the text label at the bottom of this dialog box will tell you the result of the requested operation.
Send to FTP server
You can send the selected report to an FTP server. Just fill out the FTP related fields with the correct data, as indicated in the screenshot below.
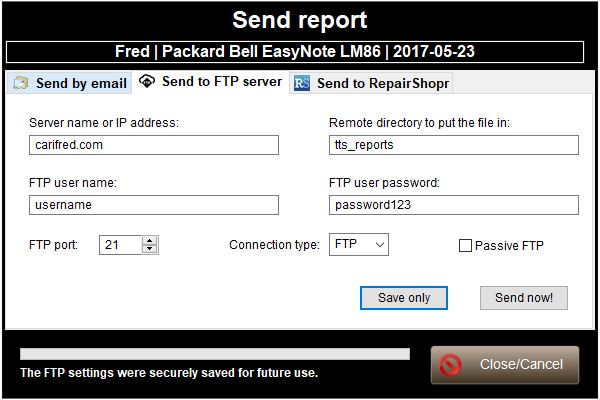
When ready, press Send now to send the report to the FTP server you specified. You can also press Save only, if you do not wish to send the report right away, bu want the fields to be automatically filled out the next time.
After sending or saving, the text label at the bottom of this dialog box will tell you the result of the requested operation.
Send to Repairshopr
You can send the selected report to your Repairshopr account, if you have one. Just fill out the fields with the correct data, as indicated in the screenshot below.
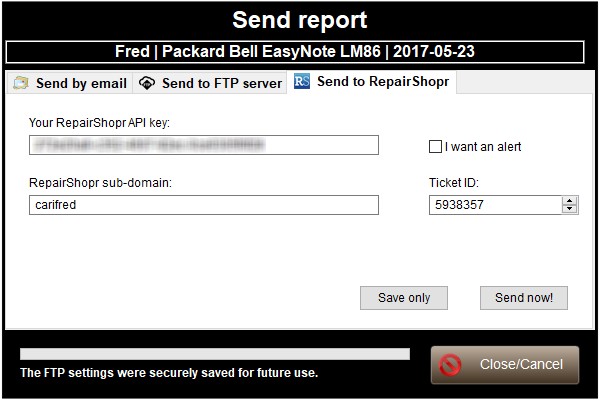
![]() Your RepairShopr API key: If you don't
already have, you can quickly get your API key from your
Repairshopr's account profile page, as indicated in the screenshot
below. From any repairshopr page, press the button at the top of the
page that contains your email address, and then select
Profile/password. The page you are taken
to will display your API key. You can just do a simple copy/paste to
insert you API key in the corresponding field.
Your RepairShopr API key: If you don't
already have, you can quickly get your API key from your
Repairshopr's account profile page, as indicated in the screenshot
below. From any repairshopr page, press the button at the top of the
page that contains your email address, and then select
Profile/password. The page you are taken
to will display your API key. You can just do a simple copy/paste to
insert you API key in the corresponding field.
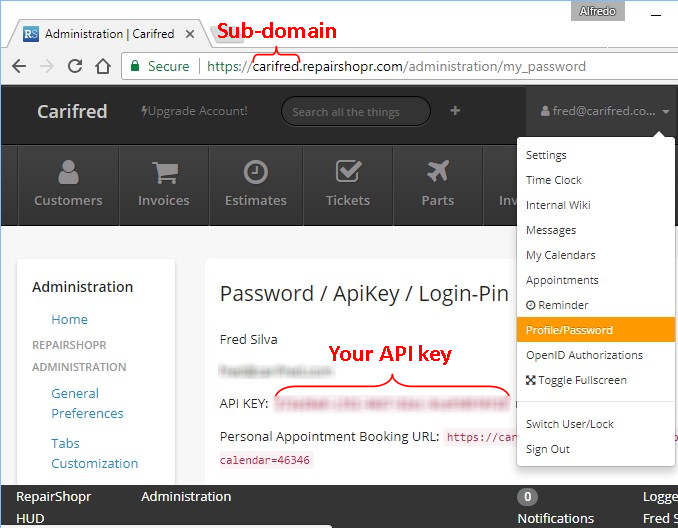
![]() Repairshopr sub-domain: Just enter the
sub-domain that you associated with your repairshopr account. If you
don't know what that is, it is indicated in the screenshot above. It
is the first token of the URL of any of your Repairshopr's account
page, just between https:// and the first
dot.
Repairshopr sub-domain: Just enter the
sub-domain that you associated with your repairshopr account. If you
don't know what that is, it is indicated in the screenshot above. It
is the first token of the URL of any of your Repairshopr's account
page, just between https:// and the first
dot.
![]() I want an alert: Check this option if you
want to receive an alert from your repairshopr account when this
report is received. Obviously, alerting notifications need to be
enabled in your RS account for this feature to work.
I want an alert: Check this option if you
want to receive an alert from your repairshopr account when this
report is received. Obviously, alerting notifications need to be
enabled in your RS account for this feature to work.
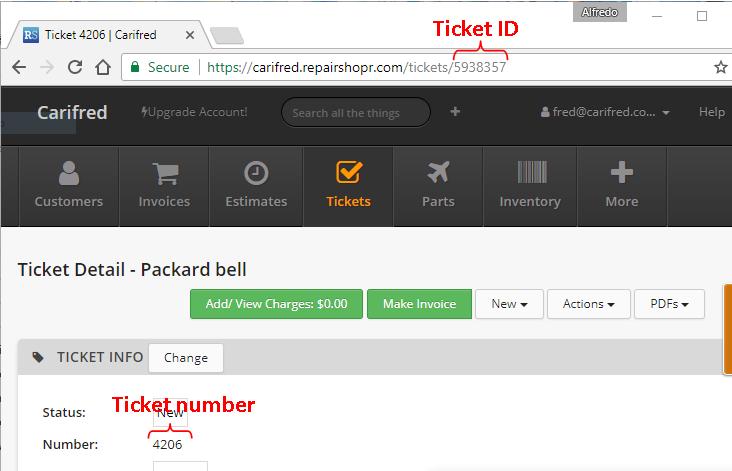
![]() Ticket ID: This field indicates the ID of
the ticket to associate this report with. Note that this is not the
ticket number. The ticket ID is the last token of the URL of the
ticket's detail page, as indicated in the screenshot below. If you
specify the ticket number instead, it will not work, and the report
will have no ticket associated.
Ticket ID: This field indicates the ID of
the ticket to associate this report with. Note that this is not the
ticket number. The ticket ID is the last token of the URL of the
ticket's detail page, as indicated in the screenshot below. If you
specify the ticket number instead, it will not work, and the report
will have no ticket associated.
When ready, press Send now to send the report to you RS account. You can also press Save only, if you do not wish to send the report right away, but want the fields to be automatically filled out the next time.
After sending or saving, the text label at the bottom of this dialog box will tell you the result of the requested operation.
To access the reports from your Repairshopr account, go to the Tickets page, drop Ticket modules down, and select Computer reports.
