
UVK Help - System repair


Help content index
Overview of the System Repair Module
Fixes and third party apps list
Adding third party apps (video tutorial by Britec).
Creating apps that run the builtin fixes/apps
More custom third party apps examples
Editing the custom third party apps
Overview of the System Repair Module
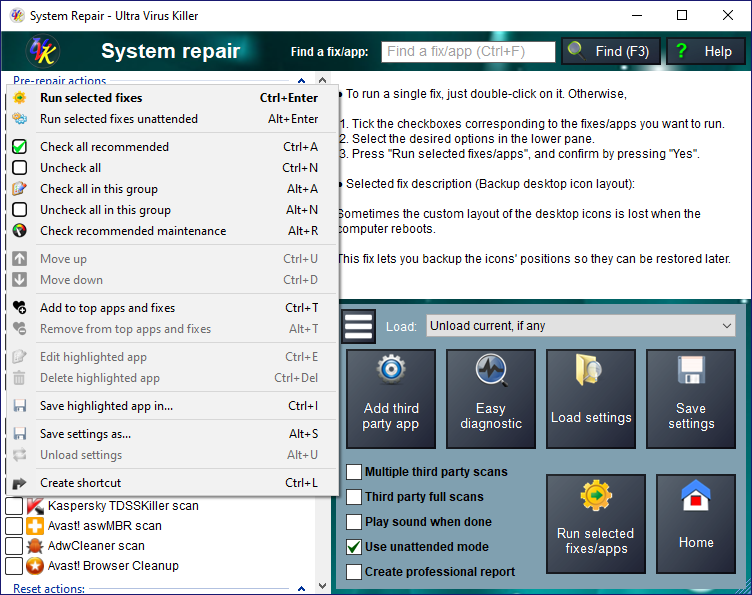
System repair is probably the UVK module computer technicians use the most. Here you can perform malware removal operations, reset many Windows settings to their defaults, fix a large number of issues, download and run your favorite third party applications, free up HDD space, improve your computer's speed, performance and reliability, run any Windows troubleshooter, repair corrupted user profiles, and the list goes on.
In order to start a repair operation you just need to tick the desired items in the left pane's list, press Run selected fixes/apps, and confirm. However, before that, you may want to setup the way you want the application to behave. For instance, if you want to minimize user interation and make the repair operation, you would also tick Use unattended mode and Multiple third party scans, in the right bottom pane. This pane also lets you enable playing a sound once the repair operation is complete, or enable the creation of a professional HTML report of all actions during the repair operation.
Besides that, there are many other things you can do in this module. For instance, you can save the currrent selection to a file, and quickly load it back later, which can save you loads of time. See Loading/Saving settings.
If you right click any item in the list, of if you press the menu button, you will see many other options avalable. See Using the fixes/apps list's menu
You can also add your own third party apps or custom fixes to the list. See Adding third party apps and Editing the custom third party apps
If you're not sure of which items to check in the list, just press Easy diagnostic, which will make your selection much easier.
Fixes and third party apps list:
UVK displays the fixes and third party apps in a single column list view table with checkboxes. Click a line to see the description of the associated fix/app, in the text box to the right of the list.
To run a single fix, double-click the corresponding line. To select one or several fixes, tick the corresponding check boxes.
Note: You can save the fixes and third party apps selection to a file, allowing you to import it back later, so you don't need to select everything again. Click here for more info.
Select the desired options in the lower pane:
Check Use unattended mode if you want UVK to run the selected fixes and apps without showing confirmation prompts. In this mode, the selected fixes/apps will be executed in sequence, from top to bottom, and requiring no user interaction.
This option does not change the way UVK automates the third party apps. It just suppresses the confirmation prompts normally displayed before and after running each fix.
While using this option may save you some clicks and some time, not using it has some benefits when running fixes that support several options, like Kill all non system processes, Backup the registry, Reset IE and internet settings, and Fix Windows sidebar.
Check Play sound when done if you want UVK to play a sound after running the selected fixes/apps.
After selecting all the desired fixes and options, click Run selected fixes/apps.
If Use unattended mode is not selected, UVK will ask you for confirmation before running each fix /app. At this point you can press Yes to run the fix/app, or No to cancel it and step to the next one (if any), or press Cancel, to cancel the whole repair operation.
If Use unattended mode is selected, UVK will ask you for confirmation only once before running the selected fixes/apps. At this point, you can cancel the whole repair operation by pressing No.
You will still be able to cancel the execution of the remaining fixes/apps by pressing Cancel all, in the System repair prograss information popup dialog.
While UVK is running the selected fixes/apps, you can update the selection. For instance, you can check more fixes/apps to execute. However, UVK will only take in account items updated below the fix/app that it is currently processing.
Currently available fixes are:
Pre-repair actions:
![]() Backup desktop icon layout: Sometimes the custom layout of
the desktop icons is lost when the computer reboots. This fix allows
you to backup the icons' positions so they can be restored later.
Tis fix is also available from a UVK script with the
<BackupDesktopIcons> command.
Backup desktop icon layout: Sometimes the custom layout of
the desktop icons is lost when the computer reboots. This fix allows
you to backup the icons' positions so they can be restored later.
Tis fix is also available from a UVK script with the
<BackupDesktopIcons> command.
![]() Auto-logon the current user: This fix will allow you
to set up automatic logon for the current user. Useful to
avoid entering the logon password if the PC is rebooted
before the repair operation ends. Tis fix is also available from a
UVK script with the <AutoLogon> command.
Auto-logon the current user: This fix will allow you
to set up automatic logon for the current user. Useful to
avoid entering the logon password if the PC is rebooted
before the repair operation ends. Tis fix is also available from a
UVK script with the <AutoLogon> command.
![]() Enable Windows Installer in Safe Mode: This fix will enable
the Windows installer to run in Safe Mode minimal and with
networking, allowing you to install applications through the Windows
Installer in those boot modes.
Enable Windows Installer in Safe Mode: This fix will enable
the Windows installer to run in Safe Mode minimal and with
networking, allowing you to install applications through the Windows
Installer in those boot modes.
![]() Reboot in safe mode and continue: This fix will reboot the
computer in safe mode with networking and continue the repair
operation in that mode, starting on the next selected fix/app.
Reboot in safe mode and continue: This fix will reboot the
computer in safe mode with networking and continue the repair
operation in that mode, starting on the next selected fix/app.
![]() Set technician power settings: Optimize the current power
scheme settings for the repair operation: Close lid does nothing,
auto sleep is disabled, hard drives and displays are always on, dim
display after 5 minutes. This fix is not available on Windows XP.
There is no dedicated script command for this fix, but you can use
one of the scripts posted in
this topic to achieve the same effect.
Set technician power settings: Optimize the current power
scheme settings for the repair operation: Close lid does nothing,
auto sleep is disabled, hard drives and displays are always on, dim
display after 5 minutes. This fix is not available on Windows XP.
There is no dedicated script command for this fix, but you can use
one of the scripts posted in
this topic to achieve the same effect.
![]() Kill all non system processes: Kill all processes which
executable files are not system protected files. Please save all
your work before using this feature. If Use unattended mode
is not checked, you will be given more process filtering options.
Tis fix is also available from a UVK script with the
<KillNonSystemProcesses> command.
Kill all non system processes: Kill all processes which
executable files are not system protected files. Please save all
your work before using this feature. If Use unattended mode
is not checked, you will be given more process filtering options.
Tis fix is also available from a UVK script with the
<KillNonSystemProcesses> command.
![]() Delete all restore points: This fix deletes all existing
system restore points. It is also available from a UVK script with
the <DeleteAllRestorePoints> command.
Delete all restore points: This fix deletes all existing
system restore points. It is also available from a UVK script with
the <DeleteAllRestorePoints> command.
![]() Create a system restore point: This fix creates a restore
point named UVK Fix. It is also available from a UVK script with the
<CreateRestorePoint> command.
Create a system restore point: This fix creates a restore
point named UVK Fix. It is also available from a UVK script with the
<CreateRestorePoint> command.
![]() Free physical memory will release memory used by the
applications by emptying their working set. Usually this
doesn't affect performance, but users should use this feature
only if they are running out of memory. This
fix is also available from a UVK script with the
<FreePhysicalMemory> command.
Free physical memory will release memory used by the
applications by emptying their working set. Usually this
doesn't affect performance, but users should use this feature
only if they are running out of memory. This
fix is also available from a UVK script with the
<FreePhysicalMemory> command.
![]() Backup the registry will create a registry backup. If
Unatteneded mode is checked, the whole registry will be backed up,
otherwise you will be given the option to choose which hives and
users to backup. This fix is also available from a UVK script with the
<BackupRegistry> command.
Backup the registry will create a registry backup. If
Unatteneded mode is checked, the whole registry will be backed up,
otherwise you will be given the option to choose which hives and
users to backup. This fix is also available from a UVK script with the
<BackupRegistry> command.
![]() Un-immunize all areas will un-immunize any areas you have
previously immunized in the System immunization section. The
current immunization will bs saved in a variable so you can restore
it after running the selected fixes by checking Restore previous
immunization. This fix is also available from a UVK
script with the <ImunizeSystem> command.
Un-immunize all areas will un-immunize any areas you have
previously immunized in the System immunization section. The
current immunization will bs saved in a variable so you can restore
it after running the selected fixes by checking Restore previous
immunization. This fix is also available from a UVK
script with the <ImunizeSystem> command.
![]() Disable the User Account Control: This fix will disable the
User Account Control (UAC). Use the "Enable the User Account
Control" post repair action to re-enable it after the repair
operation. This fix is also available from a UVK
script with the <DisableUAC> command.
Disable the User Account Control: This fix will disable the
User Account Control (UAC). Use the "Enable the User Account
Control" post repair action to re-enable it after the repair
operation. This fix is also available from a UVK
script with the <DisableUAC> command.
![]() Enable the legacy (F8) boot menu: This fix will enable the
old boot menu, activated by pressing F8. Obviously this fix only
works on Windows 8 or higher. This fix is also available from a UVK
script with the <EnableF8BootMenu> command.
Enable the legacy (F8) boot menu: This fix will enable the
old boot menu, activated by pressing F8. Obviously this fix only
works on Windows 8 or higher. This fix is also available from a UVK
script with the <EnableF8BootMenu> command.
![]() Enable Windows Recovery Environment: This fix enables the
Windows Recovery Environment (WinRE), for the next time the computer
boots up. This fix only works on Windows 8 or higher. This fix is also available from a UVK
script with the <EnableWinRE> command.
Enable Windows Recovery Environment: This fix enables the
Windows Recovery Environment (WinRE), for the next time the computer
boots up. This fix only works on Windows 8 or higher. This fix is also available from a UVK
script with the <EnableWinRE> command.
![]() Prevent reboting until all is done will try to prevent thes
PC from rebooting until the current repair operation is complete. The
computer will display a message on reboot saying a repair operation
is in progress. You should cancel shutdown at this point. This fix is also available from a UVK
script with the <PreventShutdown> command.
Prevent reboting until all is done will try to prevent thes
PC from rebooting until the current repair operation is complete. The
computer will display a message on reboot saying a repair operation
is in progress. You should cancel shutdown at this point. This fix is also available from a UVK
script with the <PreventShutdown> command.
![]() Create a System Info HTML log: This fix will create
an HTML file containing information about this computer's
hardware and software, and open it in the default browser.
Create a System Info HTML log: This fix will create
an HTML file containing information about this computer's
hardware and software, and open it in the default browser.
Reset actions:
![]() Reset Microsoft Edge: This fix will reset
Microsoft's new browser to its default settings, including home
pages, search providers and preferences. If you need full
control of what to reset, use Ultra Adware Killer instead.
This fix is also available from a UVK script with the
<ResetMSEdge>
Reset Microsoft Edge: This fix will reset
Microsoft's new browser to its default settings, including home
pages, search providers and preferences. If you need full
control of what to reset, use Ultra Adware Killer instead.
This fix is also available from a UVK script with the
<ResetMSEdge>
![]() Reset IE and internet settings
will open the "Reset Internet settings" dialog box. Use this fix if
your internet explorer isn't working properly or if you're having
troubles accessing the internet through IE. This fix is also
available from a UVK script with the
<ResetIEAndInternet> command.
Reset IE and internet settings
will open the "Reset Internet settings" dialog box. Use this fix if
your internet explorer isn't working properly or if you're having
troubles accessing the internet through IE. This fix is also
available from a UVK script with the
<ResetIEAndInternet> command.
![]() Reset Chrome: This fix will reset Google Chrome's preferences
and extensions. The cache and cookies will not be affected. The
reset operation will only be performed for the current user, but all
Chrome profiles will be reset. This fix is also available from a UVK
script with the <ResetChrome> command.
Reset Chrome: This fix will reset Google Chrome's preferences
and extensions. The cache and cookies will not be affected. The
reset operation will only be performed for the current user, but all
Chrome profiles will be reset. This fix is also available from a UVK
script with the <ResetChrome> command.
![]() Reset Chrome for all users: This fix will reset Google chrome
preferences and extensions. The cache and cookies will not be
affected. The reset operation will be performed for all users, and
all Chrome profiles will be reset. This fix is also available from a
UVK script with the <ResetChrome> -AllUsers command.
Reset Chrome for all users: This fix will reset Google chrome
preferences and extensions. The cache and cookies will not be
affected. The reset operation will be performed for all users, and
all Chrome profiles will be reset. This fix is also available from a
UVK script with the <ResetChrome> -AllUsers command.
![]() Reset Firefox: This fix will reset Firefox preferences and
extensions. The cache and cookies will not be affected. The reset
operation will only be performed for the current user, but all
Firefox profiles will be reset. This fix is also available from a
UVK script with the <ResetFirefox> command.
Reset Firefox: This fix will reset Firefox preferences and
extensions. The cache and cookies will not be affected. The reset
operation will only be performed for the current user, but all
Firefox profiles will be reset. This fix is also available from a
UVK script with the <ResetFirefox> command.
![]() Reset Firefox for all users: This fix will reset Mozilla
Firefox preferences and extensions. The cache and cookies will not
be affected. The reset operation will be performed for all users,
and all Firefox profiles will be reset. This fix is also available
from a UVK script with the
<ResetFirefox> -AllUsers command.
Reset Firefox for all users: This fix will reset Mozilla
Firefox preferences and extensions. The cache and cookies will not
be affected. The reset operation will be performed for all users,
and all Firefox profiles will be reset. This fix is also available
from a UVK script with the
<ResetFirefox> -AllUsers command.
![]() Reset Firefox print settings: Sometimes Firefox gets stuck
with one print paper size, usually after switching printers. This
fix will reset Firefox's printer settings, automatically fixing that
issue and similar ones. Note: Firefox's process will be killed prior
to the reset operation.
Reset Firefox print settings: Sometimes Firefox gets stuck
with one print paper size, usually after switching printers. This
fix will reset Firefox's printer settings, automatically fixing that
issue and similar ones. Note: Firefox's process will be killed prior
to the reset operation.
![]() Reset the DNS cache: This fix will flush the DNS by running
the following command: Ipconfig /FlushDns.
Reset the DNS cache: This fix will flush the DNS by running
the following command: Ipconfig /FlushDns.
![]() Reset the hosts file and DNS: This fix will flush the dns and
reset the hosts file. Use it if your computer denies to access some
trustful domains like antivirus or Microsoft websites. This fix is
also available from a UVK script with the
<ResetHostsAndDns> command.
Reset the hosts file and DNS: This fix will flush the dns and
reset the hosts file. Use it if your computer denies to access some
trustful domains like antivirus or Microsoft websites. This fix is
also available from a UVK script with the
<ResetHostsAndDns> command.
![]() Reset IP, Winsock and proxy: Use this fix if your internet
connection doesn't work properly, due to malware damages, or other
reason. Remember this fix is a reset to defaults. All the current
IP, Winsock and proxy settings will be reset to their defaults. This
fix is also available from a UVK script with the
<ResetIPWinsockProxy> command.
Reset IP, Winsock and proxy: Use this fix if your internet
connection doesn't work properly, due to malware damages, or other
reason. Remember this fix is a reset to defaults. All the current
IP, Winsock and proxy settings will be reset to their defaults. This
fix is also available from a UVK script with the
<ResetIPWinsockProxy> command.
![]() Reset the group policies: Reset the local group policies to their
defaults in gpedit.msc and the registry. This fix is also available
from a UVK script with the
<ResetGroupPolicy> command.
Reset the group policies: Reset the local group policies to their
defaults in gpedit.msc and the registry. This fix is also available
from a UVK script with the
<ResetGroupPolicy> command.
![]() Reset and fix the Windows firewall: Use this fix if
the Windows firewall has been disabled or corrupted by malware
and you can't enable or repair it manually. Remember this fix
is a reset to defaults. All custom firewall settings will be
reset. This fix is also available from a UVK script with the
<FixWindowsFirewall> command.
Reset and fix the Windows firewall: Use this fix if
the Windows firewall has been disabled or corrupted by malware
and you can't enable or repair it manually. Remember this fix
is a reset to defaults. All custom firewall settings will be
reset. This fix is also available from a UVK script with the
<FixWindowsFirewall> command.
![]() Reset registry and file permissions:Use this fix if you're
getting access denied errors. It will ensure the System and
Administrators groups can access the registry and the system
folders. This fix is also available from a UVK script with the
<ResetSecuritySettings> command.
Reset registry and file permissions:Use this fix if you're
getting access denied errors. It will ensure the System and
Administrators groups can access the registry and the system
folders. This fix is also available from a UVK script with the
<ResetSecuritySettings> command.
![]() Reset user default settings: This fix will reset the
user registry settings as if a new user had been created.
However, no registry entries will be deleted. The values will
be copied from the default user's hive. The reset operation
will be performed on the next reboot, and can be canceled by
deleting the respective "RunOnce" autorun entry.
Reset user default settings: This fix will reset the
user registry settings as if a new user had been created.
However, no registry entries will be deleted. The values will
be copied from the default user's hive. The reset operation
will be performed on the next reboot, and can be canceled by
deleting the respective "RunOnce" autorun entry.
![]() Reset user shell folders: This fix will reset the registry
entries for the User Shell Folders key: HKCU\Software\Microsoft\Windows\CurrentVersion\Explorer\User
Shell Folders. It's also available from a UVK script with the
<ResetUserShellFolders> command.
Reset user shell folders: This fix will reset the registry
entries for the User Shell Folders key: HKCU\Software\Microsoft\Windows\CurrentVersion\Explorer\User
Shell Folders. It's also available from a UVK script with the
<ResetUserShellFolders> command.
![]() Reset NumLock ON at logon: This fix will set the NumLock
state ON at Winlogon for all users. This fix is also
available from a UVK script with the
<ResetNumLockOn> command.
Reset NumLock ON at logon: This fix will set the NumLock
state ON at Winlogon for all users. This fix is also
available from a UVK script with the
<ResetNumLockOn> command.
![]() Reset print spooler data: This fix will clear and reset the
print spooler queue. Any pending documents in the printer queue will
be deleted. This fix is also available from a UVK script with the
<ResetPrintSpool> command.
Reset print spooler data: This fix will clear and reset the
print spooler queue. Any pending documents in the printer queue will
be deleted. This fix is also available from a UVK script with the
<ResetPrintSpool> command.
![]() Reset CD burning queue: This fix will reset the CD/DVD
burning queue. Any files pendind to be burned to CD or DVD will no
longer be burned. Please ensure no CD/DVD is currently being burned
before running this fix. This fix is also available from a UVK
script with the <ResetCDBurnQueue> command.
Reset CD burning queue: This fix will reset the CD/DVD
burning queue. Any files pendind to be burned to CD or DVD will no
longer be burned. Please ensure no CD/DVD is currently being burned
before running this fix. This fix is also available from a UVK
script with the <ResetCDBurnQueue> command.
![]() Reset WLAN profiles and settings: This fix will reset
everything related to WIFI, including saved profiles and passwords.
Use this fix only if you're having WIFI issues. This fix is also available from a UVK
script with the <ResetWLAN> command.
Reset WLAN profiles and settings: This fix will reset
everything related to WIFI, including saved profiles and passwords.
Use this fix only if you're having WIFI issues. This fix is also available from a UVK
script with the <ResetWLAN> command.
![]() Reset Get Windows 10 notifications: This fix, only available on Windows 7, 8 and 8.1,
will remove all Windows 10 upgrade notifications, including the tray icon and the
corresponding Windows update notification. This fix is also available from a UVK
script with the <ResetGWX> command.
Reset Get Windows 10 notifications: This fix, only available on Windows 7, 8 and 8.1,
will remove all Windows 10 upgrade notifications, including the tray icon and the
corresponding Windows update notification. This fix is also available from a UVK
script with the <ResetGWX> command.
![]() Unpin all Start Menu tiles: This fix, only available on
Windows 8 and above, will remove all the tiles from the Start Menu.
New tiles can be added manually, afterwards. This fix is also available from a UVK
script with the
<UnpinAllStartTiles> command.
Unpin all Start Menu tiles: This fix, only available on
Windows 8 and above, will remove all the tiles from the Start Menu.
New tiles can be added manually, afterwards. This fix is also available from a UVK
script with the
<UnpinAllStartTiles> command.
![]() Reset Windows services' start types: This fix, only available
on Windows 10, 8.1, 7, Vista and XP, will reset the start type of
the protected Win32 services. Services will only be reset if they
have been modified. This fix is also available from a UVK
script with the
<ResetServicesStartTypes> command.
Reset Windows services' start types: This fix, only available
on Windows 10, 8.1, 7, Vista and XP, will reset the start type of
the protected Win32 services. Services will only be reset if they
have been modified. This fix is also available from a UVK
script with the
<ResetServicesStartTypes> command.
![]() Reset the Windows Store: This fix, only available
on Windows 10, 8.1, and 8, resets the Windows Store without changing
account settings or deleting installed apps. This fix is also available from a UVK
script with the
<ResetWindowsStore> command.
Reset the Windows Store: This fix, only available
on Windows 10, 8.1, and 8, resets the Windows Store without changing
account settings or deleting installed apps. This fix is also available from a UVK
script with the
<ResetWindowsStore> command.
![]() Reset and fix the file associations: This fix resets the
custom file associations for the current user account and fixes the
registry permissions for file associations.This should also make
Windows stop resetting your file associations.
Reset and fix the file associations: This fix resets the
custom file associations for the current user account and fixes the
registry permissions for file associations.This should also make
Windows stop resetting your file associations.
Fixes for common Windows problems:
![]() Fix the WMI and the System restore:
Sometimes the WMI (Windows management instrumentation) is corrupted,
which also prevents the system restore from working. This fix will
repair both the WMI core and the system restore service. It's also
available from a UVK script with the
<FixWMIAndSR> command.
Fix the WMI and the System restore:
Sometimes the WMI (Windows management instrumentation) is corrupted,
which also prevents the system restore from working. This fix will
repair both the WMI core and the system restore service. It's also
available from a UVK script with the
<FixWMIAndSR> command.
![]() Fix IE and the Windows shell:
This fix will repair possible Windows shell hijacks and register the
files needed for the Windows shell to work properly. It's also
available from a UVK script with the
<FixIEAndWindowsShell> command.
Fix IE and the Windows shell:
This fix will repair possible Windows shell hijacks and register the
files needed for the Windows shell to work properly. It's also
available from a UVK script with the
<FixIEAndWindowsShell> command.
![]() Fix install problems will repair common installation issues. It
fixes the appdata environment variable, restarts and reinstalls the
Windows installer service, repairs and empties the temporary
folders. This fix is also available from a UVK script with the
<FixInstallProblems> command.
Fix install problems will repair common installation issues. It
fixes the appdata environment variable, restarts and reinstalls the
Windows installer service, repairs and empties the temporary
folders. This fix is also available from a UVK script with the
<FixInstallProblems> command.
![]() Run MS Install/Uninstall troubleshooter will download and
run the Microsoft troubleshooter for program install/uninstall
issues. This fix is also available from a UVK script with the
<RunInstallUninstallFix>
command.
Run MS Install/Uninstall troubleshooter will download and
run the Microsoft troubleshooter for program install/uninstall
issues. This fix is also available from a UVK script with the
<RunInstallUninstallFix>
command.
![]() Fix Windows sidebar: Use this fix if your sidebar gadgets aren't
working or displaying properly. This fix will be ignored if the
windows sidebar is not installed on the machine. This fix is also
available from a UVK script with the
<FixWindowsSidebar> command.
Fix Windows sidebar: Use this fix if your sidebar gadgets aren't
working or displaying properly. This fix will be ignored if the
windows sidebar is not installed on the machine. This fix is also
available from a UVK script with the
<FixWindowsSidebar> command.
![]() Fix desktop icons and context menu: A new fix to fight modern
malware effects. It enables the desktop itself, the icons displaying
and the context menu. This fix is also available from a UVK script
with the <FixUserDesktop> command.
Fix desktop icons and context menu: A new fix to fight modern
malware effects. It enables the desktop itself, the icons displaying
and the context menu. This fix is also available from a UVK script
with the <FixUserDesktop> command.
![]() Fix and enable Windows update: This fix can be very useful if
the Windows Updates have been disabled by malware.
It enables and restarts the wauserv service,
registers the necessary dll's for this service and enables the Windows
updates. You'll also be prompted to delete Windows Update history
and temporary files. If you click No, these actions won't be
executed. This fix is also available from a UVK script with the
<FixWindowsUpdate> command.
Fix and enable Windows update: This fix can be very useful if
the Windows Updates have been disabled by malware.
It enables and restarts the wauserv service,
registers the necessary dll's for this service and enables the Windows
updates. You'll also be prompted to delete Windows Update history
and temporary files. If you click No, these actions won't be
executed. This fix is also available from a UVK script with the
<FixWindowsUpdate> command.
![]() Fix shortcuts, urls and protocols: Use this fix if your
desktop or internet shortcuts don't work, or if the programs don't
open your browser when you click on the links. This fix is also
available from a UVK script with the
<FixShortcutsUrlsProtocols> command.
Fix shortcuts, urls and protocols: Use this fix if your
desktop or internet shortcuts don't work, or if the programs don't
open your browser when you click on the links. This fix is also
available from a UVK script with the
<FixShortcutsUrlsProtocols> command.
![]() Fix the EventSystem service: Use this fix if you can no
longer login to your account, or when you log in, the system account
is used instead of yours. Note: This fix is not available on Windows
Xp. This fix is also available from a UVK script with the
<FixEventSystemService> command.
Fix the EventSystem service: Use this fix if you can no
longer login to your account, or when you log in, the system account
is used instead of yours. Note: This fix is not available on Windows
Xp. This fix is also available from a UVK script with the
<FixEventSystemService> command.
![]() Fix the SubSystems key:
Some malware hijack the HKLM\SYSTEM\CurrentControlSet\Control\Session
Manager\SubSystems registry key. This fix will repair it. It's
also available from a UVK script with the
<FixSubSystemsKey>. command
Fix the SubSystems key:
Some malware hijack the HKLM\SYSTEM\CurrentControlSet\Control\Session
Manager\SubSystems registry key. This fix will repair it. It's
also available from a UVK script with the
<FixSubSystemsKey>. command
![]() Fix local group access: Sometimes service and netowrk errors
occur because Network service and Local service
are not members of the administrators group. This fix will solve
those issues. It's also available from a UVK script with the
<FixGroupAccess> command.
Fix local group access: Sometimes service and netowrk errors
occur because Network service and Local service
are not members of the administrators group. This fix will solve
those issues. It's also available from a UVK script with the
<FixGroupAccess> command.
![]() Fix missing tray icons: Only for Windows XP. This fix will
apply several tweaks in order to restore the tray icons if they are missing.
Fix missing tray icons: Only for Windows XP. This fix will
apply several tweaks in order to restore the tray icons if they are missing.
![]() Fix executable file associations: This fix will repair the
following file extensions:
Fix executable file associations: This fix will repair the
following file extensions:
EXE, COM, MSI, REG, BAT, CMD and VBS.
Note:
The file associations must not have been locked in the IT/Geek
tools section, or the fix will fail.
This fix is also
available from a UVK script with the
<FileExtension> | All command.
![]() Fix Internet Explorer 10 history: Some cleanup programs
delete the IE's History folder, which, for Internet Explorer 10 or
higher, makes it stop working. This fix will repair that. It's also
available from a UVK script with the
<FixIE10History> command.
Fix Internet Explorer 10 history: Some cleanup programs
delete the IE's History folder, which, for Internet Explorer 10 or
higher, makes it stop working. This fix will repair that. It's also
available from a UVK script with the
<FixIE10History> command.
![]() Fix Apps not responding too soon: This fix will increase the
time windows waits before marking the applications as "Not
responding". Useful for slow systems. You will need to log off and
on for the changes to take effect. Also available from a UVK script
with the <FixAppsNotResponding> command.
Fix Apps not responding too soon: This fix will increase the
time windows waits before marking the applications as "Not
responding". Useful for slow systems. You will need to log off and
on for the changes to take effect. Also available from a UVK script
with the <FixAppsNotResponding> command.
![]() Fix browser shortcuts: Some adware programs modify the
browsers' desktop and start menu shortcuts, making the browsers open
specific pages when launched from those shortcuts. This fix will
repair the IE, Chrome, Firefox and Opera shortcuts for all users.
It's also available from a UVK script with the
<FixBrowserShortcuts> command.
Fix browser shortcuts: Some adware programs modify the
browsers' desktop and start menu shortcuts, making the browsers open
specific pages when launched from those shortcuts. This fix will
repair the IE, Chrome, Firefox and Opera shortcuts for all users.
It's also available from a UVK script with the
<FixBrowserShortcuts> command.
![]() Fix the Windows store and Metro apps: This fix re-registers
and repairs the Windows store apps.
Fix the Windows store and Metro apps: This fix re-registers
and repairs the Windows store apps.
This fix may solve other issues not related to the
Windows store itself, such as Windows updates or Metro apps not
working. It's also available from a UVK script with the
<FixWinStoreApps> command.
![]() Fix corrupted user profiles: This fix will try to
detect and repair corrupted user profiles, and fix system errors
such as"The User Profile Service failed the logon" an "User profile
cannot be loaded". Also available from a UVK script with the
<FixUserProfiles> command.
Fix corrupted user profiles: This fix will try to
detect and repair corrupted user profiles, and fix system errors
such as"The User Profile Service failed the logon" an "User profile
cannot be loaded". Also available from a UVK script with the
<FixUserProfiles> command.
![]() Fix Task scheduler errors: This fix will try to repair Task
scheduler related errors, such as when it says "The selected task
"{0}" no longer exists". NOTE: This fix is not available on Windows
XP. Also available from a UVK script with the
<FixTaskScheduler> command.
Fix Task scheduler errors: This fix will try to repair Task
scheduler related errors, such as when it says "The selected task
"{0}" no longer exists". NOTE: This fix is not available on Windows
XP. Also available from a UVK script with the
<FixTaskScheduler> command.
![]() Fix Wifi takes long to connect: Sometimes, after booting up, Windows
may take long to automatically connect to a saved Wifi network. This
fix repairs that issue. Also available from a UVK script with the
<FixWifiLongWait> command.
Fix Wifi takes long to connect: Sometimes, after booting up, Windows
may take long to automatically connect to a saved Wifi network. This
fix repairs that issue. Also available from a UVK script with the
<FixWifiLongWait> command.
![]() Fix this PC not visible in the network: This fix configures
and starts a few Windows services that are required for a computer
to be visible in the network. NOTE: This fix does not enable network
discovery or file sharing. Also available from a UVK script with the
<FixPcNotShownInNetwork> command.
Fix this PC not visible in the network: This fix configures
and starts a few Windows services that are required for a computer
to be visible in the network. NOTE: This fix does not enable network
discovery or file sharing. Also available from a UVK script with the
<FixPcNotShownInNetwork> command.
![]() Fix Google Chrome black window: Sometimes when Chrome is
launched it displays a non working, entirely black window. This fix
repairs that issue. Also available from a UVK script with the
<FixChromeBlackWindow> command.
Fix Google Chrome black window: Sometimes when Chrome is
launched it displays a non working, entirely black window. This fix
repairs that issue. Also available from a UVK script with the
<FixChromeBlackWindow> command.
File system related actions:
![]() Check the system drive on reboot: This fix will schedule the
system drive to be checked on next reboot. It's also available from
a UVK script with the
<ScheduleChkDskOnReboot> command.
Check the system drive on reboot: This fix will schedule the
system drive to be checked on next reboot. It's also available from
a UVK script with the
<ScheduleChkDskOnReboot> command.
![]() Cancel Chkdsk on reboot:
If Chkdsk is scheduled to check the system drive on reboot or the
dirty bit has been set, this fix will cancel it. Also available from
a UVK script with the
<CancelChkDskOnReboot> command.
Cancel Chkdsk on reboot:
If Chkdsk is scheduled to check the system drive on reboot or the
dirty bit has been set, this fix will cancel it. Also available from
a UVK script with the
<CancelChkDskOnReboot> command.
![]() Unhide user files and folders: Some malware hides the user's
files and folders, UVK will make them visible again. UVK will avoid
unhidding files and folders that should be kept hidden, like the
AppData, Recent, or the Start menu folders, and the desktop.ini,
thumbs.db, index.dat or user.dat* files, etc. This fix is also
available from a UVK script with the
<UnhideUserFiles> or
<UnhideDir>%UserProfile% command.
Unhide user files and folders: Some malware hides the user's
files and folders, UVK will make them visible again. UVK will avoid
unhidding files and folders that should be kept hidden, like the
AppData, Recent, or the Start menu folders, and the desktop.ini,
thumbs.db, index.dat or user.dat* files, etc. This fix is also
available from a UVK script with the
<UnhideUserFiles> or
<UnhideDir>%UserProfile% command.
![]() Unhide C: This fix will unhide all non system files and
folders in the system partition. Also availabe from a UVK script
with the
<UnhideDir>
command.
Unhide C: This fix will unhide all non system files and
folders in the system partition. Also availabe from a UVK script
with the
<UnhideDir>
command.
![]() Unhide all fixed drives: This fix will unhide all non system
files and folders in all the fixed drives. Also availabe from a UVK
script with the
<UnhideDir>All drives
command.
Unhide all fixed drives: This fix will unhide all non system
files and folders in all the fixed drives. Also availabe from a UVK
script with the
<UnhideDir>All drives
command.
![]() Rebuild icon cache: Use this fix if the Windows explorer
doesn't display the icons correctly. This fix is also available from
a UVK script with the
<RebuildIconCache>
command.
Rebuild icon cache: Use this fix if the Windows explorer
doesn't display the icons correctly. This fix is also available from
a UVK script with the
<RebuildIconCache>
command.
Essential installs/updates:
![]() Install/Update Chrome: This fix updates the popular Google
Chrome Internet browser. The installer will only be downloaded and
executed if the application is not up to date. This fix is
also available from a UVK script with the <UpdateChrome>
command.
Install/Update Chrome: This fix updates the popular Google
Chrome Internet browser. The installer will only be downloaded and
executed if the application is not up to date. This fix is
also available from a UVK script with the <UpdateChrome>
command.
![]() Install/Update Firefox: This fix updates the popular Mozilla
Firefox Internet browser. The installer will only be downloaded and
executed if the application is not up to date. This fix is
also available from a UVK script with the <UpdateFirefox>
command.
Install/Update Firefox: This fix updates the popular Mozilla
Firefox Internet browser. The installer will only be downloaded and
executed if the application is not up to date. This fix is
also available from a UVK script with the <UpdateFirefox>
command.
![]() Install/Update 7-Zip: This fix updates the popular Z-Zip file
compressorand manager. The installer will only be downloaded and
executed if the application is not up to date. This fix is
also available from a UVK script with the <Update7Zip>
command.
Install/Update 7-Zip: This fix updates the popular Z-Zip file
compressorand manager. The installer will only be downloaded and
executed if the application is not up to date. This fix is
also available from a UVK script with the <Update7Zip>
command.
![]() Install/Update K-Lite Codec Pack: This fix installs/updates
the K-Lite Codec Pack Basic. The installer will only be downloaded
and executed if the application is not up to date. This fix is
also available from a UVK script with the <UpdateKLiteCodeckPack>
command.
Install/Update K-Lite Codec Pack: This fix installs/updates
the K-Lite Codec Pack Basic. The installer will only be downloaded
and executed if the application is not up to date. This fix is
also available from a UVK script with the <UpdateKLiteCodeckPack>
command.
![]() Install/Update the DirectX:
This fix will update the
DirectX in unattended mode. This fix is also available from a
UVK script with the
<UpdateDirectX>
command.
Install/Update the DirectX:
This fix will update the
DirectX in unattended mode. This fix is also available from a
UVK script with the
<UpdateDirectX>
command.
![]() Install/Update Java: This fix will install or update (if already
installed) the Flash player plugin and activeX in unattended mode.
This fix is also available from a UVK script with the
<UpdateJava>
command.
Install/Update Java: This fix will install or update (if already
installed) the Flash player plugin and activeX in unattended mode.
This fix is also available from a UVK script with the
<UpdateJava>
command.
![]() Install/Update Flash: This fix will install or update (if
already installed) the Flash player plugin for Firefox and Chrome
(if installed) and the flash activeX for IE in unattended
mode. This fix is also available from a UVK script with the
<UpdateFlash>
command.
Install/Update Flash: This fix will install or update (if
already installed) the Flash player plugin for Firefox and Chrome
(if installed) and the flash activeX for IE in unattended
mode. This fix is also available from a UVK script with the
<UpdateFlash>
command.
![]() Install/Update Shockwave player: This fix will install or
update the Adobe shockwave player. The process is totally automated,
even if "Use unattended mode" is unchecked. This fix is also available from a UVK script with the
<UpdateShockwave>
command.
Install/Update Shockwave player: This fix will install or
update the Adobe shockwave player. The process is totally automated,
even if "Use unattended mode" is unchecked. This fix is also available from a UVK script with the
<UpdateShockwave>
command.
![]() Install .Net Framework: This fix will update the .Net
Framework in unattended mode. This fix is also available from a UVK
script with the
<InstallNetFramework>
command.
Install .Net Framework: This fix will update the .Net
Framework in unattended mode. This fix is also available from a UVK
script with the
<InstallNetFramework>
command.
![]() Install/Update Visual C++ runtime: This fix will install the
following Visual C++ redistributable packages: VC++ 2005 SP1, VC++
2008 SP1, VC++ 2010 SP1, VC++ 2012, VC++ 2013 and VC++ 2015. The process is totally
automated. This fix is also available from a UVK script with the
<InstallVC++>
command.
Install/Update Visual C++ runtime: This fix will install the
following Visual C++ redistributable packages: VC++ 2005 SP1, VC++
2008 SP1, VC++ 2010 SP1, VC++ 2012, VC++ 2013 and VC++ 2015. The process is totally
automated. This fix is also available from a UVK script with the
<InstallVC++>
command.
![]() Install Windows Fixit Center: This fix will install the
Windows Fixit Center in unattended mode and then run the
application.
Install Windows Fixit Center: This fix will install the
Windows Fixit Center in unattended mode and then run the
application.
![]() Install Desktop gadgets on Win 8: This fix only works for
Windows 8. It will download the 8GadgetPack from
addgadgets.com and silently
install it. This fix is also available from a UVK script with the
<InstallWin8Gadgets> command.
Install Desktop gadgets on Win 8: This fix only works for
Windows 8. It will download the 8GadgetPack from
addgadgets.com and silently
install it. This fix is also available from a UVK script with the
<InstallWin8Gadgets> command.
![]() Install the System Update Readiness Tool: This fix only works for Windows Vista and 7.
It will download and run the System Update Readiness Tool in unattended mode.
This fix is also available from a UVK script with the
<InstallSURT> command.
Install the System Update Readiness Tool: This fix only works for Windows Vista and 7.
It will download and run the System Update Readiness Tool in unattended mode.
This fix is also available from a UVK script with the
<InstallSURT> command.
Privacy cleanup:
![]() Clear Quick Access and Jump Lists: This fix deletes the
computer and Internet Explorer browsing history for the current user. This fix is also available from a UVK script with the
<CleanupRecentList>
command.
Clear Quick Access and Jump Lists: This fix deletes the
computer and Internet Explorer browsing history for the current user. This fix is also available from a UVK script with the
<CleanupRecentList>
command.
![]() Clear computer and IE history: This fix will empty the
temporary folders and the recycle bin for all users. This fix is
also available from a UVK script with the
<ClearIEHistory> command.
Clear computer and IE history: This fix will empty the
temporary folders and the recycle bin for all users. This fix is
also available from a UVK script with the
<ClearIEHistory> command.
![]() Clear MS Edge history: This fix deletes the browsing history
for all MS Edge profiles in the current user's application data
folder. Note: If MS Edge is syncing the browsing history, this fix
may not have any effect. This fix is
also available from a UVK script with the <ClearEdgeHistory> command.
Clear MS Edge history: This fix deletes the browsing history
for all MS Edge profiles in the current user's application data
folder. Note: If MS Edge is syncing the browsing history, this fix
may not have any effect. This fix is
also available from a UVK script with the <ClearEdgeHistory> command.
![]() Clear Chrome history: This fix deletes the browsing history
for all Chrome profiles in the current user's application data
folder. Note: If MS Edge is syncing the browsing history, this fix
may not have any effect. This fix is
also available from a UVK script with the <ClearChromeHistory> command.
Clear Chrome history: This fix deletes the browsing history
for all Chrome profiles in the current user's application data
folder. Note: If MS Edge is syncing the browsing history, this fix
may not have any effect. This fix is
also available from a UVK script with the <ClearChromeHistory> command.
![]() Clear Firefox history: This fix deletes the browsing history
for all Firefox profiles in the current user's application data
folder. Note: If Firefox is syncing the browsing history, this fix
may not have any effect. This fix is
also available from a UVK script with the <ClearFirefoxHistory> command.
Clear Firefox history: This fix deletes the browsing history
for all Firefox profiles in the current user's application data
folder. Note: If Firefox is syncing the browsing history, this fix
may not have any effect. This fix is
also available from a UVK script with the <ClearFirefoxHistory> command.
![]() Clear all browsers history: This fix deletes the browsing
history for IE, MS Edge, Chrome and Firefox, and only for the
current user's application data folder. Note: For browsers syncing
the history this fix may not have any effect. This fix is
also available from a UVK script with the
<ClearAllBrowsersHistory> command.
Clear all browsers history: This fix deletes the browsing
history for IE, MS Edge, Chrome and Firefox, and only for the
current user's application data folder. Note: For browsers syncing
the history this fix may not have any effect. This fix is
also available from a UVK script with the
<ClearAllBrowsersHistory> command.
![]() Clear all browsers history (all users):
Clear all browsers history (all users):
This fix deletes
the browsing history for IE, MS Edge, Chrome and Firefox, and for
all user accounts in this computer. Note: For browsers syncing the
browsing history this fix may not have any effect. This fix is
also available from a UVK script with the
<ClearAllBrowsersHistory>AllUsers command.
![]() Delete all browsers cookies: This fix deletes the cookies for
all installed internet browsers. Supported browsers are: IE,
Firefox, Chrome, Opera and Safari. This fix is
also available from a UVK script with the
<DeleteBrowsersCookies> command.
Delete all browsers cookies: This fix deletes the cookies for
all installed internet browsers. Supported browsers are: IE,
Firefox, Chrome, Opera and Safari. This fix is
also available from a UVK script with the
<DeleteBrowsersCookies> command.
![]() Delete browsers cookies (all users): This fix deletes the
cookies for all installed internet browsers, and for all users in
this system. This fix is
also available from a UVK script with the
<DeleteBrowsersCookies>-AllUsers command.
Delete browsers cookies (all users): This fix deletes the
cookies for all installed internet browsers, and for all users in
this system. This fix is
also available from a UVK script with the
<DeleteBrowsersCookies>-AllUsers command.
![]() Clear Windows event logs: This fix will reset the windows
event logs. Use it if the event logs have become too big to be
easily analyzed. This fix is also available from a UVK script with
the <ClearEventLogs>
command.
Clear Windows event logs: This fix will reset the windows
event logs. Use it if the event logs have become too big to be
easily analyzed. This fix is also available from a UVK script with
the <ClearEventLogs>
command.
![]() Clear Error report folders: With time, Windows can
accumulate thousands of useless error reports. This fix will remove
them all, to recover HDD space.This fix is also available from a UVK
script with the <ClearErrorReports>
command.
Clear Error report folders: With time, Windows can
accumulate thousands of useless error reports. This fix will remove
them all, to recover HDD space.This fix is also available from a UVK
script with the <ClearErrorReports>
command.
![]() Clear the shell cache: The Windows shell saves folder
view, position and size in a registry database. This fix will clear
that database, which improves the response of the shell, but it will
forget any previously saved folder view, position and size.
This fix is also available from a UVK script with the
<ClearShellCache>
command.
Clear the shell cache: The Windows shell saves folder
view, position and size in a registry database. This fix will clear
that database, which improves the response of the shell, but it will
forget any previously saved folder view, position and size.
This fix is also available from a UVK script with the
<ClearShellCache>
command.
![]() Clear the shell MuiCache: If the Shell's list of most
recently used programs becomes too long, it may slow down the
Windows file explorer. This fix will clear that list for the current
user. This fix is also available from a UVK script with the
<CleanupMUICache>
command.
Clear the shell MuiCache: If the Shell's list of most
recently used programs becomes too long, it may slow down the
Windows file explorer. This fix will clear that list for the current
user. This fix is also available from a UVK script with the
<CleanupMUICache>
command.
Maintenance actions:
![]() Free storage space GUI: This fix is intended to be used only
if the system volume is short in free space. Displays a dialog box
that lets ou select and remove file system items that usually take
large amounts of storage space. This fix is
also available from a UVK script with the <FreeStorageSpaceGUI> command.
Free storage space GUI: This fix is intended to be used only
if the system volume is short in free space. Displays a dialog box
that lets ou select and remove file system items that usually take
large amounts of storage space. This fix is
also available from a UVK script with the <FreeStorageSpaceGUI> command.
![]() Empty all users temp folders: This fix will empty the
temporary folders and the recycle bin for all users. This fix is
also available from a UVK script with the
<CleanAllUsersTemp> command.
Empty all users temp folders: This fix will empty the
temporary folders and the recycle bin for all users. This fix is
also available from a UVK script with the
<CleanAllUsersTemp> command.
![]() Empty temporary folders: This fix will empty all users and system
temporary folders. The recycle bin will not be emptied. Locked files
will be deleted on reboot. If you also want to empty the recycle
bin, use "Empty all users temp folders" instead. This fix is
also available from a UVK script with the
<EmptyTempFolders> command.
Empty temporary folders: This fix will empty all users and system
temporary folders. The recycle bin will not be emptied. Locked files
will be deleted on reboot. If you also want to empty the recycle
bin, use "Empty all users temp folders" instead. This fix is
also available from a UVK script with the
<EmptyTempFolders> command.
![]() Empty all browsers cache will cleanup the cache for all
installed internet browsers. This will be done only for the current
user's folders. Supported browsers are: Internet Explorer, Mozilla
Firefox, Google Chrome, Opera and Safari. This fix is also available
from a UVK script with the
<EmptyBrowsersCache> command.
Empty all browsers cache will cleanup the cache for all
installed internet browsers. This will be done only for the current
user's folders. Supported browsers are: Internet Explorer, Mozilla
Firefox, Google Chrome, Opera and Safari. This fix is also available
from a UVK script with the
<EmptyBrowsersCache> command.
![]() Empty browsers cache (all users): This fix will empty the
cache for all installed internet browsers, and for all users in the
system. This fix is also available from a UVK script with the
<EmptyBrowsersCache>
-AllUsers command.
Empty browsers cache (all users): This fix will empty the
cache for all installed internet browsers, and for all users in the
system. This fix is also available from a UVK script with the
<EmptyBrowsersCache>
-AllUsers command.
![]() Clear Internet Explorer's history: This fix will clear the
Internet Explorer's history for the current user. The IE's cookies
and cache will not be affected. This fix is also available from a
UVK script with the <ClearIEHistory>
command.
Clear Internet Explorer's history: This fix will clear the
Internet Explorer's history for the current user. The IE's cookies
and cache will not be affected. This fix is also available from a
UVK script with the <ClearIEHistory>
command.
![]() Clear empty appdata sub directories: Some programs leave
orphan empty appdata sub-directories behind, which can accumulate
over time. This fix will remove those folders.
This fix is also available from a UVK script with the
<CleanupAppData>
command.
Clear empty appdata sub directories: Some programs leave
orphan empty appdata sub-directories behind, which can accumulate
over time. This fix will remove those folders.
This fix is also available from a UVK script with the
<CleanupAppData>
command.
![]() Cleanup MSI orphan files: When installing/uninstalling
programs results in errors, orphan files are left over in the
Windows installer folder, which may, over time, use a large ammount
of HDD space. This fix will safely remove those orphan files. This fix is also available from a UVK
script with the
<CleanMSIOrphanFiles>
command.
Cleanup MSI orphan files: When installing/uninstalling
programs results in errors, orphan files are left over in the
Windows installer folder, which may, over time, use a large ammount
of HDD space. This fix will safely remove those orphan files. This fix is also available from a UVK
script with the
<CleanMSIOrphanFiles>
command.
![]() Cleanup Windows Installer unused files: This fix will
free hard disk space by removing unneeded files from the Windows
installer folder, which may, over time, use a large ammount of HDD
space. This fix is also available from a UVK
script with the
<CleanMSIUnusedFiles>
command.
Cleanup Windows Installer unused files: This fix will
free hard disk space by removing unneeded files from the Windows
installer folder, which may, over time, use a large ammount of HDD
space. This fix is also available from a UVK
script with the
<CleanMSIUnusedFiles>
command.
![]() Uninstall programs: This fix will launch a separate instance
of the Smart Uninstaller, in case you want to uninstall some
unwanted programs during the repair operation. This action is also
available from a UVK script with the
<SmartUninstaller>
command.
Uninstall programs: This fix will launch a separate instance
of the Smart Uninstaller, in case you want to uninstall some
unwanted programs during the repair operation. This action is also
available from a UVK script with the
<SmartUninstaller>
command.
![]() Cleanup the registry: This fix will cleanup the registry the
same way the System booster
does. All areas will be scanned, except the Junk files and
the System restore points. Invalid items are automatically
removed.
Cleanup the registry: This fix will cleanup the registry the
same way the System booster
does. All areas will be scanned, except the Junk files and
the System restore points. Invalid items are automatically
removed.
Note: This fix is only available to registered
users. This fix is also available from a UVK script with the
<CleanupRegistry> command.
![]() Cleanup junk files: This fix will cleanup the junk files the
same way the System booster
does. Junk files found are automatically removed.
Cleanup junk files: This fix will cleanup the junk files the
same way the System booster
does. Junk files found are automatically removed.
Note: This
fix is only available to registered users. This fix is also
available from a UVK script with the
<CleanupJunkFiles> command.
![]() Cleanup notification area cache: This fix will cleanup the tray icon cache for all users.
NOTE: The Windows Explorer process will be restarted. This fix is
also available from a UVK script with the
<CleanupTrayIconCache> command.
Cleanup notification area cache: This fix will cleanup the tray icon cache for all users.
NOTE: The Windows Explorer process will be restarted. This fix is
also available from a UVK script with the
<CleanupTrayIconCache> command.
![]() Run full disk cleanup: This fix will run the Windows
disk cleanup utility and scan the system drive. On Windows vista and
higher, Windows update and Service pack files will be automatically
scanned. This fix is also available from a UVK
script with the <RunFullDiskCleanup>
command.
Run full disk cleanup: This fix will run the Windows
disk cleanup utility and scan the system drive. On Windows vista and
higher, Windows update and Service pack files will be automatically
scanned. This fix is also available from a UVK
script with the <RunFullDiskCleanup>
command.
![]() Unattended disk cleanup: This fix will run the Windows
disk cleanup utility, scan the system drive and automatically free
disk space. No user interaction will be needed. This fix is also available from a UVK
script with the <AutoDiskCleanup>
command.
Unattended disk cleanup: This fix will run the Windows
disk cleanup utility, scan the system drive and automatically free
disk space. No user interaction will be needed. This fix is also available from a UVK
script with the <AutoDiskCleanup>
command.
![]() Run Memory diagnostics on reboot: This fix will schedule
memdiag to perform the memory diagnostics on the next system boot. This fix is also available from a UVK
script with the <RunMemDiagOnReboot>
command.
Run Memory diagnostics on reboot: This fix will schedule
memdiag to perform the memory diagnostics on the next system boot. This fix is also available from a UVK
script with the <RunMemDiagOnReboot>
command.
![]() Cancel Memory diagnostics on reboot: If memdiag has been
scheduled to perform the memory diagnostics on the next boot, this
fix will cancel it. This fix is also available from a UVK
script with the <CancelMemDiag>
command.
Cancel Memory diagnostics on reboot: If memdiag has been
scheduled to perform the memory diagnostics on the next boot, this
fix will cancel it. This fix is also available from a UVK
script with the <CancelMemDiag>
command.
![]() Prevent resetting default apps: Windows 10 is known for
periodically resetting the default apps. This will fix that issue by
preventing some built-in apps such as Microsoft Edge or Photos to be
set as the default apps.
Prevent resetting default apps: Windows 10 is known for
periodically resetting the default apps. This will fix that issue by
preventing some built-in apps such as Microsoft Edge or Photos to be
set as the default apps.
![]() Update Windows: This fix will search for Windows updates,
and automatically download and install the available ones. This fix is also available from a UVK
script with the <UpdateWindows>
command.
Update Windows: This fix will search for Windows updates,
and automatically download and install the available ones. This fix is also available from a UVK
script with the <UpdateWindows>
command.
![]() Update Windows using WAU Manager: This fix runs
WAU Manager which searches for
Windows updates, and automatically downloads and installs the
available ones.
Update Windows using WAU Manager: This fix runs
WAU Manager which searches for
Windows updates, and automatically downloads and installs the
available ones.
![]() Delete temporary profile folders: The late Windows Update
issue of logging users in to a temporary profile can create many
TEMP profile folders. This fix will safely remove those. This fix is
also available from a UVK script with the <DeleteTempProfiles>
command.
Delete temporary profile folders: The late Windows Update
issue of logging users in to a temporary profile can create many
TEMP profile folders. This fix will safely remove those. This fix is
also available from a UVK script with the <DeleteTempProfiles>
command.
![]() Manage Wi-Fi profiles: Wi-Fi Profiles Manager lists the
saved Wi-Fi profiles and lets you connect, disconnect, delete and
set their connection priority. This application is
also available from a UVK script with the <WiFiManager>
command.
Manage Wi-Fi profiles: Wi-Fi Profiles Manager lists the
saved Wi-Fi profiles and lets you connect, disconnect, delete and
set their connection priority. This application is
also available from a UVK script with the <WiFiManager>
command.
![]() Cleanup the systemprofile folder: This fix deletes useless
folders that often get accumulated in the System profile, such as
CrashDumps and tw-xxx.tmp. This fix will safely remove those. This fix is
also available from a UVK script with the 0 command.
Cleanup the systemprofile folder: This fix deletes useless
folders that often get accumulated in the System profile, such as
CrashDumps and tw-xxx.tmp. This fix will safely remove those. This fix is
also available from a UVK script with the 0 command.
![]() Delete Windows Update downloads: This fix empties the
%Windir%\SoftwareDistribution\Downloads folder.
Delete Windows Update downloads: This fix empties the
%Windir%\SoftwareDistribution\Downloads folder.
![]() Delete the Windows.old folder: This fix permanently
deletes any remaining %SystemDrive%\Windows.old* folders.
Delete the Windows.old folder: This fix permanently
deletes any remaining %SystemDrive%\Windows.old* folders.
System repair and optimization:
![]() Run sfc scan: This fix will run the system protected
resources scan (sfc.exe /scannow). This fix is also available from a
UVK script with the
<RunSfcScan>command.
Run sfc scan: This fix will run the system protected
resources scan (sfc.exe /scannow). This fix is also available from a
UVK script with the
<RunSfcScan>command.
![]() Register system DLLs: This fix will register all the Windows
DLLs in the System32 folder. Register all system dlls is a unique
UVK feature that can solve many problems related to the Windows
explorer, Windows update, missing services, installation problems,
runtime errors, missing windows features, system working too slow
and many other problems. This fix does not only registers DLL files,
but also OCX and CPL files. This fix is also available from a UVK
script with the
<RegisterSystemDLLs>
command.
Register system DLLs: This fix will register all the Windows
DLLs in the System32 folder. Register all system dlls is a unique
UVK feature that can solve many problems related to the Windows
explorer, Windows update, missing services, installation problems,
runtime errors, missing windows features, system working too slow
and many other problems. This fix does not only registers DLL files,
but also OCX and CPL files. This fix is also available from a UVK
script with the
<RegisterSystemDLLs>
command.
![]() Repair Windows using Dism.exe: This fix, available only for
Windows 8 and higher, and for registered users, uses the "Dism
/Online /Cleanup-Image /RestoreHealth" command to fix corrupted
files in the current Windows installation. This fix can take long to
complete, so please be patient. This fix is also available from a
UVK script with the
<DismWindowsRepair>
command.
Repair Windows using Dism.exe: This fix, available only for
Windows 8 and higher, and for registered users, uses the "Dism
/Online /Cleanup-Image /RestoreHealth" command to fix corrupted
files in the current Windows installation. This fix can take long to
complete, so please be patient. This fix is also available from a
UVK script with the
<DismWindowsRepair>
command.
![]() Clean up the WinSxS folder: This fix will free up HDD space
by removing files from previous Windows versions and service packs.
It may take long time to execute. Please note that, after that, you
will no longer be able to downgrade to those previous Windows
states. This fix is also available from a UVK script with the
<CleanupWinSxS>
command.
Clean up the WinSxS folder: This fix will free up HDD space
by removing files from previous Windows versions and service packs.
It may take long time to execute. Please note that, after that, you
will no longer be able to downgrade to those previous Windows
states. This fix is also available from a UVK script with the
<CleanupWinSxS>
command.
![]() Defragment C: This fix will defrag the system partition. It
can take from several minutes to one hour or even longer more to finish,
depending on the size of the system partition, and how fragmented it
is.
Defragment C: This fix will defrag the system partition. It
can take from several minutes to one hour or even longer more to finish,
depending on the size of the system partition, and how fragmented it
is.
![]() Defragment all drives: This fix will defrag all the fixed
hard drives. It can take long, depending on the size of the hard
drives, and
how fragmented they are.
Defragment all drives: This fix will defrag all the fixed
hard drives. It can take long, depending on the size of the hard
drives, and
how fragmented they are.
![]() Optimize boot and shutdown: This fix will add some registry
tweaks to reduce the shutdown and boot time and process the idle
tasks to reduce the boot time.
Optimize boot and shutdown: This fix will add some registry
tweaks to reduce the shutdown and boot time and process the idle
tasks to reduce the boot time.
![]() Defrag and optimize: This fix will do the same as the two last
fixes above together: Defragment all drives, and Optimize boot and
shutdown. This fix is also available from a UVK script with the
<DefragAndOptimize>
command.
Defrag and optimize: This fix will do the same as the two last
fixes above together: Defragment all drives, and Optimize boot and
shutdown. This fix is also available from a UVK script with the
<DefragAndOptimize>
command.
![]() Upgrade to / Reinstall Windows 10: This fix downloads and
runs the Windows 10 Installation Tool, which lets you perform an
in-place Windows 10 reinstall or upgrade your OS to the latest
Windows version, while keeping all your data and apps. . This fix is also available from a UVK script with the
<ReinstallWindows10>
command.
Upgrade to / Reinstall Windows 10: This fix downloads and
runs the Windows 10 Installation Tool, which lets you perform an
in-place Windows 10 reinstall or upgrade your OS to the latest
Windows version, while keeping all your data and apps. . This fix is also available from a UVK script with the
<ReinstallWindows10>
command.
![]() DISM repair GUI with all options: This fix lets you easily
run DISM with the desired command line switches. It acts as a GUI
interface for the most common DISM options, such as selecting the
desired image source and destination.
DISM repair GUI with all options: This fix lets you easily
run DISM with the desired command line switches. It acts as a GUI
interface for the most common DISM options, such as selecting the
desired image source and destination.
![]() SFC scan GUI with all options: This fix lets you easily run
the System File Checker with the desired command line switches. It
provides a guided user interface for the most common SFC options,
such as selecting the offline Windows dir and the path for the log.
SFC scan GUI with all options: This fix lets you easily run
the System File Checker with the desired command line switches. It
provides a guided user interface for the most common SFC options,
such as selecting the offline Windows dir and the path for the log.
![]() Check disk GUI with all options: This fix lets you easily run
DISM with the desired command line switches. In fact, it acts as a
GUI interface for the most common DISM options, such as selecting
the desired image source and destination.
Check disk GUI with all options: This fix lets you easily run
DISM with the desired command line switches. In fact, it acts as a
GUI interface for the most common DISM options, such as selecting
the desired image source and destination.
![]() Install/Repair the Start Menu app: This fix attempts
to reinstall the Windows Start Menu app. .Run this fix only if
you're having isues with the Start Menu.
Install/Repair the Start Menu app: This fix attempts
to reinstall the Windows Start Menu app. .Run this fix only if
you're having isues with the Start Menu.
Windows troubleshooters;
![]() Aero Effects Troubleshooter: This fix runs the Aero Effects
Troubleshooter, which troubleshoots problems displaying Aero effects
such as transparency.
Aero Effects Troubleshooter: This fix runs the Aero Effects
Troubleshooter, which troubleshoots problems displaying Aero effects
such as transparency.
![]() App Compatibility Troubleshooter: This fix runs the App
Compatibility Troubleshooter, which helps the user configure older
programs so that they can run in the current version of Windows.
App Compatibility Troubleshooter: This fix runs the App
Compatibility Troubleshooter, which helps the user configure older
programs so that they can run in the current version of Windows.
![]() Audio Playback Troubleshooter: This fix runs the Audio
Playback Troubleshooter, which troubleshoots problems playing sounds
and other audio files.
Audio Playback Troubleshooter: This fix runs the Audio
Playback Troubleshooter, which troubleshoots problems playing sounds
and other audio files.
![]() Audio Recording Troubleshooter: This fix runs the Audio
Recording Troubleshooter, which troubleshoots problems recording
audio from a microphone or other input source.
Audio Recording Troubleshooter: This fix runs the Audio
Recording Troubleshooter, which troubleshoots problems recording
audio from a microphone or other input source.
![]() Device Troubleshooter: This fix runs the Device
Troubleshooter, which troubleshoots problems using hardware and
access devices connected to the computer.
Device Troubleshooter: This fix runs the Device
Troubleshooter, which troubleshoots problems using hardware and
access devices connected to the computer.
![]() DirectAccess Troubleshooter: This fix runs the DirectAccess
Troubleshooter, which troubleshoots problems connecting to a
workplace network over the Internet using DirectAccess.
DirectAccess Troubleshooter: This fix runs the DirectAccess
Troubleshooter, which troubleshoots problems connecting to a
workplace network over the Internet using DirectAccess.
![]() File Share Troubleshooter: This fix runs the File Share
Troubleshooter, which troubleshoots problems accessing shared files
and folders on other computers over the network.
File Share Troubleshooter: This fix runs the File Share
Troubleshooter, which troubleshoots problems accessing shared files
and folders on other computers over the network.
![]() HomeGroup Troubleshooter: This fix runs the HomeGroup
Troubleshooter, which troubleshoots problems viewing computers or
shared files in a homegroup.
HomeGroup Troubleshooter: This fix runs the HomeGroup
Troubleshooter, which troubleshoots problems viewing computers or
shared files in a homegroup.
![]() IE Performance Troubleshooter: This fix runs the Internet
Explorer Performance Troubleshooter, which helps the user prevent
add-on problems and optimize temporary files and connections.
IE Performance Troubleshooter: This fix runs the Internet
Explorer Performance Troubleshooter, which helps the user prevent
add-on problems and optimize temporary files and connections.
![]() IE Security Troubleshooter: This fix runs the Internet
Explorer Security Troubleshooter, which helps the user prevent
malware, pop-up windows, and online attacks.
IE Security Troubleshooter: This fix runs the Internet
Explorer Security Troubleshooter, which helps the user prevent
malware, pop-up windows, and online attacks.
![]() Install/Uninstall Troubleshooter: This fix runs the
Install/Uninstall Troubleshooter, which helps you to fix problems
that block programs from being installed or removed.
Install/Uninstall Troubleshooter: This fix runs the
Install/Uninstall Troubleshooter, which helps you to fix problems
that block programs from being installed or removed.
![]() Internet Connection Troubleshooter: This fix runs the
Internet Connection Troubleshooter, which troubleshoots problems
connecting to the Internet or to a specific website.
Internet Connection Troubleshooter: This fix runs the
Internet Connection Troubleshooter, which troubleshoots problems
connecting to the Internet or to a specific website.
![]() Keyboard Troubleshooter: This fix runs the Keyboard
Troubleshooter, which helps you to find and fix problems with your
keyboard settings.
Keyboard Troubleshooter: This fix runs the Keyboard
Troubleshooter, which helps you to find and fix problems with your
keyboard settings.
![]() Maintenance Troubleshooter: This fix runs the Maintenance
Troubleshooter, which helps the user perform maintenance tasks.
Maintenance Troubleshooter: This fix runs the Maintenance
Troubleshooter, which helps the user perform maintenance tasks.
![]() Network Adapter Troubleshooter: This fix runs the Network
Adapter Troubleshooter, which troubleshoots problems with Ethernet,
wireless, or other network adapters.
Network Adapter Troubleshooter: This fix runs the Network
Adapter Troubleshooter, which troubleshoots problems with Ethernet,
wireless, or other network adapters.
![]() Network Inbound Troubleshooter: This fix runs the Network
Inbound Troubleshooter, which troubleshoots problems with allowing
other computers to communicate with the target computer through
Windows Firewall.
Network Inbound Troubleshooter: This fix runs the Network
Inbound Troubleshooter, which troubleshoots problems with allowing
other computers to communicate with the target computer through
Windows Firewall.
![]() Performance Troubleshooter: This fix runs the Performance
Troubleshooter, which helps the user adjust settings to improve
operating system speed and performance.
Performance Troubleshooter: This fix runs the Performance
Troubleshooter, which helps the user adjust settings to improve
operating system speed and performance.
![]() Power Troubleshooter: This fix runs the Power Troubleshooter,
which helps the user adjust power settings to improve battery life
and reduce power consumption.
Power Troubleshooter: This fix runs the Power Troubleshooter,
which helps the user adjust power settings to improve battery life
and reduce power consumption.
![]() Printer Troubleshooter: This fix runs the Printer
Troubleshooter, which troubleshoots problems printing or managing
the printer queue.
Printer Troubleshooter: This fix runs the Printer
Troubleshooter, which troubleshoots problems printing or managing
the printer queue.
![]() Show/Hide Updates Troubleshooter: This fix runs the Show/Hide
Updates Troubleshooter, which provides a user interface to hide and
show Windows updates and drivers for Windows 10, since that feature
is no longer available in the control panel.
Show/Hide Updates Troubleshooter: This fix runs the Show/Hide
Updates Troubleshooter, which provides a user interface to hide and
show Windows updates and drivers for Windows 10, since that feature
is no longer available in the control panel.
![]() Start Menu Troubleshooter: This fix runs the Start Menu
Troubleshooter, which troubleshoots problems related to the Start
Menu and Cortana.
Start Menu Troubleshooter: This fix runs the Start Menu
Troubleshooter, which troubleshoots problems related to the Start
Menu and Cortana.
![]() Windows Store Apps Troubleshooter: This fix runs the Windows
Store Apps Troubleshooter, which troubleshoots problems with apps
from the Windows Store.
Windows Store Apps Troubleshooter: This fix runs the Windows
Store Apps Troubleshooter, which troubleshoots problems with apps
from the Windows Store.
![]() Windows Update Troubleshooter: This fix runs the Windows
Update Troubleshooter, which troubleshoots problems that prevent
Windows Update from performing update tasks.
Windows Update Troubleshooter: This fix runs the Windows
Update Troubleshooter, which troubleshoots problems that prevent
Windows Update from performing update tasks.
![]() Windows Update Web Troubleshooter: This fix runs the Windows
Update Web Troubleshooter, which troubleshoots problems concerning
the Windows autoamtic updates and related services.
Windows Update Web Troubleshooter: This fix runs the Windows
Update Web Troubleshooter, which troubleshoots problems concerning
the Windows autoamtic updates and related services.
![]() WMP Settings Troubleshooter: This fix runs the Windows Media
Player Settings Troubleshooter, which helps the user reset Windows
Media Player settings to the default configuration.
WMP Settings Troubleshooter: This fix runs the Windows Media
Player Settings Troubleshooter, which helps the user reset Windows
Media Player settings to the default configuration.
![]() WMP DVD Playing Troubleshooter: This fix runs the Windows
Media Player DVD Troubleshooter, which troubleshoots problems
playing a DVD using Windows Media Player.
WMP DVD Playing Troubleshooter: This fix runs the Windows
Media Player DVD Troubleshooter, which troubleshoots problems
playing a DVD using Windows Media Player.
![]() WMP Library Troubleshooter: This fix runs the Windows Media
Player Library Troubleshooter, which troubleshoots problems with
adding media files to the Windows Media Player library.
WMP Library Troubleshooter: This fix runs the Windows Media
Player Library Troubleshooter, which troubleshoots problems with
adding media files to the Windows Media Player library.
Post repair actions:
![]() Restore desktop icon layout: This fix will restore the
position of the desktop icons, as previously saved with the
Backup desktop icon layout pre-repair acion. This fix is also available from a UVK
script with the <RestoreDesktopIcons>
command.
Restore desktop icon layout: This fix will restore the
position of the desktop icons, as previously saved with the
Backup desktop icon layout pre-repair acion. This fix is also available from a UVK
script with the <RestoreDesktopIcons>
command.
![]() Restore the standard boot menu: This fix will restore the
standard boot menu on windows 8, 8.1 and 10. Note: The F8 legacy
boot menu will be disabled. This fix is also available from a UVK
script with the
<RestoreBootMenu>
command.
Restore the standard boot menu: This fix will restore the
standard boot menu on windows 8, 8.1 and 10. Note: The F8 legacy
boot menu will be disabled. This fix is also available from a UVK
script with the
<RestoreBootMenu>
command.
![]() Launch Multiple Reboot Scheduler: This fix runs our
boot uptimizing tool (MRS), which allows you
to reboot the PC several times in sequence, with a configurable
delay time between each reboot. In the end, the results of the
reboot optimization are displayed in a dialog box. This fix is also
available from a UVK script with the
<MultipleRebootScheduler>
command.
Launch Multiple Reboot Scheduler: This fix runs our
boot uptimizing tool (MRS), which allows you
to reboot the PC several times in sequence, with a configurable
delay time between each reboot. In the end, the results of the
reboot optimization are displayed in a dialog box. This fix is also
available from a UVK script with the
<MultipleRebootScheduler>
command.
![]() Launch Acount Profile Fixer: This fix runs our
Account Profile Fixer (APF) tool, which
allows you to easily replace a user account with a new one, while
keeping all the data from the old account, fixing all possible user
profile related issues. This fix is also available from a UVK script
with the <AccountProfileFixer>
command.
Launch Acount Profile Fixer: This fix runs our
Account Profile Fixer (APF) tool, which
allows you to easily replace a user account with a new one, while
keeping all the data from the old account, fixing all possible user
profile related issues. This fix is also available from a UVK script
with the <AccountProfileFixer>
command.
![]() Launch WAU Manager: This fix runs our
WAU Manager tool, which is a
lightweight but complete replacement for the built in
WindowsAutomatic Updates interface.
Launch WAU Manager: This fix runs our
WAU Manager tool, which is a
lightweight but complete replacement for the built in
WindowsAutomatic Updates interface.
![]() Launch ClearDiskInfo: This fix runs our
ClearDiskInfo, which gives you
full storage device information in a human friendly way.
Launch ClearDiskInfo: This fix runs our
ClearDiskInfo, which gives you
full storage device information in a human friendly way.
![]() Restore the previous UAC state: If you disabled the User
Account Control (UAC) in the current repair operation using the
Disable the User Account Control pre-repair action, this fix
will restore its previous state.
Restore the previous UAC state: If you disabled the User
Account Control (UAC) in the current repair operation using the
Disable the User Account Control pre-repair action, this fix
will restore its previous state.
![]() Enable the User Account Control: This fix will enabled the
User Account Control (UAC) and apply the default notification
settings. This fix is also available from a UVK script with the
<EnableUAC>
command.
Enable the User Account Control: This fix will enabled the
User Account Control (UAC) and apply the default notification
settings. This fix is also available from a UVK script with the
<EnableUAC>
command.
![]() Restore previous immunization: If you used the Un-immunize
all areas fix above, then this fix will restore the previous
immunization.
Restore previous immunization: If you used the Un-immunize
all areas fix above, then this fix will restore the previous
immunization.
![]() Delete all restore points (post repair): Delete all the
existing system restore points after running the selected
fixes/apps. This can be useful to delete eventual restore points
created during the repair. Use this feature only if you are sure the
system will be working properly after the repair operation.
Delete all restore points (post repair): Delete all the
existing system restore points after running the selected
fixes/apps. This can be useful to delete eventual restore points
created during the repair. Use this feature only if you are sure the
system will be working properly after the repair operation.
![]() Create restore point (post repair): Create a system restore
point named "UVK - Ultra Virus Killer post repair restore point"
after the repair operation. If the system restore is disabled, it
will be automatically enabled.
Create restore point (post repair): Create a system restore
point named "UVK - Ultra Virus Killer post repair restore point"
after the repair operation. If the system restore is disabled, it
will be automatically enabled.
![]() Reset power settings): This fix will apply the following
settings for the current power scheme: Close lid action: Sleep. HDD
power off and sleep timeout: 30 min. Dim display timeout: 5 min.
Display power off: 20 min. This fix is not available on Windows XP.
There is no dedicated script command for this fix, but you can use
one of the scripts posted in
this topic to achieve the same effect.
Reset power settings): This fix will apply the following
settings for the current power scheme: Close lid action: Sleep. HDD
power off and sleep timeout: 30 min. Dim display timeout: 5 min.
Display power off: 20 min. This fix is not available on Windows XP.
There is no dedicated script command for this fix, but you can use
one of the scripts posted in
this topic to achieve the same effect.
![]() Send reports by Email or FTP: This fix will launch a separate
instance of the "Reporting" feature, allowing you to send the
reports of the repair operation to your email address or FTP server. Also available from a UVK
script with the
<SendReports> command.
Send reports by Email or FTP: This fix will launch a separate
instance of the "Reporting" feature, allowing you to send the
reports of the repair operation to your email address or FTP server. Also available from a UVK
script with the
<SendReports> command.
![]() Uninstall Malwarebytes AntiMalware: This option uninstalls
Malwarebytes AntiMalware, if it has been previously installed. Also
available from a UVK script with the
<UninstallMBAM> command.
Uninstall Malwarebytes AntiMalware: This option uninstalls
Malwarebytes AntiMalware, if it has been previously installed. Also
available from a UVK script with the
<UninstallMBAM> command.
![]() Uninstall Super AntiSpyware: This option uninstalls Super
AntiSpyware, if it has been previously installed. Also available
from a UVK script with the
<UninstallSAS> command.
Uninstall Super AntiSpyware: This option uninstalls Super
AntiSpyware, if it has been previously installed. Also available
from a UVK script with the
<UninstallSAS> command.
![]() Uninstall RogueKiller: This option uninstalls RogueKiller, if
it has been previously installed in this PC.
Uninstall RogueKiller: This option uninstalls RogueKiller, if
it has been previously installed in this PC.
![]() Uninstall the application: This option will mark UVK for
self-uninstalling after running the selected fixes above, if any.
You can combine any other fixes with this one, if you want to
automatically uninstall this app after running them.
Uninstall the application: This option will mark UVK for
self-uninstalling after running the selected fixes above, if any.
You can combine any other fixes with this one, if you want to
automatically uninstall this app after running them.
![]() Remove user auto-logon: This fix will cancel any existing
user automatic logon. Normally you would use this fix if you also
used the Auto-logon the current user pre-repair action. Also
available from a UVK script with the
<AutoLogon> command.
Remove user auto-logon: This fix will cancel any existing
user automatic logon. Normally you would use this fix if you also
used the Auto-logon the current user pre-repair action. Also
available from a UVK script with the
<AutoLogon> command.
![]() Defrag the registry if needed: This fix will check the
registry hives for fragmentation, and defrag the ones more than 10%
fragmented. Note: The computer may be automatically rebooted after
running this fix. Also, this fix requires activation.
Defrag the registry if needed: This fix will check the
registry hives for fragmentation, and defrag the ones more than 10%
fragmented. Note: The computer may be automatically rebooted after
running this fix. Also, this fix requires activation.
![]() Shutdown the computer: Even though you can use this fix
alone, it was created to be used along with other fixes, allowing to
automatically shutdown the machine after running all the selected
fixes. Also available from a UVK script with the
<Shutdown>
command.
Shutdown the computer: Even though you can use this fix
alone, it was created to be used along with other fixes, allowing to
automatically shutdown the machine after running all the selected
fixes. Also available from a UVK script with the
<Shutdown>
command.
![]() Reboot the computer: This fix allows to automatically reboot
the machine after running all the fixes. Also available from a UVK
script with the
<Reboot> command.
Reboot the computer: This fix allows to automatically reboot
the machine after running all the fixes. Also available from a UVK
script with the
<Reboot> command.
![]() Reboot in safe mode:
This fix will reboot the computer in safe mode. Also available from
a UVK script with the
<RebootSafeMode>
command.
Reboot in safe mode:
This fix will reboot the computer in safe mode. Also available from
a UVK script with the
<RebootSafeMode>
command.
![]() Reboot in safe mode with network: This fix will reboot the
computer in safe mode with networking. Also available from a UVK
script with the
<RebootSafeMode>1
command.
Reboot in safe mode with network: This fix will reboot the
computer in safe mode with networking. Also available from a UVK
script with the
<RebootSafeMode>1
command.
![]() Restore normal boot: If, for some reason this PC is stuck in
safe mode boot, this fix will restore the normal boot.
Restore normal boot: If, for some reason this PC is stuck in
safe mode boot, this fix will restore the normal boot.
Click here to get a complete list of the commands for UVK scripts.
The fixes/apps are listed in the order we decided they should be executed. If you want t change the order they are executed, you have two options:
1. Add the fixes you want to run to the Top apps and fixes group. In this group the items can me moved up and down, to change the order in which they are executed.
2. Create custom apps that run the builtin fixes/apps in the order you want. More info here.
Easy diagnostic
This feature was created to help you selecting fixes in the list by providing you with a list of symptoms that you need to select instead. When you press the Easy diagnostic button, a dialog box similar to the one in the pictures below will be displayed.

Tick the items that correspond to the issues you're having. The list also contains some generic items such as Other software issues, or Other Windows issues, which you may use if none of the remaining items apply to you.
When you're done, press Check only or Check and run, and the fixes that are likely to repair the issues you select here will automatically be checked in the System repair list. If you press Check and run, the repair operation is also started automatically.
Note: Items previously checked in the sytem repair list will not be unchecked.
If you don't want to check any items in the System repair list, just press Cancel or close this dialog box.
Third party builtin scans:
UVK can automate installing/updating some of the most well known malware removal tools, and also make them automatically start a scan.
In order to perform these scans, tick the checkbox next to the third party tool you want to run. Remember that you can save this selection to a file, and import it back later. Click here for more info.
By default, UVK will wait until the third party application closes, before stepping to the next fix/app. If you want to stop monitoring the third party application and go straight to the next selected app/fix, press the Stop monitoring button.
The currently builtin third party apps are:
![]() Ultra Adware Killer scan: This app will launch
Ultra Adware Killer and
automatically start a scan.
Ultra Adware Killer scan: This app will launch
Ultra Adware Killer and
automatically start a scan.
![]() MalwareBytes AntiMalware scan: This app will download and
install MalwareBytes AntiMalware if it is not already installed
and up to date.
MalwareBytes AntiMalware scan: This app will download and
install MalwareBytes AntiMalware if it is not already installed
and up to date.
Then it will update the MBAM's virus defiitions, and start a threat scan. This feature is compatible with MBAM pro, if already installed.
Note: UVK does not automate the threat removal process.
![]() Super AntiSpyware scan: This app will download and install
Super AntiSpyware if it is not already installed and up to
date.
Super AntiSpyware scan: This app will download and install
Super AntiSpyware if it is not already installed and up to
date.
Then it will start the scan. If Third party full scans (in the lower pane) is checked it will start a full scan, otherwise it will start a normal (quick) scan. This feature is compatible with SAS pro, if already installed.
Note: UVK does not automate the threat removal process.
![]() RogueKiller scan: This app Updates RogueKiller and launches
the tool. The application will be downloaded if not already up to
date.
RogueKiller scan: This app Updates RogueKiller and launches
the tool. The application will be downloaded if not already up to
date.
![]() Kaspersky TDSSKiller scan: This app will download the popular
Kaspersky rootkit removal tool only if it is not already present in
its download location and up to date, and then start a scan. The
threat removal process is not automated, though.
Kaspersky TDSSKiller scan: This app will download the popular
Kaspersky rootkit removal tool only if it is not already present in
its download location and up to date, and then start a scan. The
threat removal process is not automated, though.
![]() Avast! aswMBR scan: This app will download the popular Avast!
rootkit removal tool if it is not already present in its
download location and up to date, and then start a scan. If
Third party full scans (in the lower pane) is checked, aswMBR
will automatically download and use the latest avast! virus
definitions database. The threat
removal process is not automated.
Avast! aswMBR scan: This app will download the popular Avast!
rootkit removal tool if it is not already present in its
download location and up to date, and then start a scan. If
Third party full scans (in the lower pane) is checked, aswMBR
will automatically download and use the latest avast! virus
definitions database. The threat
removal process is not automated.
![]() AdwCleaner scan: This app will download the popular Explode
adware removal tool only if it is not already present in its
download location and up to date, and then start a scan. The threat
removal process is not automated.
AdwCleaner scan: This app will download the popular Explode
adware removal tool only if it is not already present in its
download location and up to date, and then start a scan. The threat
removal process is not automated.
Important note: After the AdwCleaner scan is complete, if you click the Delete button to remove the adware found, AdwCleaner terminates all processes, including UVK's and reboots the computer before UVK has completed all the repair procedure. To prevent this situation, Click the Stop monitoring button so UVK can complete the repair procedure, and then click the Delete button in the AdwCleaner's interface.
![]() Autoruns by SysInternals: Update and run Autoruns.
This tool provides a complete view of everything that starts
when your system boots or when you log in.
Autoruns by SysInternals: Update and run Autoruns.
This tool provides a complete view of everything that starts
when your system boots or when you log in.
![]() HWMonitor by CPUID: Update and run HWMonitor. This
tool is a hardware monitoring program that reads PC systems main
health sensors :
HWMonitor by CPUID: Update and run HWMonitor. This
tool is a hardware monitoring program that reads PC systems main
health sensors :
voltages, temperatures, powers, currents,
fans speed, utilizations, clock speeds.
To ensure the automation works properly for all the third party applications, please don't do anything while it is being processed. Mouse clicks and keystrokes can easily prevent the success of the automation.
Disclamer: We are not responsible for any damage or data loss caused by running the third party apps.
Adding third party apps:
UVK allows you to add your own third party apps to the list. Each app is a set of actions that you tell UVK to perform.
Each app can do the following:
![]() Download a file from the internet using several methods.
Download a file from the internet using several methods.
![]() Run up to four commands. These commands are normally used to
install/run the downloaded application, register it, update it,
start a scan, etc., but they can do many other things. For instance
your app could download a reg file, and use the regedit.exe /s, or
the
reg
import command to merge it. The last three commands can be set to
execute a file depending on the current Windows architecture. This
can be useful if the application has two different files, one 32
bits, and another one 64 bits.
Run up to four commands. These commands are normally used to
install/run the downloaded application, register it, update it,
start a scan, etc., but they can do many other things. For instance
your app could download a reg file, and use the regedit.exe /s, or
the
reg
import command to merge it. The last three commands can be set to
execute a file depending on the current Windows architecture. This
can be useful if the application has two different files, one 32
bits, and another one 64 bits.
![]() Starting with UVK version 11.9, each command can be a single line
UVK scripting command, but
multiple line commands will not work.
Starting with UVK version 11.9, each command can be a single line
UVK scripting command, but
multiple line commands will not work.
The apps you create belong to you. You can set them to do what ever you want, and you are fully responsible for all the actions they perform.
To create a custom third party app, press Add third party app. A window similar to the one in the screenshot below will be displayed, allowing you to configure your new app. The screenshots below explain how to create an app that downloads, installs and runs cCleaner in automated mode. You will find more examples below.
App info tab
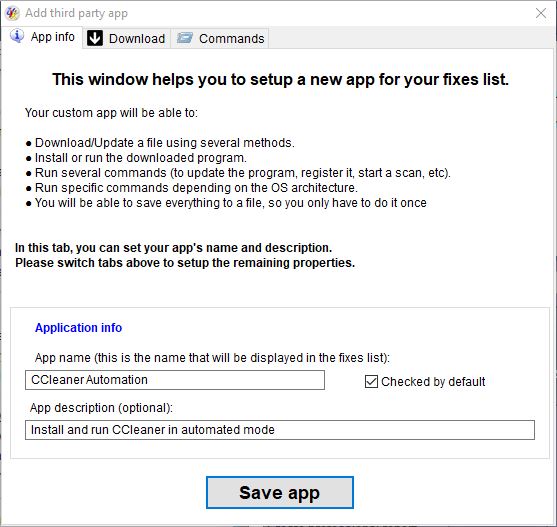
Firstly you need to set the name for your new app. This is the only
required filed, meaning you can create an empty app that doesn't do
anything.
In this
example, the app's name is cCleaner automation.
Important: You app must have a different name from the builtin fixes/apps, otherwise the same named fix/app will be executed instead. You can take advantage of this restriction to create apps that run the builtin fixes/apps. More info here.
If Checked by default is ticked, the app will be automatically checked when you load the settings from a file, otherwise, it will be unchecked.
Enter a quick description for your app in the App description (optional) field. This is the text that will be displayed in the text box to the right of the fixes/apps list. In this example, the description is Install and run cCleaner in automated mode.
Then select the Downlod tab you can enter the download url for your
app, and the path where the downloaded file should be saved in the
hard drive. The file name must also be specified. You can use any of the
supported
environment variables. The drop-down area to the right of
the field can help you to automatically select %ThirdParty%
or %InstallSourceDir%.
In this example, the file's path is
%ThirdParty%\cCleanerSetup.exe.
Download tab
In this tab you can program your app to perform two optional downloads, for which you can choose the download method, and optionally the Link text's text, as shown in the screenshot below.
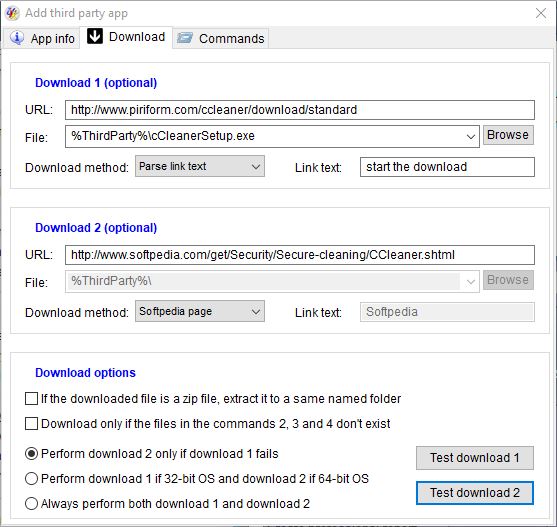
For both downloads, you have six different download methods available:
![]() Direct download: This is the easiest method. You just have to
specify the download url.
Direct download: This is the easiest method. You just have to
specify the download url.
The inconvenient of this method is that not all applications have apermanent download URL. For instance UVK has a constant download url (http://www.carifred.com/uvk/UVKSetup.exe), but for some other programs, the url changes each time a new version is released, i.e. http://www.example.com/program_1.1.exe, then http://www.example.com/program_1.2.exe, and so on.
Also, some web pages provide a temporary download url, which will only last a few minutes.
This is when the other download methods become useful.
![]() Parse link text: To use this method, you need to find a web
page that has a link pointing to the updated file. The web page and
the text link do not change when a new version is released, but the
target url of the text link is updated each time a new version is
released. This is very common. This is the method used in this
example.
Parse link text: To use this method, you need to find a web
page that has a link pointing to the updated file. The web page and
the text link do not change when a new version is released, but the
target url of the text link is updated each time a new version is
released. This is very common. This is the method used in this
example.
Set the Download url field with the address of the page that contains the link, and the Link text field with the text of the link. If the link displays an image instead of text, you can specify a portion of the html code contained in the link's <a> element. This can be the link's image file name, for instance. Try to use a protion of text which is unique in the page's html code.
Need an example? Here it goes:
Take a look at this link: Download UVK now
Now have a look at your browser's address bar. You'll see the URL of this page (https://www.carifred.com/uvk/help/system_repair.php).
So now you could create an app that downloads UVK by parsing the text link above. You would set the download related fields as follows:
Download url:
http://www.carifred.com/uvk/help/system_repair.php
Download type: Parse link text
Link text: Download UVK
now
Download file: %ThirdParty%\UVKSetup.exe
![]() Softpedia page: Yes they are working again. If none of the methods above work for you,
and the program you want to download is part of the Softpedia's list
of software, then you can use this method.
Softpedia page: Yes they are working again. If none of the methods above work for you,
and the program you want to download is part of the Softpedia's list
of software, then you can use this method.
Google Softpedia followed by the name of the program, and you will quickly find the page, if it exists. Usually it's address is something like http://www.softpedia.com/get/[Section]/[Program's name].shtml.
Set the the Download url field with the address of that page, and select Softpedia page.
![]() Majorgeeks page: If the program you want to download is part of the Majorgeeks list
of software, then you can use this method.
Majorgeeks page: If the program you want to download is part of the Majorgeeks list
of software, then you can use this method.
Google Majorgeeks followed by the name of the program, and you will quickly find the page, if it exists. Usually it's address is something like http://www.majorgeeks.com/files/details/[Program's name].html.
Set the the Download url field with the address of that page, and select Majorgeeks page.
![]() TechSpot (64 bits) or TechSpot (32 bits): These
download types can be used when a program has two different
downloads: One 32 bits and the other 64 bits.
TechSpot (64 bits) or TechSpot (32 bits): These
download types can be used when a program has two different
downloads: One 32 bits and the other 64 bits.
You just need to find the Techspot page of the desired program. You can goolge TechSpot followed by the name of the program, and you will quickly find the page, if it exists. Usually it's address is something like http://www.techspot.com/downloads/[ID and name].html.
Just set the the Download url field with the address of that page, and select TechSpot (64 bits) or TechSpot (32 bits), according to the version you wish to download.
Tick If the downloaded file is a zip file, extract it to a same named folder if your app downloads a zip file. In this case UVK will unzip the file to a folder having the same name as the name you chosed for the zip file, without the file extension. For instance, if you specify %ThirdParty%\zipname.zip as the downloaded file name, UVK will extract the contents of the zip file to %ThirdParty%\zipname. If the extraction folder does not exist, it will be automatically created.
Tick Download only if the files in the commands 2, 3 and 4 don't exist if you wish to skip this download in the case the files you set to run in the commands 2, 3 and 4 already exist. This can be useful if you want to skip the download if a program is already installed. For instance, you could check this option for this example, to skip the download if cCleaner is already installed.
The options below coontrol which of the two downloads are executed. For instance, you can have a different download for 32-bit and 64-bit systems, or perform the second download only if the first one fails. The available options are:
- Perform download 2 only if download 1 fails.
- Perform download 1 if 32-bit OS, and download 2 if 64-bit OS.
- Always perform both download 1 and download 2.
Select the desired option. If you select the first one, the same file path is used for both downloads, so the File field of Download 2 is disabled.
You can test your downloads anytime by pressing the Test download 1 and Test download 2 buttons, respectively.
In this example, the fields were set as follows:
Url of Download 1:
https://www.filecroco.com/download-ccleaner/download/
File:
%ThirdParty%\cCleanerSetup.exe
Download 1 type: Parse link
text
Link text: Download now
Url of Download
2:
https://www.download3k.fr/Install-CCleaner.html
Download 2 type: Download3k US
Once you've set the download fields, you can test them out by pressing the Test button, to the right of the Link text field. If the download type you selected is Parse Link Text, pressing the Test button will open the Parse link text tester, which will help you test your download and find the correct link text.
Commands tab
Once you have configured your downloads, select the Commands tab. You will now be able to setup the commands that your app will run, as shown in the screenshot below.
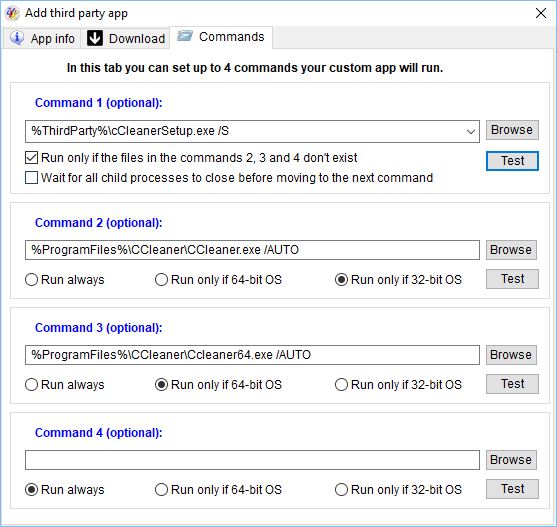
The first command does not have the Run only if 32 or 64 bit OS option. This command is normally (but not necessarily) used to run the downloaded file. You can leave it blank if you don't need it or use it to run any other command.
Check Run only if the files in the commands 2, 3 and 4 don't exist if you wish to skip this command in the case the files you set to run in the commands 2, 3 and 4 already exist. This can be useful if you want to skip running this command if a program is already installed. For instance, you could check this option for this example, to skip the command if cCleaner is already installed.
Check Wait for all child processes to end before moving to the next command if you want UVK to monitor all processes children of this command, and only move to the next command after those processes have been closed. By default, UVK only monitors the command's process itself, not child processes. This option is useful for applications that automatically install and run, such as combofix, or UVKPortable.
The three commands left (Command 3,Command 3 and Command 4) are optional. You can set these commands to Always run, Run only if the operating system is 64 bits, or run only if the OS is 32 bits. Just select the desired radio button in the same group.
Use the Browse button in each group if you want to locate the file you want to run using the Windows shell.
Starting with UVK version 11.9, each command can be a UVK scripting tag. Only single line tags are supported. Multiple line tags will not work. Use the log analyzer to list the available command tags. The code below shows some tags you can use, one per command.
<FixInstallProblems>
<RegisterSysemDLLs>
<DefragDrive>D:
Starting with UVK version 7.3.5, the commands can be used to open files and protocols. For instance, to install an MSI package, you no longer need to use
msiexec.exe "Package path.msi" /passive /norestart
even though it is still the recommended way. You can use just
PackagePath.msi /passive /norestart
You can also make use of this new feature to open internet locations and other protocols. For instance, you can create an app that opens one or several internet pages. Tutorials, for instance. You just need to set the URL of the page as the command.
Or you can make use of the mailto protocol to create apps that send pre-formated emails.
mailto:obama@whitehouse.gov?subject=Congrats%20Obama
mailto:obama@whitehouse.gov?subject=Congrats%20Obama&body=Enjoy%20your%20stay
Or you can make your apps open local documents, such as MS office docs, text files, or PDF docs, by simply specifying the path of the document itself, which will be opened with the default application in the current PC.
%InstallSourceDir%\Docs\Tutorial 1.pdf
%ThidParty%\Docs\Tutorial 2.docx
%Desktop%\Docs\Tutorial 3.txt
Or you can create apps that run UVK scripts easily. You just need to specify the path of your script in the command. Append -Auto if you want to run the script without confirmation.
%InstallSourceDir%\My script.uvk
%ThirdParty%\My script.uvk -Auto
Click << Back if you want to go back and edit the app's name or download info. The data you have entered in this section will not be lost.
Save the new app
When you think you have entered all the desired info, select the App info tab and click the Save app button. Once you app is saved, this window is closed, but you don't need to worry about any mistakes you may have made. You will be able to easily edit your app later.
If you want to discard everything you entered, just close this dialog box instead.
Important: Any changes to your custom apps are be saved in memory untill you leave the System repair section. If you want to be able to load your apps again later, use the Save settings button. Click here for more info.
Your app is now ready to test/run and you should be able to see it in the fixes/apps list, just below the Third party builtin scans group. If you want to test it, just double click its line, or tick its checkbox and click Run selected fixes/apps. If you want to edit the new app, right-click it in the list and press Edit highlited app. More info here.
The commands for this example are:
Command 1: %ThirdParty%\cCleanerSetup.exe /S
Checked:
Run only if the files in the commands 2, 3 and 4 don't exist
Command 2: %ProgramFiles%\CCleaner\CCleaner.exe /AUTO
Command 2 option: Run only if 32 bit OS
Command 3: %ProgramFiles%\CCleaner\Ccleaner64.exe /AUTO
Command 3 option: Run only if 64 bit OS
Adding third party apps (video tutorial by Britec).
Creating apps that run the builtin fixes/apps
If you want to change the order in which the builtin apps/fixes are executed, you just need to create same named custom apps. or you can add them to the Top apps and fixes group.
Let's say you would like to run the Kaspersky TDSSKiller scan before the MalwareBytes AntiMalware scan and then the Kill all non system processes fix.
You would then create three custom apps in the following order:
App 1 name: Kaspersky TDSSKiller scan
App 1 description
(optional): Updates TDSSKiller and starts a scan.
App 2 name: MalwareBytes AntiMalware scan
App 2
description (optional): Updates MalwareBytes AntiMalware and
starts a threat scan.
App 3 name: Kill all non system processes
App 3
description (optional): Kill all processes which executable files
are not system protected files.
In these special apps, all other fields should be empty, because they will not be parsed anyway. To easily copy the app's name and description, hilight the desired fix/app in the list before clicking Add third party app, and then copy the desired text from the description text box.
Obviously, you can add your own apps either before or after the special apps.
More custom third party apps examples
Defraggler automation:
App name:
Defraggler automation
Description: Installs Defraggler,
and defragments the System drive
Download 1 url:
https://www.piriform.com/defraggler/download/standard
Download
1 type: Parse link text
Download 1 link text: start the
download
Download 1 file: %ThirdParty%\DefgragglerSetup.exe
Download
2 url:
https://www.filehorse.com/download-defraggler/download/
Download 2 type:
Parse link text
Download 2 link text:
Start Download
Command 1: %ThirdParty%\DefgragglerSetup.exe /S
Command 2: %ProgramFiles%\Defraggler\df.exe %SystemDrive%
/QD
Command 2 option: Run only is 32 bit OS
Command
3: %ProgramFiles%\Defraggler\df64.exe %SystemDrive%
/QD
Command 3 option: Run only is 64 bit OS
RogueKiller:
App name: RogueKiller download install and run
Description:
Download RogueKiller, install and run the application
Download 1 url:
https://www.adlice.com/download-start/?app=roguekiller&type=setup
Download
1 type: Parse link text
Download 1 Link text: click
here
Download 1 file: %ThirdParty%\RogueKiller32.exe
Download
2 url: https://www.filecroco.com/download-roguekiller/download/
Download
1 type: Parse link text
Download 1 Link text: Download
now
Download 2 file: %ThirdParty%\RogueKiller64.exe
Command 1: %ToolsDir%\RogueKiller_setup.exe /silent
Command
1 options:
Run always, Run hidden
Command 2:
%ProgramFiles%\RogueKiller\RogueKiller.exe
Command 2 option:
Run only if 32 bit OS
Command 3:
%ProgramFiles%\RogueKiller\RogueKiller64.exe
Command 3 option:
Run only if 64 bit OS
Autoruns:
App name: Autoruns
Description:
Autoruns by SysInternals
Download 1 url:
https://download.sysinternals.com/files/Autoruns.zip
Download
1 type: Direct download
Download 1 file:
%ThirdParty%\Autoruns.zip
Download 2 url:
https://technet.microsoft.com/en-us/sysinternals/bb963902
Download 2 type: Parse link text
Download 2 Link text:
Download Autoruns and Autorunsc
Checked: If the downloaded file
is a zip file, extract it to a same named folder
Command 1:
%ThirdParty%\Autoruns\autoruns.exe
File extension fixer:
App name: File extension fixer
Description: File extension fixer repairs the executable file
associations and runs programs even if those are damaged.
Download
1 url:
https://www.carifred.com/exefixer/ExeFixer.com
Download
1 type: Direct download
Download 1 file:
%ThirdParty%\ExeFixer.com
Command 1: %ThirdParty%\ExeFixer.com
Hopefully the examples above ilustrate correctly how the custom third party apps work, and how to use the different download types and the other options.
In any case, if the app you want to add is part of Tech Tool Store, you can quickly export it to a UVK custom third party app. Take a look at TTS's help page.
Editing the custom third party apps
UVK provides you with an easy way to edit your custom apps. After you create or load your apps, right-click the one you want to edit and select Edit hilighted app.
The Custom third party apps editor uses the same interface as the one used to create the apps. See Adding third party apps for more info.
Just set the fields with the new data and press Save app.
Note: The changes made to the apps are saved in memory until you leave the System repair section. If you want to be able to load your modified apps later, press Save settings. Click here for more info.
Loading/Saving settings:
As mentioned before, you can save all the settings in the System repair section to a file, and load them back later.
These "settings" include the fixes and third party apps selecton in the list, your top apps and fixes, your custom third party apps, and the selected options in the lower pane.
If you already loaded a System repair settings file, and you want to save the settings to the same file, press the Save settings button. Otherwise, pressing this button will have the same effect as the Save settings as... option explained below.
To choose the file you want to save the settings to, press Save settings as..., in the fixes/apps list's menu, then browse to the folder where you want to create your System repair settings file, choose a name for your file and press Save.
The settings are saved to a System repair settings file (uvksr). This file type is associated with UVK when you install the application, meaning you can open these files by double-clicking them.
Thus, to load the saved file, just double click it, or press the Load settings button to locate the file using the Windows Shell. UVK will load the Fixes and third party apps selection, your top and custom third party apps, and the selected options in the lower pane from the file.
After the settings are loaded, you can still, modify them, or add, edit and remove apps, if you wish.
Using the fixes/apps list's menu:
The Fixes/apps context menu contains lots of useful options to manage your list of Apps and fixes. To open this menu, right-click an item in the list, or press the List menu button. The menu will popup, similar to the one in the screenshot below. Click the desired menu item to execute the corresponding action.
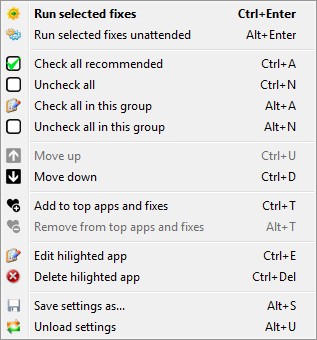
![]() Run selected fixes: Run the selected fixes in the list. This
has the same effect as un-checking Use unattended mode and pressing
the Run selected fixes/apps button.
Run selected fixes: Run the selected fixes in the list. This
has the same effect as un-checking Use unattended mode and pressing
the Run selected fixes/apps button.
![]() Run selected fixes unattended: Run the selected fixes in
unattended mode. This has the same effect as checking Use
unattended mode and pressing the Run selected fixes/apps
button.
Run selected fixes unattended: Run the selected fixes in
unattended mode. This has the same effect as checking Use
unattended mode and pressing the Run selected fixes/apps
button.
![]() Check all recommended: If you select this option, UVK will
automatically select the fixes and third party apps that we
recommend to run at every repair.
Check all recommended: If you select this option, UVK will
automatically select the fixes and third party apps that we
recommend to run at every repair.
![]() Uncheck all: Uncheck all items in the list.
Uncheck all: Uncheck all items in the list.
![]() Check/Uncheck this fix: Inverse the highlited item's check
state.
Check/Uncheck this fix: Inverse the highlited item's check
state.
![]() Unckeck all in this group: Uncheck all items in the same
group as the hilighted item.
Unckeck all in this group: Uncheck all items in the same
group as the hilighted item.
![]() Move up or Move down: Move the selected item up or
down in the list, respectively. This option is only available for
the Top apps and fixes, and the Custom third party apps
groups.
Move up or Move down: Move the selected item up or
down in the list, respectively. This option is only available for
the Top apps and fixes, and the Custom third party apps
groups.
![]() Add to top apps and fixes: Add the hilighted item to the
Top apps and fixes group.
Add to top apps and fixes: Add the hilighted item to the
Top apps and fixes group.
![]() Remove from top apps and fixes: Remove the hilighted item
from the Top apps and fixes group. Obviously, this option is
only available for items in this group.
Remove from top apps and fixes: Remove the hilighted item
from the Top apps and fixes group. Obviously, this option is
only available for items in this group.
![]() Edit hilighted app: Edit the hilighted Custom third party
app. More info here.
Edit hilighted app: Edit the hilighted Custom third party
app. More info here.
![]() Delete hilighted app: Delete the hilighted Custom third party
app.
Delete hilighted app: Delete the hilighted Custom third party
app.
![]() Save settings as...: Save the current settings, top and
custom apps and fixes to the file you choose.
More info here.
Save settings as...: Save the current settings, top and
custom apps and fixes to the file you choose.
More info here.
![]() Unload settings: Uload the currently loaded UVKSR file, if
any.
Unload settings: Uload the currently loaded UVKSR file, if
any.
Top apps and fixes:
The Top apps and fixes group was inserted in the UVK version 6.7, and contains items to execute in first place.
By default, this group is empty. You can add any item in the list to this group, but each item can be added only once.
The items in this group can be moved up and down, allowing you to choose the order in which they are executed. The items in this group can also be removed whenever you wish.
To add, remove or move items in the Top apps and fixes group, use the list's context menu items.
The items in this group behave as shortcuts to the original items with the same name. Their check state is totally independent of the check state of the original item, though.
Please keep in mind that the fixes/apps will be executed only if they are checked, and in a top-to-bottom order.
The Parse Link Text tester:
When you click the Test button for a third party app's download and the Parse link text method is selected, you will be presented with a dialog box similar to the one in the screenshot below.

The text input fields:
You can see straight away that the first text input field shows the URL of the page that you want to parse. This page itself contains the address of the file that you want to download. Because that address may change overtime (i.e. when a new version of the file if released), this feature can help, keep reading.
The second text input field shows the Link Text. Originally this feature only worked with anchor links, hence its name, but it actually can be much more. Below this field, there is a label which tells how many instances of the link text were found in the page's source, and which instance it is currently using.
The third text input field shows the final, direct URL of the file you want to download, after parsing the link text in the page source code.
The last input field shows the file path, where the downloaded file is to be saved. You can use environment variables.
The buttons in the lower pane:
The Test the download now button lets you test the final download. When you click this button, the application parses the link text in the page and performs the final download, and optionally extracts the file, if it is and archive and that option is checked. You are informed about the results.
The Reparse the link text (update the final URL) button reloads the source code from the page you indicate in the first text input field, parses the link text you indicate in the second field, and updates the third field with the final URL, and also the label that tells the number of instances found.
The Locate the final URL in the page text jumps to the Page source code tab, and shows you the final URL. It scrolls to the location of the URL in the code, and selects it for you.
The Set page/link text and close this window button applies any changes you made to the page URL and/or the link text, and closes this dialog box.
Finally, the Discard and return button ignores any changes you have made, and just closes this dialog box.
The instructions tab:
This tab displays some tips and instructions on how to setup the link text. The same instructions are below.
The Page source code tab:
This page shows the HTML code of the page to be parsed, and also a text input field that lets you easily find portions of code.
Hit Ctrl+F or click the text field to bring keyboard focus to it. Enter the desired text and then hit Enter or F3 to find the text.
How this feature works:
When you download an application from a web page, the download URL may change each time a new version of the application is released or the web page is updated. That is when this feature comes in handy. You provide the address of a web page that contains the URL of the file to download and a code that identifies that URL, even if it changes. Switch to the Page source code tab to define the code's text, which can be one of the following:
1: Text in an anchor link element (<a>). Take the following HTML link as an example:
<a href="/downloads/appname_1.5.7_x64.exe">Download appname</a>
In this case, you can simply use Download appname as the link text. If that text exists more than once in the page, you could use _x64.exe">Download appname instead, to uniquely identify it. What matters is that your text lies between the <a and the </a> tags of the anchor element. You can also specify the instance number of the text in the page. For example, Download appname,2 would use the second link containing Download appname.
2: The text right before the download URL, and the text right after, separated with |||. Here's an example:
<button onclick="window.location ='/downloads/appname_1.5.7_x64_maverick.exe'">
In this case the download URL is /downloads/appname_1.5.7_x64_maverick.exe, so you could use window.location ='|||'"> as the link text. The window.location ='. part is just before the URL, and '"> is right after. In the future, even if the whole final URL changes to something different, the lint text will still work as long as the sorrounding code does not change. Note that the sorrunding code must be immediately before and immediately after the final URL.
3: Wild cards. You copy the final URL, exactly as it is found in the page's HTML code, then you replace the part that is suceptible to change, with **. Here's an example:
<button onclick="window.location.href ='/downloads/appname_1.5.7_x32.exe'">
In this case, your lint text could be /downloads/appname_**_x32.exe. In the future, if the final URL changes to /downloads/appname_1.5.8_x32.exe, for instance, the link text remains valid.
Notes:
Link text parsing is
not case sensitive.
All three methods above work with both
relative and fully qualified URLs.
You don't need to know HTML
code to use this feaure, but you need to know what a URL is.
Creating professinal reports:
If you're an IT professional, then you probably would like to generate a detailed report of the repair actions taken in the System repair section. Check Create professional report, in the lower pane. A dialog box similar to the screenshot below will popup.
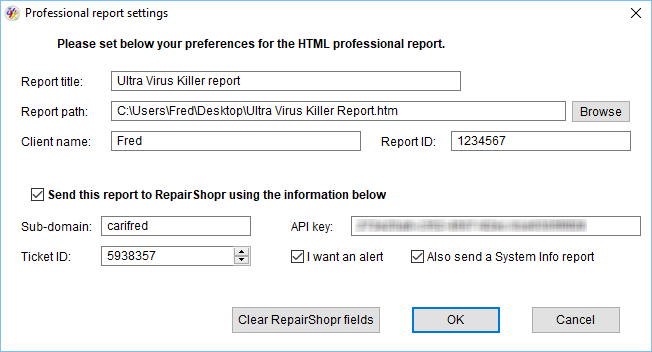
Users having a branding UVK license are able to edit the report title, and the report's logo and file name are automatically branded.
Enter the report path and file name in the corresponding input
box, or use the Browse button to browse it using the Windows
shell.
The report path defaults to the current user's desktop
folder, and a unique file name is automatically created by default.
Enter the desired client name in the respective input box. Defaults to the current user's name.
Enter an optional report ID in the corresponding field, or leave it blank if you do not need it.
RepairShopr fields:
If you have a RepairShopr account and want to associate this report with a ticket, check Send this report to RepairShopr using the information below, and then fill the text input fields below with the corresponding information. To access the reports from your Repairshopr account, go to the Tickets page, drop down Ticket modules, and select Computer reports.
![]() Sub-domain: Just enter the sub-domain that you associated
with your repairshopr account. If you don't know what that is, it is
indicated in the screenshot below. It is the first token of the URL
of any of your Repairshopr's account page, just between https:// and the first
dot.
Sub-domain: Just enter the sub-domain that you associated
with your repairshopr account. If you don't know what that is, it is
indicated in the screenshot below. It is the first token of the URL
of any of your Repairshopr's account page, just between https:// and the first
dot.
![]() API key: Your RepairShopr API key. You can get it from you RS
profile/password page as indicated in the picture below.
API key: Your RepairShopr API key. You can get it from you RS
profile/password page as indicated in the picture below.
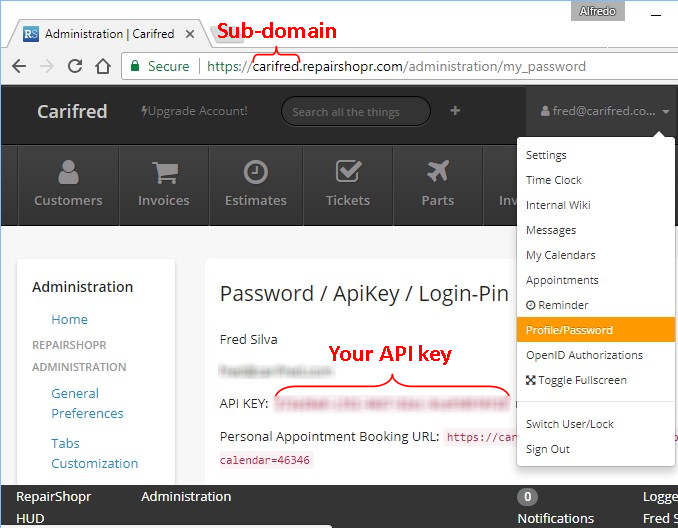
![]() Ticket ID: This field indicates the ID of the ticket to
associate this report with. Note that this is not the ticket number.
The ticket ID is the last token of the URL of a ticket's detail page, as indicated in the screenshot below. If you
specify the ticket number instead, it will not work, and the report
will have no ticket associated.
Ticket ID: This field indicates the ID of the ticket to
associate this report with. Note that this is not the ticket number.
The ticket ID is the last token of the URL of a ticket's detail page, as indicated in the screenshot below. If you
specify the ticket number instead, it will not work, and the report
will have no ticket associated.
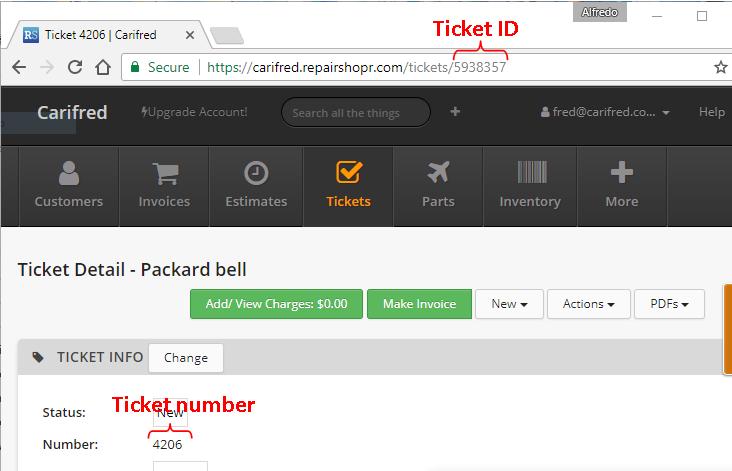
![]() I want an alert: Check this option if you want to receive an
alert once the report reaches your RS account. The alert is sent by
RepairShopr, and obviously that functionality needs to be enabled
for this feature to work.
I want an alert: Check this option if you want to receive an
alert once the report reaches your RS account. The alert is sent by
RepairShopr, and obviously that functionality needs to be enabled
for this feature to work.
![]() Also send a System Info HTML report: Check this option if you
want UVK to automatically send the System information report
generated in the System Info
section to RepairShopr, and associate it with the same Ticket ID.
Also send a System Info HTML report: Check this option if you
want UVK to automatically send the System information report
generated in the System Info
section to RepairShopr, and associate it with the same Ticket ID.
If you decide you don't want to send anything to RepairShopr, press the Clear RepairShopr fields button, or just uncheck Send this report to RepairShopr using the information below.
Otherwise, press OK to apply, or cancel to discard any changes.
Note: the report will be created when you run the first fix/app, and will contain a detailed description of all the fixes/apps you run untill you leave the System repair section, or close UVK. Thus, it will only be ready when you leave the System repair section, and it will be automatically opened with the default browser.
The professional report is created in the HTML format and will look similar like this one.
Leaving the System Repair module:
Press Home or the Esc key to return to the Home page.
