SimplySync Backup


SimplySync Backup overview
SimplySync Backup is an intuitive backup tool for Windows. It works in both portable and installed mode, and is very fast and easy to use.
SimplySync Backup has really cool features such as:
- Strict backup. Update backups ensuring they contain the very same files as the source.
- Bi-directional sync. Copy new and changed files from source to destination and vice-versa.
- FTP and network support. Backup to and from the network, to and from an FTP server.
- Direct FTP to FTP. Copy websites directly from one server to the other.
- One-click backup. You can create shortcuts for unattended backups.
- Automatic updates. (Automatically download and install application updates (requires activation).
- Scheduled backups. Backup jobs can be setup to be executed automatically, on a schedule basis (requires activation).
Current version: 2.7.0.0. Change log
Please read the End User License Agreement for our software before using this program.
If you like this program and want to support its future development, you can donate by clicking the button below. Thanks in advance. Any amount is appreciated.
Tutorial content index:
Activation and automatic updates
Add/Edit scheduled backup jobs
Adding / Editing backup folders
Setting up an FTP server location
Application settings
SimplySync Backup can be used as both a portable application and an installed application.
If you want to use it as a portable application, you just need to execute it and immediately benefit of all its features. But even in portable mode, you may want to use the Associate the application with .sall files option listed below.
To configure SimplySync Backup, press the Settings button in the application's main page. You will be presented with a dialog box similar to the one in the picture below. The Installation tab is selected by default. Select the desired options. Changes are applied only when you press the Apply button.
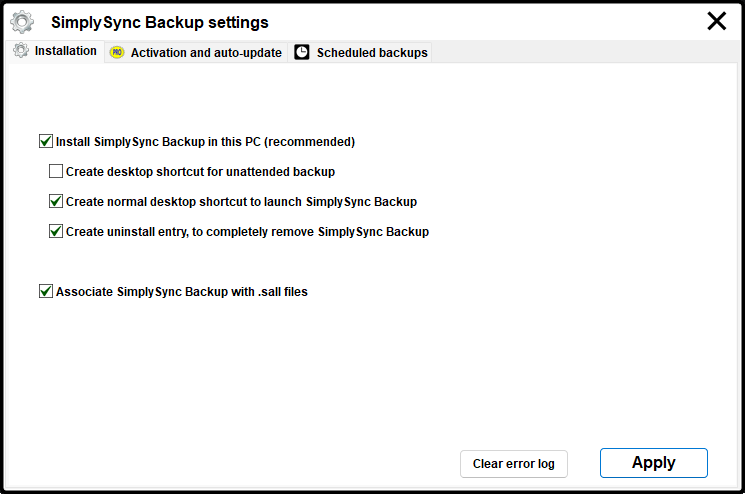
![]() Install the application on this PC (recommended) - If
you select this option, SimplySync Backup will be installed in
the local computer, acording to the selected options below. If
you uncheck this option and SimplySync Backup is already
installed, it will be uninstalled.
Install the application on this PC (recommended) - If
you select this option, SimplySync Backup will be installed in
the local computer, acording to the selected options below. If
you uncheck this option and SimplySync Backup is already
installed, it will be uninstalled.
![]() Create Desktop shortcut for unattended backup - This option
creates a desktop shortcut that automatically starts the last saved
backup in unattended mode (no user interaction needed).
Create Desktop shortcut for unattended backup - This option
creates a desktop shortcut that automatically starts the last saved
backup in unattended mode (no user interaction needed).
![]() Create normal desktop shortcut to launch SimplySync Backup -
This option creates a desktop shortcut for the current user that
just launches SimplySync Backup.
Create normal desktop shortcut to launch SimplySync Backup -
This option creates a desktop shortcut for the current user that
just launches SimplySync Backup.
![]() Create uninstall entry, to completely remove SimplySync Backup -
This option creates an uninstall entry that will allow users to
remove the installed version of the application through the
Add/remove programs control panel applet.
Create uninstall entry, to completely remove SimplySync Backup -
This option creates an uninstall entry that will allow users to
remove the installed version of the application through the
Add/remove programs control panel applet.
![]() Associate the application with .sall files - This option
associates SimplySync Backup files (.sall) files with our app,
allowing you to open them with a simple double-click.
Associate the application with .sall files - This option
associates SimplySync Backup files (.sall) files with our app,
allowing you to open them with a simple double-click.
Once you have selected the desired options, press Apply. If you're installing the application, SimplySync Backup will be restarted and the installed version will be launched.
Clicking the Clear error log button will delete the contents of your SimplySync Bckup error log. You should do this if your log became too large or if you just want it to become more lisible.
Switch tabs:
This dialog box contains 3 tabs: Installation, Activation and auto-update, and Scheduled backups. You can switch netween the diferent tabs by clicking the corresponding button, at the top of the dialog box.
Activation and auto-update: Switch to this tab if you want to check for updates, enable automatic updates, purchase or install a license.
Scheduled backups: Switch to this tab if you want to create or modify scheduled backups, or enable/disable the schaduled backups feature itself.
Activation and auto-update
In this tab you can update SimplySync Backup or enable automatic updates. You can also purchase or install a product license there.
In order to access this feature, press the Settings button in SimplySync Backup's main page, and then select the Activation and auto-update tab. You will be presented with an interface similar to the picture below.
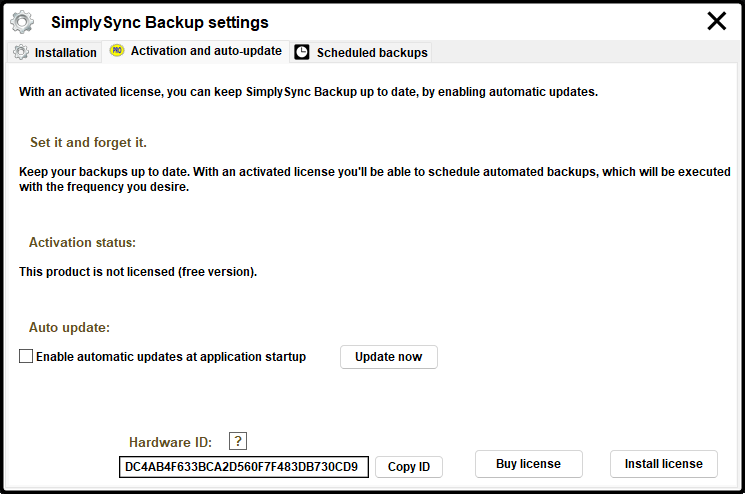
You can enable the SimplySync Backup to automatically search for updates each time it is launched. Simply tick the Enable automatic updates at application launch checkbox. Note that this feature requires that a product license is installed for it to work. You can find below instructions to purchase and install a new license.
If you just want to manually check if a new version is available, press the Update now button. This will automatically install any available update, but you need to periodically come to this tab and manually check for updates.
SimplySync Backup generates a unique ID for your hardware, which can used to purchase a license. The Copy ID button may come in handy to copy your hardware ID to the clipboard and paste it in our license purchase page or our license recovery page.
You can easily purchase a product license by clicking the Buy license button. This will take you to our Buy license page and it will automatically send the hardware ID of the computer you're working on, thus making the purchase process easier.
Once you purchase your product license you can easily activate it by pressing the Install license button, and then browse to the location where you saved your license file (SimplySync.sskey) in, select it and then pressing Open. If you don't remember where you saved your license when you downloaded it, just check your Downloads folder, you will probably find it there. Licenses can also be installed by simply double-clicking the downloaded SimplySync.sskey file.
Scheduled backups
In this tab you can create scheduled backup jobs and also enable/disable the scheduled backups feature itself.
In order to access this tab, press the Settings button in SimplySync Backup's main page, and then select the Scheduled backups tab. You will be presented with an interface similar to the picture below.
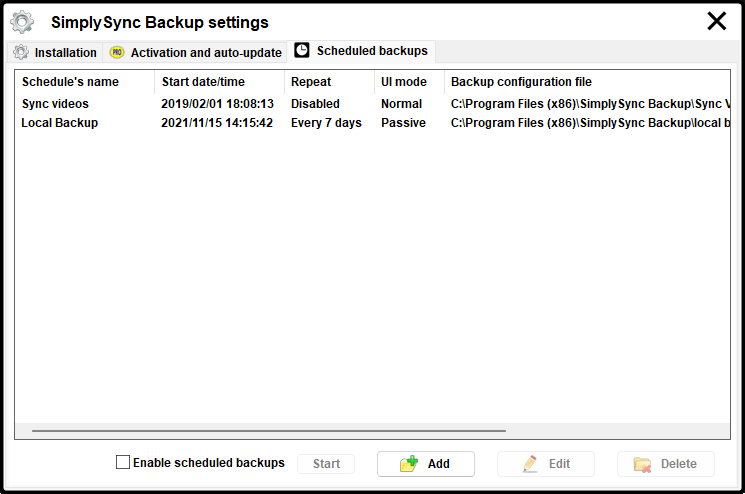
Before enabling this feature, you need to add at least one backup schedule to the list. To do so, press the Add button. Once you have one or more schedules listed you can edit or delete them, as explained below. See Add/Edit scheduled backups for more instructions.
Each backup schedule executes a SimplySync Backup configuration file (.sall). If you don't know how to create those files, please see Adding / Editing backup folders, and Loading and saving backups. You just create a .sall file for each schedule as explained in the corresponding help sections, and then you create a schedule for each sall file. In fact you can create several schedules for the same .sall file, but I guess that does not make much sense.
If you already have one or more schedules, you can easily edit or delete the desired ones. To edit a schedule, select it in the list, and press the Edit button. See Add/Edit scheduled backups for more instructions. To delete a schedule, select it in the list, and press the Delete button. This operation can not be reversed.
When you have at least one schedule, you can tick the Enable scheduled backups checkbox. This will not only enable the feature, but it will also start the scheduled backups monitoring task. If the checkbox is already ticked but the task is nor running and you want to start it, press the Start button. When the scheduled backups are enabled, SimplySync Backup will start automatically whenever you Sign in to Windows and monitor your scheduled backups in the background, starting the corresponding ones at the time you setup. See Monitoring scheduled backups to learn more.
Add/Edit scheduled backups
This feature allows you to add a scheduled backup to the list or edit an existing one. If you don't understand what this is, please read the Scheduled backups section before reading this one. The scheduled backups editor is presented with an interface similar to the picture below.
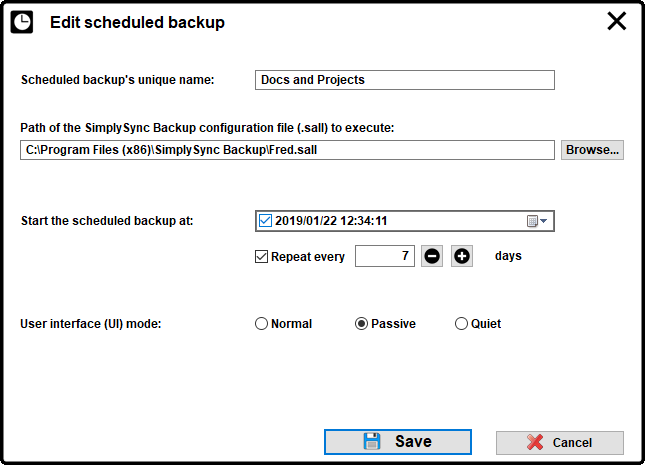
Enter the desired name for your schedule in the Scheduled backup's unique name text field. This name must not aready exist in the list.
Enter the path of the desired .sall file to be executed by this schedule, or click the Browse button to choose the file using the Windows shell. The enabled backup jobs in that file will be executed according to this schedule.
Set the time and date of the first execution in the Start the scheduled backup at: field. You can press the calendar button to the right of this field to easily select a different date.
If you only want to run this schedule once, make sure the Repeat every checkbox is not ticked. Otherwise, tick that checkbox and use the -/+ buttons to the right to set how frequently you want to repeat the schedule.
Next, select the User interface (UI) mode:
Normal: SimplySync Backup will just show its normal UI at the desired time and date. You will need to manually start the backup operation and close the application afterwards. this option may not be suitable for most users.
Passive: SimplySync Backup shows up its normal UI and will nor require any user input. The backup operations start automatically and the application is automatically closed in the end. You will still be able to stop and cancel the operation.
Quiet: SimplySync Backup will not not show any UI. It will simply execute the backup operations and exit in the end. You will still receive a notification each time a schedule is executed, but this will not require any user input. As with all Windows notifications, you can disable receiving this notification from the Windows Settings app.
Once you set the desired options, press the Save button to save this schedule to the list. If you prefer to discard any changes, just press the Cancel button or close this dialog box.
Monitoring scheduled backups
When scheduled backups are enabled, SimplySync Backup is automatically started when you sign in to Windows and will monitor your scheduled backups until you sign out, starting the enabled backup jobs at the time they were scheduled to.
By default, When SimplySync Bcakup is monitoring the scheduled backups, it does not show any user interface, with the exception of a tray icon. Depending on your Windows settings, the tray icon may be visible or hidden.
In the picture below, the tray icon is visible in the taskbar. We right clicked the tray icon to bring up the available options.
![]()
In the picture below, the tray icon is hidden from the taskbar. We clicked the taskbar's tray arrow to show up the hidden icons, and then we right clicked the tray icon to bring up the available options.
![]()
You can right or left click the tray icon to show up SimplySync Backup's available options.
Launch SimplySync Backup - Selecting this option will launch SimplySync Backup in a new instance. You can also access this option by simply double-clicking the tray icon.
Manage scheduled backups - Selecting this option will open the Scheduled backups manager, allowing you to add or edit the existing scheduled backups, or enable/disbale them. Monitoring the scheduled backups will be paused until you close the dialog box.
Exit scheduled backups monitor - If you select this option, monitoring the scheduled backups will be stopped. Note that this will not disable the feature, just stop it until it is started again or you sign in to Windows again.
Adding / Editing backup folder pairs
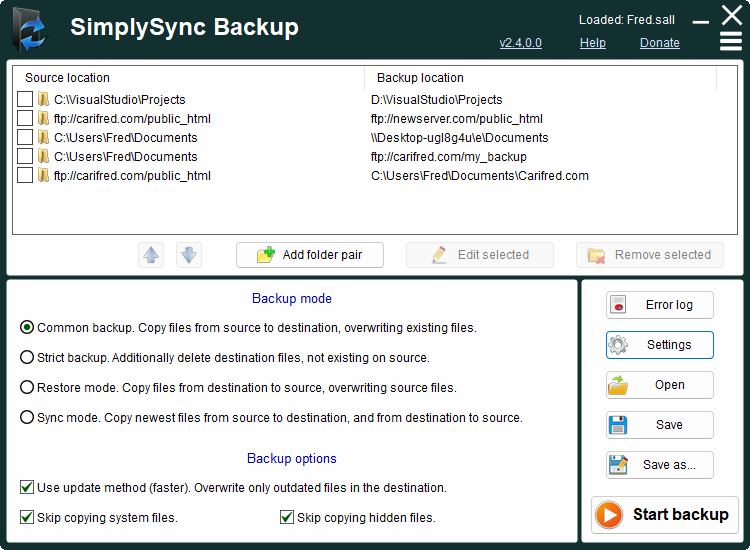
SimplySync Backup displays the list of backup folders in its main interface. The list consists of pairs of directory or paths, the first being the location of the files to backup (source), and the second the destination. Just below the list, you have three buttons that help you to manage the folder pairs in the list: Add folder pair, Edit selected and Remove selected.
Adding folder pairs to the list is pretty straightforward. You just need to press the Add folder pair button, and you will be presented with a dialog box similar to the picture below.
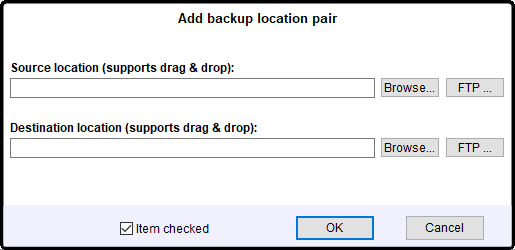
The Source location field holds the path of your backup's original folder. The Destination folder field holds the path of your backup folder. Both fields support "drag & drop", so you can simply drag the source and destination folders directly from the Windows file explorer and drop them over the fields, in order to set the folder paths.
In Common backup and Strict backup mode, SimplySync Backup copies the files from the source location to the destination location. In Restore mode, files are copied (restored) from the destination location to the source location. In Synchronization mode files are copied in both directions.
Use the Browse button to the right of each field to add the desired paths to the fields. If the destination folder's name is different from the source folder's name, the SimplySync Backup will ask you if you want to append the source folder's name to the destination path. You should press Yes, or No, depending on your choice.
The source and destination fields both support drag and drop, so you can set them up by simply dragging a folder from the Windows File Explorer to the desired field.
If you want to add an FTP location, press the FTP... button located to the right of the desired field, and proceed as explained in the Setting up an FTP location section below.
If you don't want this folder to be automatically checked when it is added to the list, un-tick the Item checked checkbox.
Press OK to add the folders to the list, or Cancel to close this dialog box without adding them.
To edit the existing folder pairs is even easier. You just select the folder pair you wish to edit in the list, and press the Edit selected button. You will be presented with the same dialog box, but the fields will be already set with the current paths. You can manually edit the paths directly in the text fields, or use the Browse buttons to change the paths with the help of the Windows shell.
To remove a folder pair from the list, click the corresponding line to select it, and press Delete selected.
If you right-click a folder pair in the list, you will see a menu with two options: Open source folder, and Open destination folder. Each of these options allows you to quickly open the selected source or destination folder in one click.
You can also move the items up or down in the list by using the "arrow" buttons, to the left of the Add folder pair button.
Setting up an FTP location
SimplySync Backup fully supports FTP. You can backup files from an FTP server to your computer, which is useful to backup your website, for instance. You can also copy files from your computer to an FTP server, which is useful to keep a remote copy of your important files or update your website after edting it locally. And finally, you can copy files directly from an FTP server to another one. This can be useful to migrate your website to a different server, for instance.
When adding or editing a folder pair, press the desired FTP... button to setup an FTP location. A dialog box similar to the picture below will be displayed:

When editing a previously setup FTP location, the fields are automatically filled with the current values.
Enter your FTP server's name or IP address in the corresponding field. Valid examples are carifred.com or 12.345.678.9.
Enter the path of the remote directory where the files will be copied to/from in the respective field. e.g. /dirname or /backup/mybackup.
Enter the FTP user name to use when connecting to the FTP server in the respective field. e.g. username@servername.com.
Enter the FTP user password to use when connecting to the FTP server in the respective field. You can make the caracters visible by ticking the Show checkbox.
Enter the port number to connect to, or use the up/down arrows to increase/decrease the current value. Most servers allow FTP connections to port 21, which is the default FTP port.
If your FTP server supports FTP over SSL, you can check Use SSL encryption. This will encrypt the data transferred between your computer and the FTP server, ensuring no one else has access to it.
If your server supports passive FTP semantics, you can also tick the Use passive FTP checkbox.
After setting upp all the desired fields, press OK to apply the changes and leave this dialog box. You can also press Cancel, in which case all changes are discarded and this dialog box is closed.
Loading and saving backups
The list of backup folders and the selected bakup options can be saved to a file of your choice, and they can be loaded back later from that file.
To save the current folders and settings, press the Save as... button, in SimplySync Backup's main interface. Select the desired path and file name to save the settings to. The file will have a .sall extension.
Once you save your backup folders and settings, you have several ways of loading them back. One easy way is to simply drag your .sall file over the SimplySync Backup's icon or desktop shortcut. Another way is to press the Open button, in the app's main page, and select the desired file to load.
In any case, you can associate the .sall file extension with SimplySync Backup so you can load those files by double-clicking them. See the Application setup help section for more information.
Starting the bakup / restore operation
To begin the backup/restore operation, you just need to press the Start backup button in SimplySync Backup's main interface. You will be presented with a dialog box similar to the one in the picture below.
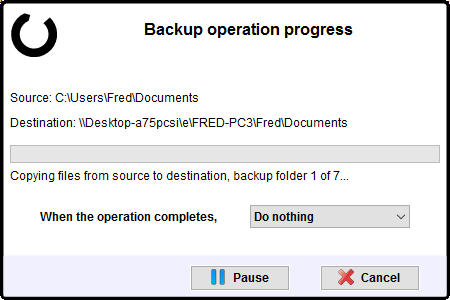
While the operation is being performed, you can pause or cancel it, by pressing the respective buttons.
You can also schedule SimplySync Backup to perform a power related action when the backup operation is complete, by selecting the desired option in the drop-down box just after When the operation completes. Available actions are Do nothing, Close application, Log off, Sleep, Hibernate, Shut down and Restart.
Supported command line switches
SimplySync Backup supports the following command line parameters:
SimplySync.exe "Settings file" /Uninstall /Passive /Quiet
"Settings file" - The path of the SimplySync Backup settings (.sall) file to load. The backup operation may or may not be automatically started, depending on the remaining switches. You should enclose this path in double quotes, in case it contains white spaces.
/Uninstall - Uninstall the application. The UI may or may not be shown, depending on the other switches.
/Passive - Perform the backup or uninstall operation with no user interaction showing only the progress of the operation.
/Quiet - Perform the backup or uninstall operation with no user interaction and no user interface.
Notes:
- All command line switches are optional.
- If you pass neither "Settings file" nor /Uninstall, SimplySync Backup will use the default settings file for the current user - if any - saved in the same directory as the SimplySync Backup executable.
Examples:
The command below performs the backup operation previously saved to my backup.sall, in passive mode.
SimplySync.exe "my backup.sall" /Passive
The command below performs the default backup operation, in quiet mode.
SimplySync.exe /Quiet
The command below uninstalls the application silently.
SimplySync.exe /Uninstall /Quiet
