
UVK Help - Registry seeker


This module can be accessed by pressing Registry seeker, in the Home page
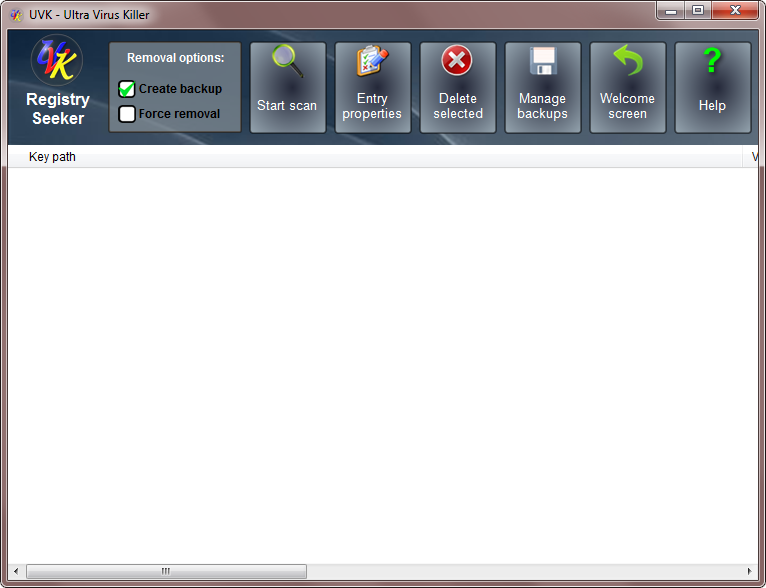
Feature description:
The Registry seeker is a very powerful feature that allows you to find several text strings in the registry within the same scan. The matches for each string are displayed in a separate group, in the list. You will be able to backup, delete and edit the entries matched.
The registry seeker can be of great use, but it can also cause severe damage to your operating system, if not used carefuly. Like any other registry editing tool, it should only be used by advanced users, who know how the Windows registry works.
When using the Registry seeker you assume all responsibility of its usage. I you don't agree with this, or don't understand how it works, just stay away from this feature.
This help page is also a tutorial on how to remove leftovers of a common adware named Movies toolbar. If you ever had this adware, you can follow the steps in this tutorial to remove any leftovers.
Start a new registry scan:
To start a new registry scan, press Start scan. A dialog box like the one in the screenshot below will be dispayed.
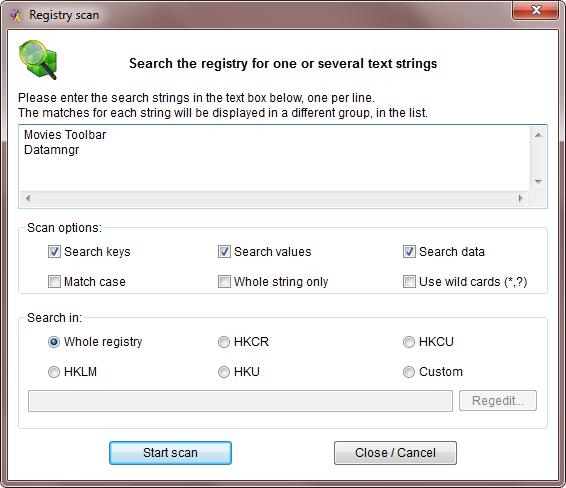
Enter the search strings in the text box, one per line. Each search string can contain any number of characters, including white spaces. In this example we use the following strings:
Movies Toolbar
Datamngr
You should always use search strings which are specific to the items you want to find. This will reduce the number of matches, and prevent matching many "good" registry entries.
Select the desired scan options:
![]() Search keys - Whether to search in key names.
Search keys - Whether to search in key names.
![]() Search values - Whether to search in value names.
Search values - Whether to search in value names.
![]() Search data - Whether to search in value data.
Search data - Whether to search in value data.
![]() Match
case - Perform case sensitive search.
Match
case - Perform case sensitive search.
![]() Whole
string only - Match only the whole search string.
Whole
string only - Match only the whole search string.
![]() Use
wild cards - Allow the use of wild cards in the search strings.
* = Match any character any number of times. ? = Match any character
once.
Use
wild cards - Allow the use of wild cards in the search strings.
* = Match any character any number of times. ? = Match any character
once.
In this example, we use the default options: Search keys, Search values and Search data only.
Select the root key for the scan:
![]() Whole
registry - Perform the scan in the entire registry. All users
hives will be loaded prior to the scan.
Whole
registry - Perform the scan in the entire registry. All users
hives will be loaded prior to the scan.
![]() HKCR
- Perform the scan in the HKEY_CLASSES_ROOT key.
HKCR
- Perform the scan in the HKEY_CLASSES_ROOT key.
![]() HKCU
- Perform the scan in the HKEY_CURRENT_USER key.
HKCU
- Perform the scan in the HKEY_CURRENT_USER key.
![]() HKLM
- Perform the scan in the HKEY_LOCAL_MACHINE key.
HKLM
- Perform the scan in the HKEY_LOCAL_MACHINE key.
![]() HKU -
Perform the scan in the HKEY_USERS key. All users hives will
be loaded prior to the scan.
HKU -
Perform the scan in the HKEY_USERS key. All users hives will
be loaded prior to the scan.
![]() Custom - Perform the scan in the key you define. When you select
this option, the input box just below is automatically enabled, and
you can manually enter the desired key name there. Or you can press
Regedit... In this case UVK will launch the registry editor,
where you should browse to the desired key, right-click it and click
Open.
Custom - Perform the scan in the key you define. When you select
this option, the input box just below is automatically enabled, and
you can manually enter the desired key name there. Or you can press
Regedit... In this case UVK will launch the registry editor,
where you should browse to the desired key, right-click it and click
Open.
In this example, we want to search in the entire registry, obviously.
Start the scan:
After selecting the desired options, you can start the scan by pressing the Start scan button. UVK will start searching the registry for the requested strings, and adding the matches to the list. You can stop the scan anytime by pressing the Cancel button.
In our example, we got the results shown in the screenshot below:

Here are some search strings you can use to find other well-known adware leftovers:
iLivid
SearchProtect
SW-Booster
Optimizer Pro
SearchQUIEHelper
Wajam
sweet-page
softonic.
ask.com
conduit
Torch
Removal options:
Before you start removing any matched entries, you can setup the removal options:
![]() Create backup - (Recommended) If selected, UVK will create a
backup of the registry entries before deleting them. You will be
able to restore or delete this backup later
Create backup - (Recommended) If selected, UVK will create a
backup of the registry entries before deleting them. You will be
able to restore or delete this backup later
![]() Force
removal - If selected, UVK will grant access to the registry
key, if unable to delete the selected entry normally.
Force
removal - If selected, UVK will grant access to the registry
key, if unable to delete the selected entry normally.
Analyze and edit a matched entry:
UVK allows you to get more information on a matched entry and even edit it's data (if it is a registry value). Just click the desired entry's line to select it, and press Entry properties, at the top. Simply double-clicking the desired line will have the same effect.
A dialog box similar to the screenshot below will be displayed:
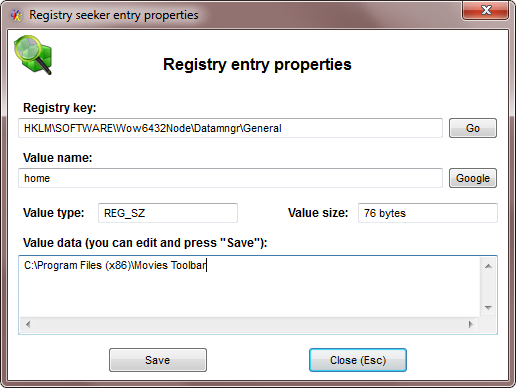
Besides giving you information about the registry entry, this dialog box also allows you to edit the value's data, if the entry is a registry value.
if you want to edit the value's data, just enter the new text for the value in the text box at the bottom and press the Save button. For multi-string values, enter one string per line.
Press the Go button if you want to jump to the corresponding key/value in the registry editor.
Press the Google button to quickly google the value's name.
Press the Close (Esc) button to close this dialog box.
Deleting the selected matches:
Click here if you want to view a full screen shot of the matches found for our example.
Select the entries you wish to delete by ticking the correspoding check box. You can use the list's context menu items (or the corresponding kotkeys) to select/un-select all items in the list, or all items in the current group. However, you still need to take a good look at all the selected entries to ensure you're not going to delete "good" entries.
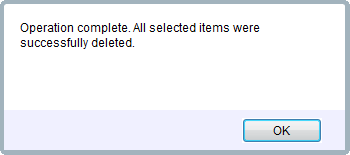
When ready, press Delete selected and confirm. UVK will remove the selected registry keys/values and revove the ones that were successfully deleted from the list. The remaining checked lines correspond to items that could not be deleted. You can check Force removal and try again, if you haven't done it already.
After the removal, a message box will be displayed, similar to the one in the screenshot below.
Restore previously deleted registry entries:
UVK allows you to restore registry entries deleted using the registry seeker, if you have chosen to create a backup before removing them.
Press Manage backups, at the top of the window. A dialog box will be displayed, similar to the one in the screenshot below:
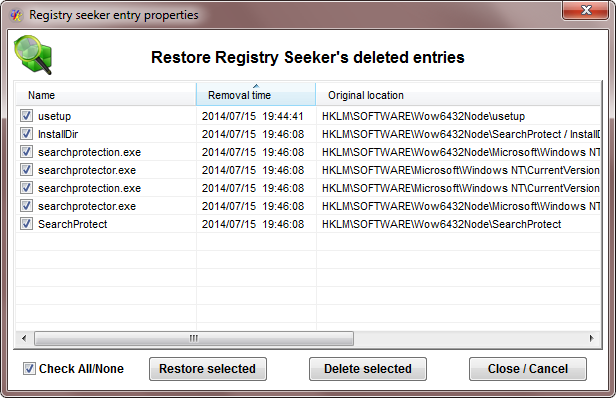
Tick the checkbox next to the backups you want to restore/delete. You can use the Check all/None check box to quickly select all the items, or none, respectively.
After selecting the desired items, press Restore selected, if you want to restore the selected backups, or Delete selected, if you want to permanently delete the selected backups, and confirm.
Press Close / Cancel to close this dialog box.
Right click context menu:
After you perform a registry seeker scan, you can right-click the items in the matches list. The context menu will have the following items:

![]() Entry properties - Displays the Registry seeker entry
properties dialog box.
Entry properties - Displays the Registry seeker entry
properties dialog box.
![]() Delete the selected entries - Delete the selected (checked)
entries in the list.
Delete the selected entries - Delete the selected (checked)
entries in the list.
![]() Google key path - Google the full registry key path of the
hilighted item.
Google key path - Google the full registry key path of the
hilighted item.
![]() Open
entry location - Jump to the hilighted item in the registry
editor.
Open
entry location - Jump to the hilighted item in the registry
editor.
![]() New
scan - Start a new scan.
New
scan - Start a new scan.
![]() Select all - Check all the items in the list, in all groups.
Select all - Check all the items in the list, in all groups.
![]() Select all in this group - Select all items in the group of the
currently hilighted item.
Select all in this group - Select all items in the group of the
currently hilighted item.
![]() Select none - Uncheck all the items in the list, in all groups.
Select none - Uncheck all the items in the list, in all groups.
![]() Select all in this group - Uncheck all items in the group of the
currently hilighted item.
Select all in this group - Uncheck all items in the group of the
currently hilighted item.
