
UVK Help: Log analyzer


The Log analyzer is a text editor specially designed to analyze UVK logs and create UVK scripts.
The Log analyzer is a very important part of UVK, as it can help you to quickly find infected files or registry entries in a UVK log.
It can also be used to analyze the reports created by the Recent file seeker, or to create UVK scripts to delete the infected items in those logs and repair your computer, or to create scripts that fully automate third party applications.
Contents:
Opening a log with the Log analyzer
Memorizing lines pointing to infected files
Opening a UVK log with the Log analyzer
If you created a UVK log from the Scan and create log section and you want to analyze it, just click the Analyze log button in the UVK's interface, after creating the log. The created log file will be automatically opened by the Log analyzer.
You can also open the Log analyzer from Start menu / All programs / UVK / Log analyzer.
Click the File menu and then Open (Ctrl+O) to open a log. Browse to the log's file location, click to select it and click Open..
Read carefully the Script commands and UVK log pages to learn how the log lines and custom commands work.
In the menu bar, on the top of the window, there is a button called Analyze log, which will help you to analyze the log and create a script to disinfect and repair the infected pc.
Analyzing the log
In the Analyze log menu you have several tools to help you in your job. Use one of the options below to reduce the number of lines to analyze:
![]() Hide
Microsoft signed files:
Hide
Microsoft signed files:
Use this option if you're only searching for infected files.
Microsoft signed files are not infected.
![]() Hide
all signed files:
Hide
all signed files:
Use this option if you only want to search within the files
which signatures couldn't be verified. Remember that infected files
can be digitally signed and not all unsigned files are infected.
![]() Hide
uninstall entries:
Hide
uninstall entries:
Use this option if you have already analyzed the uninstall
entries, or if you don't want to analyze them.
![]() Hide
folder contents:
Hide
folder contents:
This option will hide all the lines containing the
system drive,
Application data
and
Program files
folders contents.
![]() Hide
stopped services and drivers:
Hide
stopped services and drivers:
This option will hide the lines on the modes
Services
and
Drivers
which corresponding service is stopped.
![]() Clear unnecessary lines:
Clear unnecessary lines:
This option will clear all lines that don't have active content,
like the headers and descriptions.
![]() Only "File not found" lines:
Only "File not found" lines:
This option will clear all lines except those that point to
non-existing files.
The Analyze log menu also allows you to select one or several lines and get more information about the files or folders they point to, or add them to a list in memory that you can insert later.
To select only one line to analyze you don't have to really select all its content. Just click on the line, or select a small part of it to easily know which one is selected. For just one line, the Log Analyzer always refers to the full line where the caret is, and ignores the selected content.
To select several lines, put the pointer in the beginning of the first line to select, click and drag down vertically until the last line you wish to select is selected. You can also click on the beginning of the first line and press Shift+Down arrow.
After selecting the desired lines, expand the Analyze menu and click the sub menu with the option you wish:
![]() Submit selected MD5 to VirusTotal (Alt+V):
Submit selected MD5 to VirusTotal (Alt+V):
This option will use the VT API to create an html report for the
MD5 hashes in the selected lines. Only works for UVK log lines
containing a file's MD5 hash. You can select several lines.
![]() Search selected files in ThreatExpert:
Search selected files in ThreatExpert:
This option will perform a search in the ThreatExpert database
using the selected file names as the search keyword.
![]() Search selected files MD5 in ThreatExpert:
Search selected files MD5 in ThreatExpert:
This option will perform a search in the ThreatExpert database
using the selected file's MD5 hash as the search keyword.
![]() Search selected lines with google (Ctrl+G):
Search selected lines with google (Ctrl+G):
This option will google the selected file names.
![]() Search current files in runscanner (Ctrl+R):
Search current files in runscanner (Ctrl+R):
This option will perform a search in the RunScanner's database
for the selected files.
Memorizing lines pointing to infected files:
If you find lines pointing to an infected files or registry entries, select those lines, expand the Analyze log menu and click Memorize selected lines or press Alt+M.
This list can store an unlimited number of lines that you can use later to create your script.
If you want to view or edit the memorized lines, expand the Analyze menu and click View/Edit memory list, or press Alt+W. You can edit the memorized lines as you want. When you're finished editing, click the Save & close button, and youe memory list will be updated. If you want to discard any changes you have made, just close the memory list window.
To delete the memorized list, expand the Analyze menu and click Reset memory list, or press Alt+E.
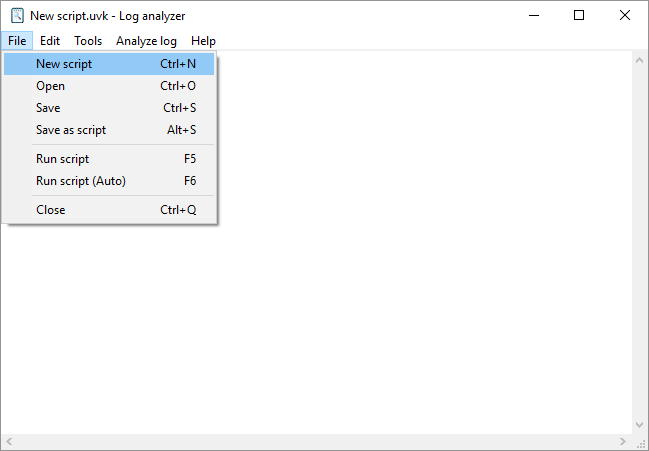
Once all the log is analyzed, if you've found and memorized lines lines pointing to infected files, you can now create your script. Expand the File menu and click New script (Ctrl+N). If you're prompted to save the file before closing, click NO.
Expand the Analyze log menu and click Manage memory list. The Log analyzer's memory list window will popup, showing the memorized lines, as in the screenshot below.
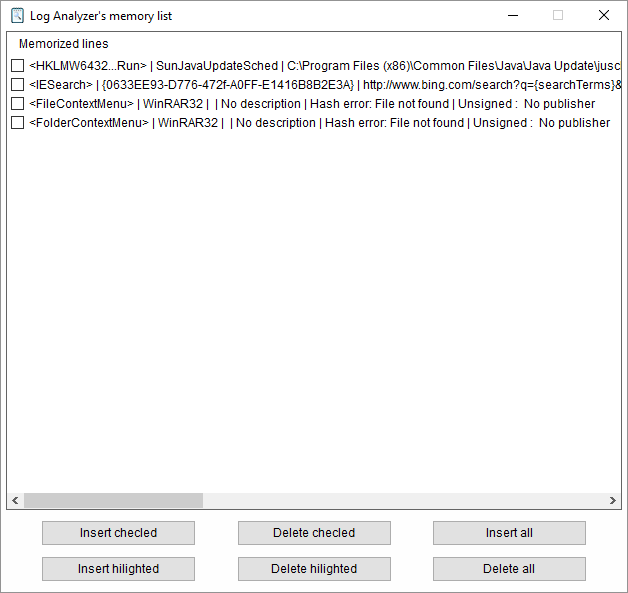
Select the desired lines by either ticking the associated check boxes, or by hilighting their lines. Then, use the buttons at the bottom of the window to perform the desired action to the selected lines: insert them to the Log analyzer's text box, or remove them from the memory list.
If you don't want to add any custom commands or automation functions, then your script is ready to save and run.
If you want UVK to delete a registry entry, but not the corresponding file, select the desired line(s), expand the Analyze menu and click Ignore files in selected lines, or press Alt+I.
This way, UVK will only delete the registry entry and not the file. This means, for a startup entry, that the application will no longer run on windows startup, but you'll still be able to run it manually.
Inserting commands:
To insert custom commands, click Tools, then Insert commands. The Insert command window will show up, and will be similar to the screenshot below.
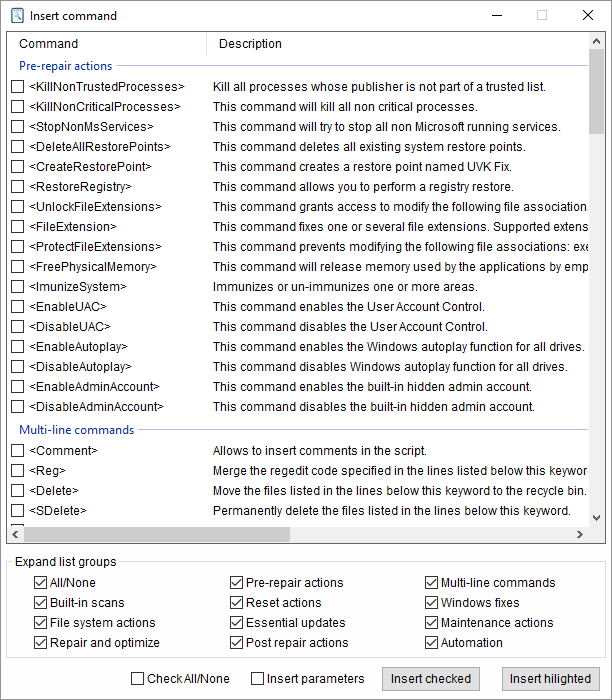
The Insert command feature is very intuitive and easy to use. You can tick the check boxes next to the items you want to insert, and then press Insert checked, or hilight one or more items in the list and then press Insert hilighted.
To hilight several items, hold the Ctrl key while clicking the desired items. You can also insert one single item by double-clicking it. Items will be inserted from the list to the Log Analyzer's text box.
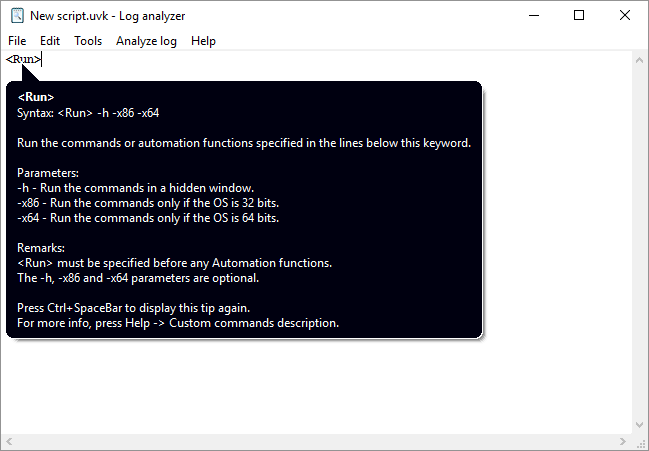
For each command, mode or function you insert, a help tooltip will be displayed explaining how the command works, and the parameters it supports, if any. You can close this tooltip by clicking anywhere in the Log analyzer's window, or by pressing the Esc key. See below an example of the tooltip.
If you want to learn how to insert automation functions, please see Automation.
Read carefully the Script commands page if you still don't know what these tags mean. For multi-line modes, the Log analyzer only inserts the keywords. Obviously, you must complete the code.
The commands inserted through the Non free commands menu will not work unless you have a valid UVK license.
The Insert a complete repair script, Insert a complete maintenance script and Insert a repair and maintenance script buttons will automatically insert predefined system repair and maintenance scripts.
Choose the right place to insert your custom commands by placing the caret in the desired line. The script will be executed by UVK from top to bottom, so you must insert the custom commands you want to run before the disinfection, above the inserted memorized lines, and the ones you want to run after the disinfection, under the inserted memorized lines.
It's easy to add custom commands to your script using the Log analyzer. Just click to put the caret in the line where you want to insert the custom commands, expand one of the insert Insert menus and insert the desired keyword.
For multi-line modes such as <Delete>, <SDelete>, <KillProcess>, <RunWait>, etc, you must manually insert the corresponding commands under the mode keyword. Usually this is done by copy/paste. The log analyzer also supports drag & drop to automatically insert file paths.
You can add comments to your script. Just expand Insert menu and click Add a comment. Then add your comments below. Here is a valid example:
<Comment>
This script will disinfect my computer and
register the
system DLLs
All the lines under the <Comment> keyword will be ignored by UVK until another mode is reached.
Automation
This feature is available starting at the UVK version 5.8. It allows to automate third party applications, by sending mouse clicks and keystrokes to the application's window.
The UVK automation consists of eleven functions, which may support several parameters. These functions must be used within the <Run> mode. This is because you usually need to run an application, in order to automate it, but you can also automate applications that are already running.
To insert a function, expand the Automation menu, and insert the desired function. A tooltip will popup with details of the function. Whenever you want to see this tip again, just press Ctrl + SpaceBar.
Then you just need to fill out the function's parameters with the correct data. This data can be manually inserted, or from the Control info tool.
If you don't know what to insert, refer to the function's description, in the Script commands help page, or press Ctrl + SpaceBar to display the help tip.
To launch and automate applications, you will use the following format:
<Run>
Application1 path\Application1
name.exe
->WaitWindow()
Other Automation functions
Application2 path\Application2 name.exe
->WaitWindow()
Other Automation functions
To automate already running applications, you use the following format:
<Run>
->WaitWindow(nSeconds, App1 Window
Special title definition)
Other Automation functions
<Run>
->WaitWindow(nSeconds, App2 Window Special title
definition)
Other Automation functions
Either way, you must specify both <Run> and ->WaitWindow(), before using the other automation functions.
For complete example scripts using the automation functions, please visit the UVK's script collection.
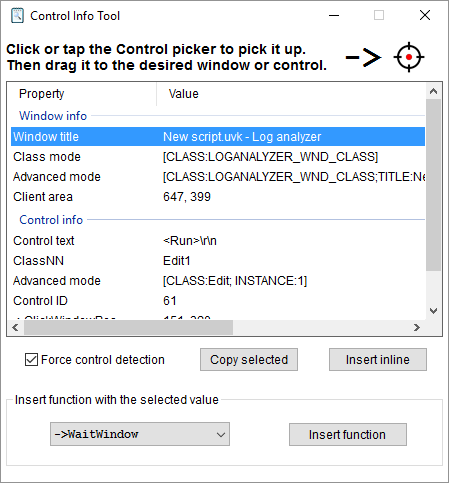
Control info tool:
To open the control info tool, click Tools >> Control info tool, or press Alt + C. Screenshot:
If you want your script to launch the application you are going to automate, insert the corresponding command in the line below the <Run> keyword, and press F6 to run the script. Example:
<Run>
notepad.exe
Otherwise you can launch the application yourself.
Now you're ready to start automating your app. Drag the control picker to the application you wan to automate and drop it over the control (button, check box, text box, etc) you want to interact with.
Now look at the Control info tool. You will see it displays information about the window you want to automate. The first three values can be used as the title parameter of the ->WaitWindow() function.
The following values can be used as the ClassNN/ID parameter of the ->WaitControl(), ->WaitControlState(), ->ClickControl() and ->ControlSend() functions: Control text, ClassNN, Advanced mode and Control ID.
The ->ClickWindowPos values can be used as the xPos and yPos parameters of the ->ClickWindowPos() function, respectively.
Select the value you want to insert from the list.
You can insert the desired function already formated with the selected value, by selecting the desired function in the dropdown box at the bottom of the Control info tool and click Insert function.
Or you can copy the selected value to the clipboard by clicking Copy selected, and paste it directly in the Log analyzer's text box.
Or you can insert the value inline by clicking Insert inline.
And that's it. Whenever you want to automate an action such as waiting for a control, or clicking it, just put your mouse cursor over the desired control, and press the Ctrl key. The Control info tool will be updated with data of the hovered control.
Completing and saving the script
If you opened a file from your hard drive for editing with the Log Analyzer, you can revert it to the original text of the file anytime, by clicking Tools >> Revert to the original script.
By expanding the Edit menu, you have common text editor options: Copy, Paste, Clear all, Select all and Undo.
Zoom in (Ctrl+I) will increase the size of the text. Zoom out (Ctrl+D) will decrease it.
Find (Ctrl+F) will open the Find text dialog, allowing you to locate specific portions of text in the log or script. If some text is selected when you click this button, it will be automatically set as the text to search. but you can edit it, of course.
Click Find next (F3) to begin the research. the first instance of the text to find will be selected, if it exists.
After using the Find function once, a new button is created in the Edit menu: Find next (F3). You can use this button, or just press F3 to find the next instance of the text to find, even if you have closed the Find text dialog.
When your script is ready, expand the File menu and click Save as script. Choose the path where you want to save the script, and click Save.
If you want to save the script under a different name, click Save as... instead.
Running the script:
Once your script is saved to the hard drive, you can run it by double-clicking on it.
You can also expand the File menu and click Run script (or just press F5). The script will be automatically opened with UVK.
Or you can run the script in silent mode: expand the File menu and click Run script (Auto) (or just press F6). Using this method, the UVK's window will not be displayed.
