
UVK Help - Misc tools


You can access this section by clicking Misc tools, in the Welcome screen.
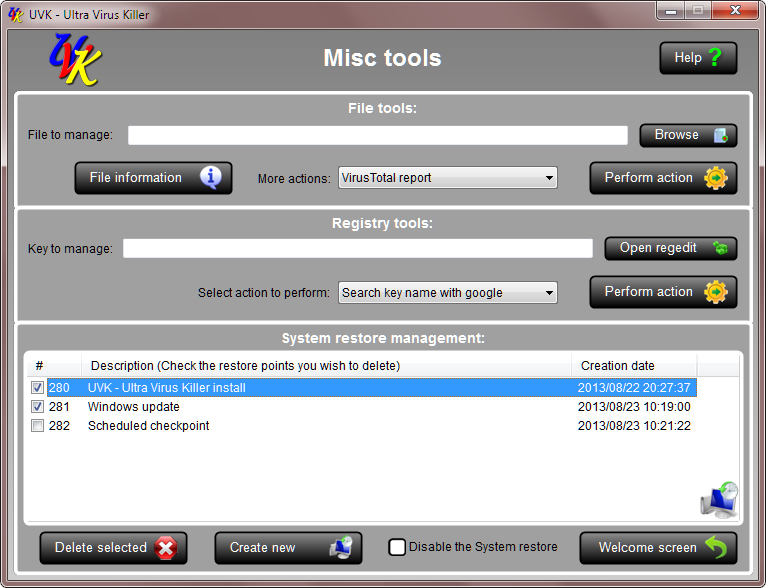
This section includes several tools for file, registry and system restore information and management..
File tools:
To manage a file, first you must enter its path in the File to
manage: input box. To easily do it, click Browse, then browse to the
path where the file you want to manage is located. Select the
desired file and click Open. The
path of the file will be added to the input box.
You may now use the options below:
![]() File information: Will display a dialog box
containing information on the selected file. See the
screenshot below:
File information: Will display a dialog box
containing information on the selected file. See the
screenshot below:
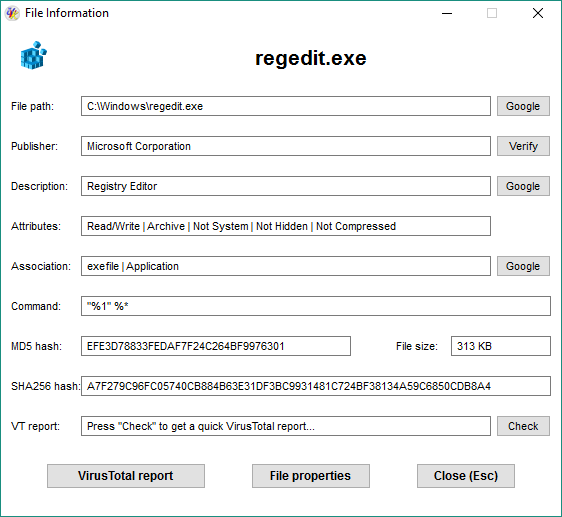
As you can see in the screenshot above, the dialog shows several information fields and some buttons to perform extra actions.
By default, the publisher displayed is not verified. Click Verify to verify it. Click the Check button to check if the file is infected using the VT api.
Click the VirusTotal MD5 report button to generate a html report on your desktop.
Click the File properties button to open the file's properties dialog.
Click the Close button or just press Esc to close the dialog box.
![]() Perform action: Select the action you want to perform in the
drop down box to the left before using this feature. Available actions are:
Perform action: Select the action you want to perform in the
drop down box to the left before using this feature. Available actions are:
-
VirusTotal MD5 report: Generate a VirusTotal html report using the MD5 hash of the selected file.
-
ThreatExpert MD5 report: Search the ThreatExpert database using the MD5 hash of the selected file.
-
ThreatExpert file name report: Search the ThreatExpert database using the name of the selected file.
-
Search file name with google: Will make a quick google search using the file name as the keyword.
-
Lock file (deny access): This will edit the file's security descriptor, and deny everyone access to the file. Useful to block infected files when you're not able to delete them.
-
Unlock file (grant access): This will grant everyone full access to the file. Useful to restore acces to files that have been blocked by malware.
-
Unlock and delete file: This will grant everyone full access to the file and the delete it. Use this feature to delete infected files.
-
Scan with the system file checker: This will scan the file's integrty with sfc.exe, and repair it if needed. This feature is only useful for system files and is only available on Vista or newer Windows versions.
Registry tools
To manage a registry key, first you need to enter its name (full registry path) in the Key to manage input box.
To easily do it, click Open regedit. On the registry editor select the key you wish to manage, right click it and click Copy key name. The selected key's name will be automatically inserted to the input box.
Be careful when messing up with the registry. If you're not sure of what you're doing, then don't do anything. Changes to the registry can cause serious damages to your operating system.
![]() Perform action: Select the action you want to perform in the
drop down box to the left before using this feature. Available actions are:
Perform action: Select the action you want to perform in the
drop down box to the left before using this feature. Available actions are:
-
Search key name with google: This will make a quick google search using the key's name as the keyword.
-
Protect key from changes: This will set read only access permissions to the key. Useful to prevent important registry keys from being changed by malware.
-
Unlock key (grant access): This will grant everyone full access to the key. Useful to restore acces to keys that have been blocked by malware.
-
Unlock and delete key: This will grant everyone full access to the key and the delete it. Use this feature to delete infected keys.
System restore management
This feature allows you to manage the existing restore points, or create new ones. Since Windows does not allow you to delete specific restore points, it may become very useful.
To delete one or several restore points, select the ones you want to delete from the list by ticking the corresponding checkmarks. Then click the Delete selected button, and confirm by clicking Yes. Even though the MSDN documentation says otherwise, this feature does not work for Windows Xp.
To create a new system restore point, click the Create new button. You'll be asked to enter the name for the restore point.
You can also enable/disable the System restore in this section. Just check/uncheck the Disable the system restore checkbox and confirm.
To return to the welcome screen click Welcome screen or press Esc.
